- ITソリューショントップ
-
製品・ソリューション
-
ダイキンのIT
 製造業向けITソリューション
  建設業務改善ソリューション
  ビル管理業務支援 DK-CONNECT BM
 FILDER CeeD TOP
  FILDER CeeD 電気 TOP
  Rebro D TOP
  データ・サイエンス・ソリューション Pipeline Pilot
 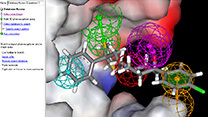 ライフサイエンス向けソフト Discovery Studio
 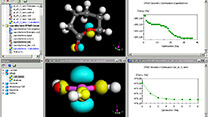 マテリアルサイエンス向けソフト Materials Studio
 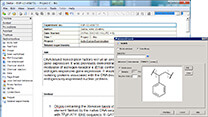 電子実験ノート
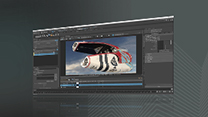 総合3DCG 制作ソフト Maya
  総合3DCG 制作ソフト 3ds Max
  総合3DCG 制作ソフト MODO
 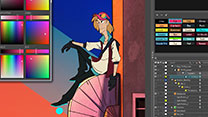 アニメーション制作ソフト Toon Boom
|
プロローグ ; Prologue
|

| 目;Eye ではまた、目からいきます。
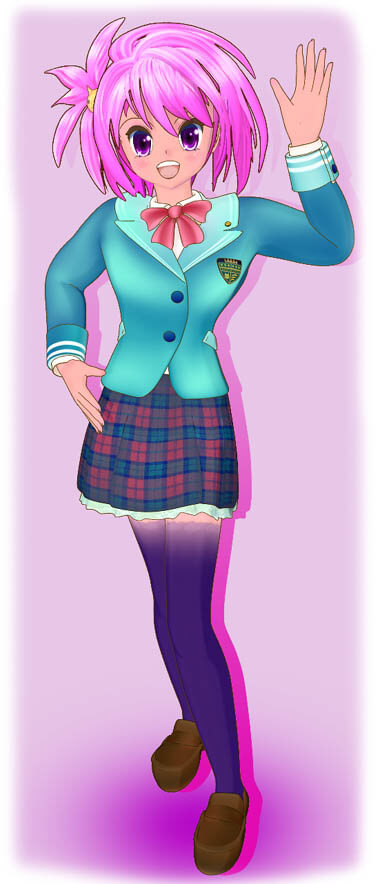
前回の時の3Dで作成したデータがあるので、その色変えで対応、紫色のグラデーションで作成しました。 Start speaking from EYE, made up a 3D Model which rendered picture is to be used for Chatator Eye's texture. As this model was made before, I only changed the color of the gradation , that was purple this time. 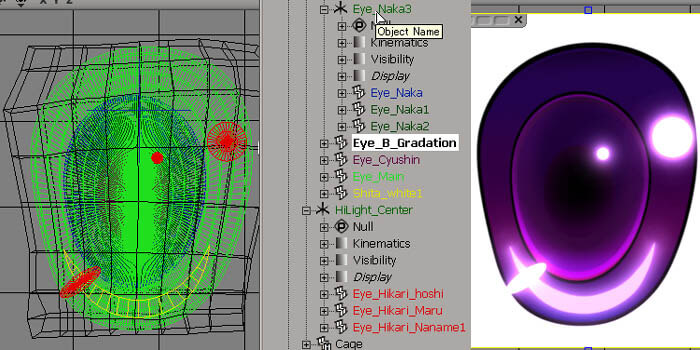 テクスチャーを使っていない Gradient は、かなり濃い目の紫グラデーションで複数重ね、 Glow にも紫がかった色で発光させています。
Thare are no textures used in this Model , only few Gradient that has dark purple , and Glow for shining that has slightly purple. 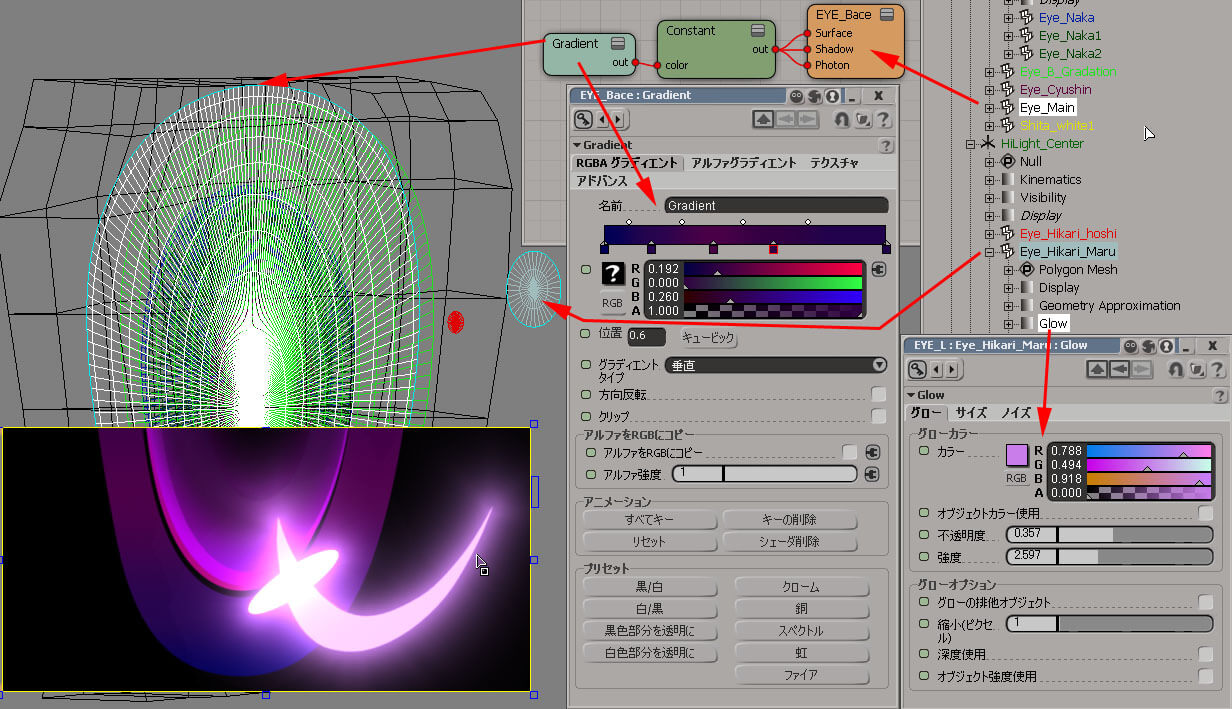 マテリアルの設定は、前キャラからの引継ぎでほとんど同じですが、ハイライトの設定が紫になっています。
Materials are almost same from the Character before , only the Hilight color is purple. 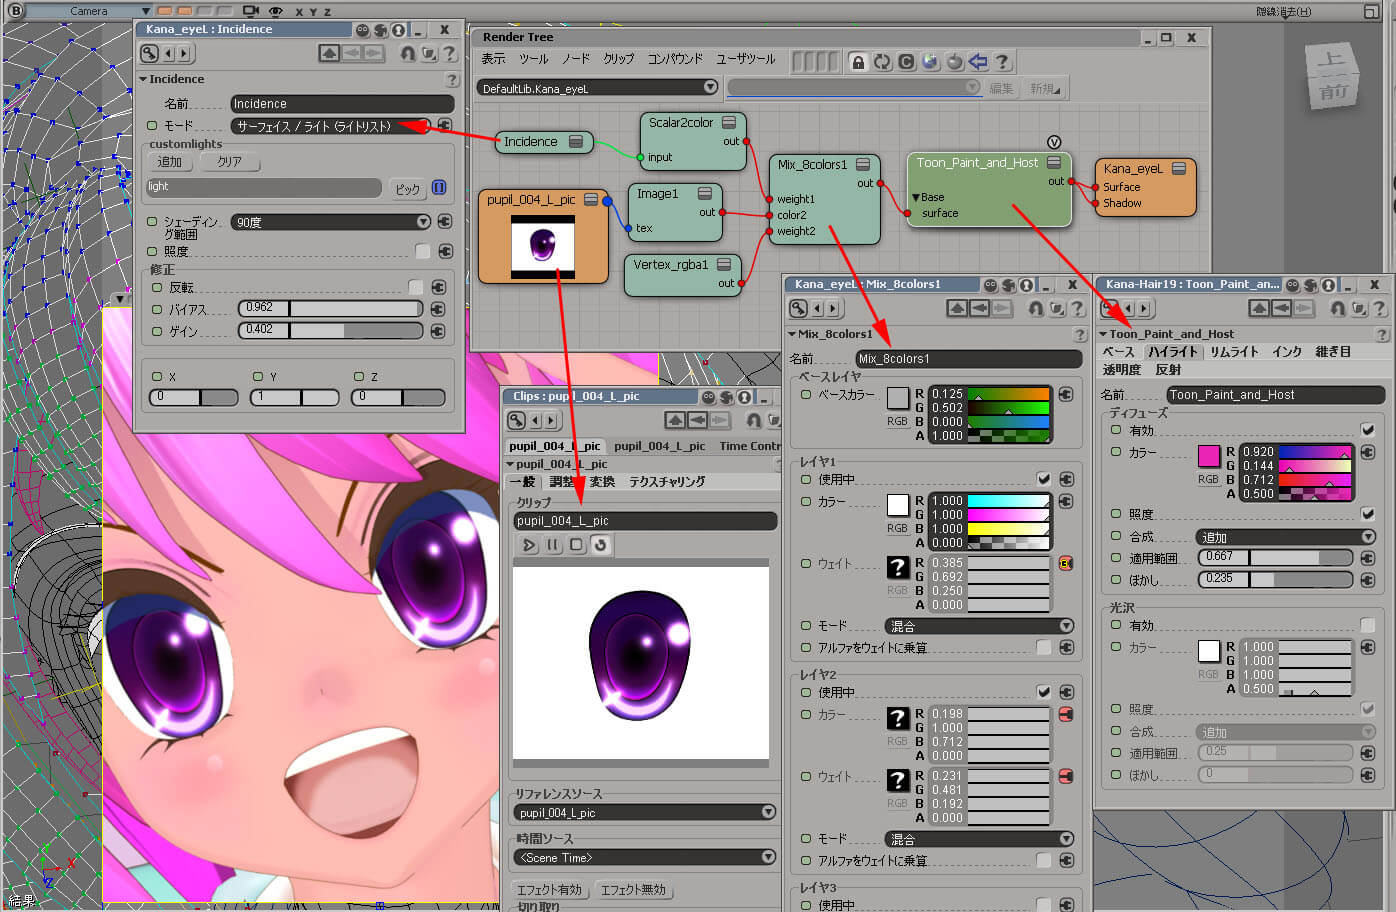 |
| 髪の毛;Hair モデリング:Modeling 髪の毛も作り方は、また変えてみました。 今度は前回の板ポリゴン方法を踏襲しつつ、部分的には一番最初のキャラの立体的なポリゴンで表現する方法との組み合わせで、 ボリューミックな造形を実現できるようにしてみました。 まずは、カーブを使って、目標とする大枠の形を想定します(外枠の黄色線)。 ラフな絵がある場合は後ろにポリゴンの板でも置いて、その形にそったカーブを描いてみて、3D的にした場合はどうしようか頭の中で考えておきます。 そうしたら、今度は前髪から個々の具体的な形をカーブを使って描いてみます(水色線)。 この時、あらゆる方向から見て、他との重なり具合が立体的な形としてうまくいっているのか、かなり慎重に位置決めをします。 I changed the way of modeling the hair, again. This time, the main method of using flat polygon is kept , but to get more volumic hair style I used 3D polygon way which way I used in the first Character. Draw the main style of the hair using curve (Yellow one below), and if you have some drawing ,put it in background polygon to display the style you want. Than, starting from front hair , use curve to get the individual hair (Blue Curve), placing it in the good position looking from all around.  カーブに色を付けたりしながら位置調整し、やっぱり無くしたり、付け加えたりしていきます。 Add more curves so that you can imagine the whole form, put some colors , replace points untill you to have good looking style. 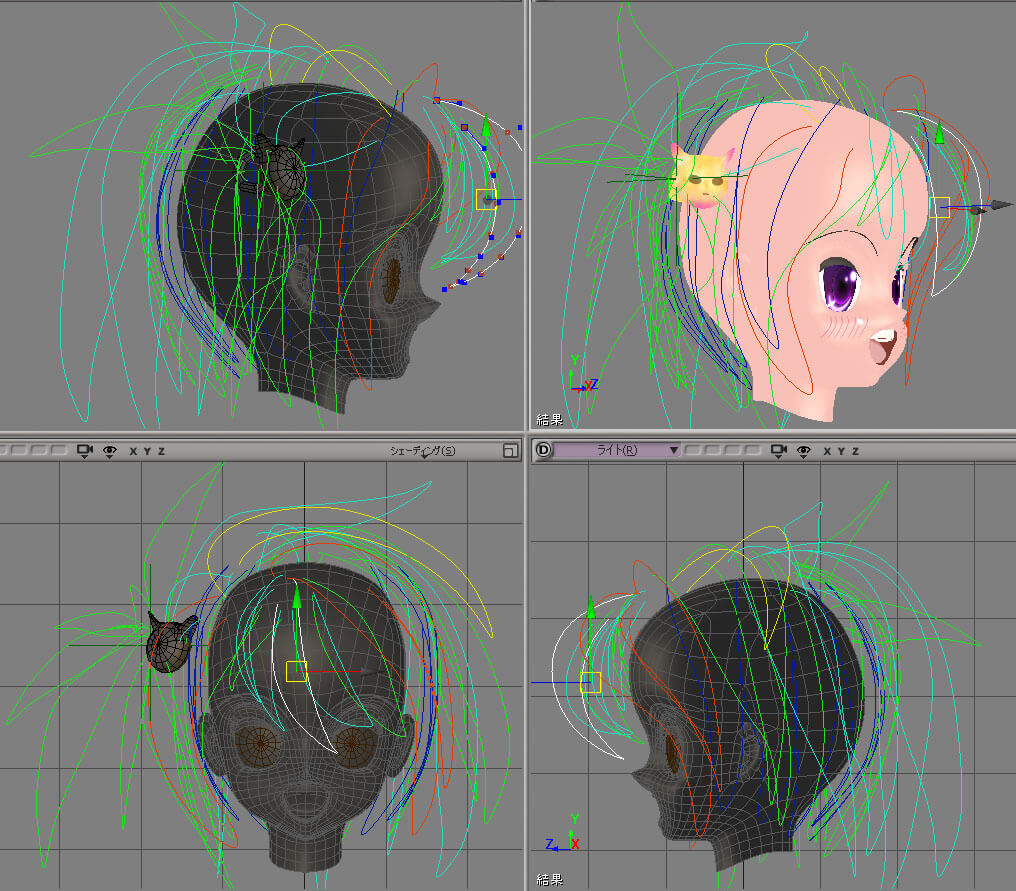 カーブの形が決まったら、作成 > カーブ > セグメントの抽出でカーブからセグメントを取り出します。 同じ要領でもう片方も作成し、それを反転させておきます。ロフトを使用する時、ねじれないようにするためです。 Once you get your curve done, get one side of the curve , and the otherside one use Inverse. Because we are going to use Loft in next step. 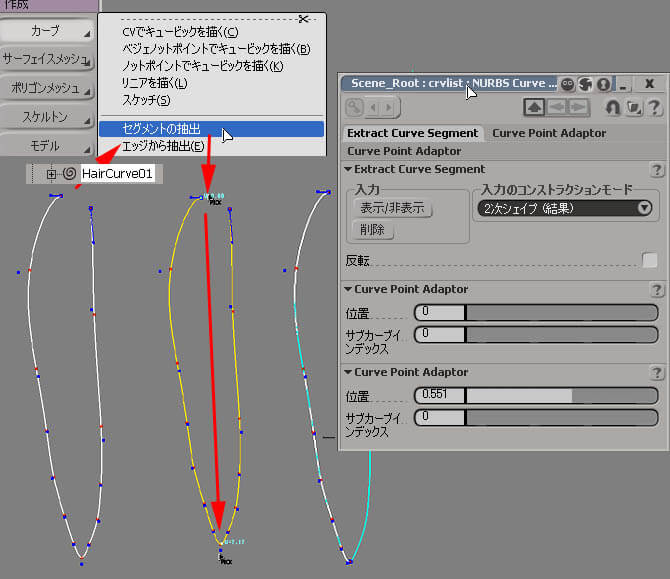 表示される設定画面はそのままキープして、次の作業に移ります。 Then make a PolygonMesh using Loft, and keep the PPG open , going to next step. 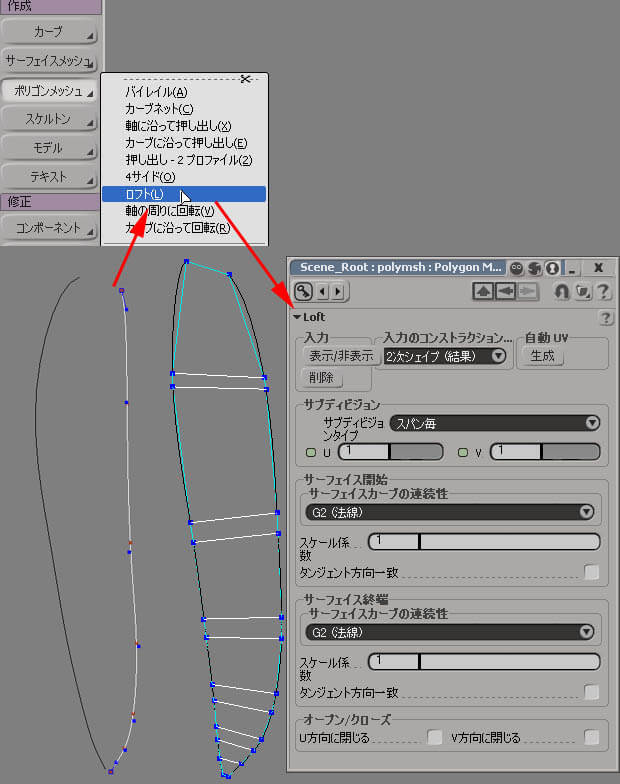 サブディビジョンを上げ、ポリゴン形状がなるべく手頃な大きさで等間隔になるようにしておきます。 Moving the curve points to make the ploygon edge almost parallel and then increase subdivision UV to make polygons same size you like. 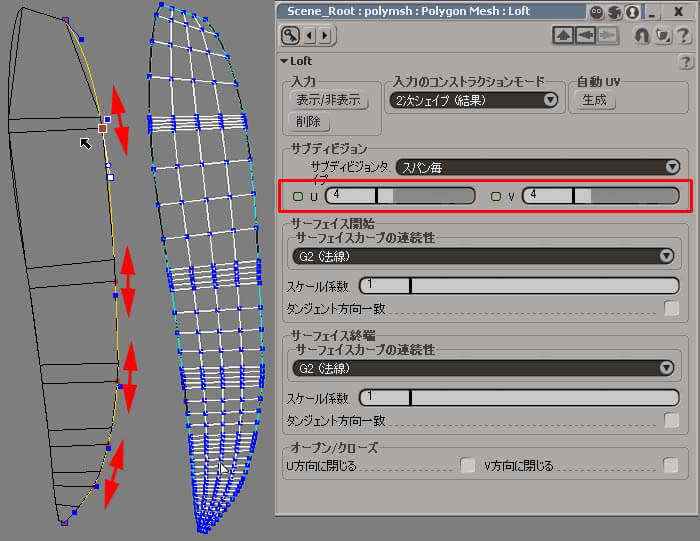 After Freezing you PolygonMesh, clean up your edges and model it's shape better. 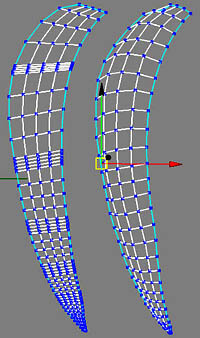 Go for more..  Modeling as follows.... 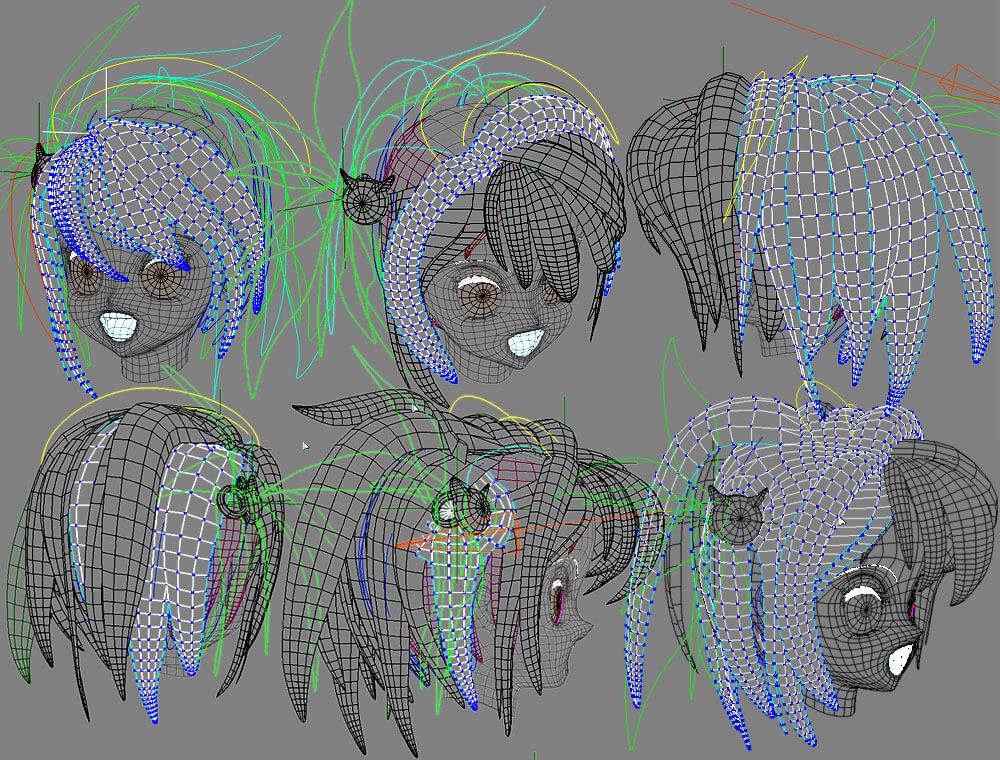 Get polygons marge together and model more a like. 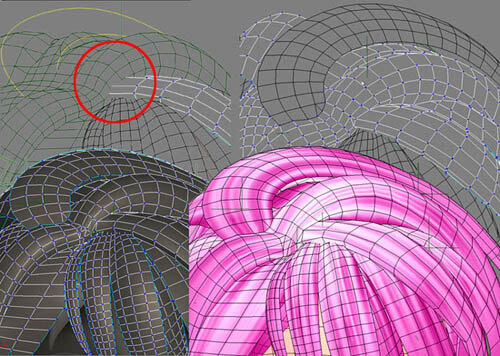 Finished modeling like this, with har cat like hair band. 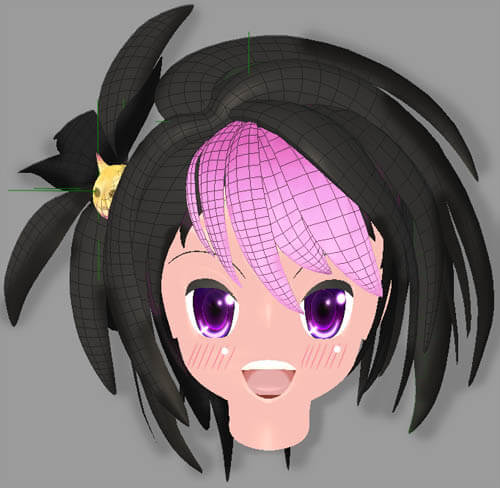 |
| 髪の毛;Hairシェーディング:Shading モデリングの後は、テクスチャーの設定です。 髪の毛の1束毎にUV設定していきます。テクスチャーエディター上では、以下図のように設定していきます。 After modeling is texturing, set hair parts each UV. Texture Editor setting is shown as below. 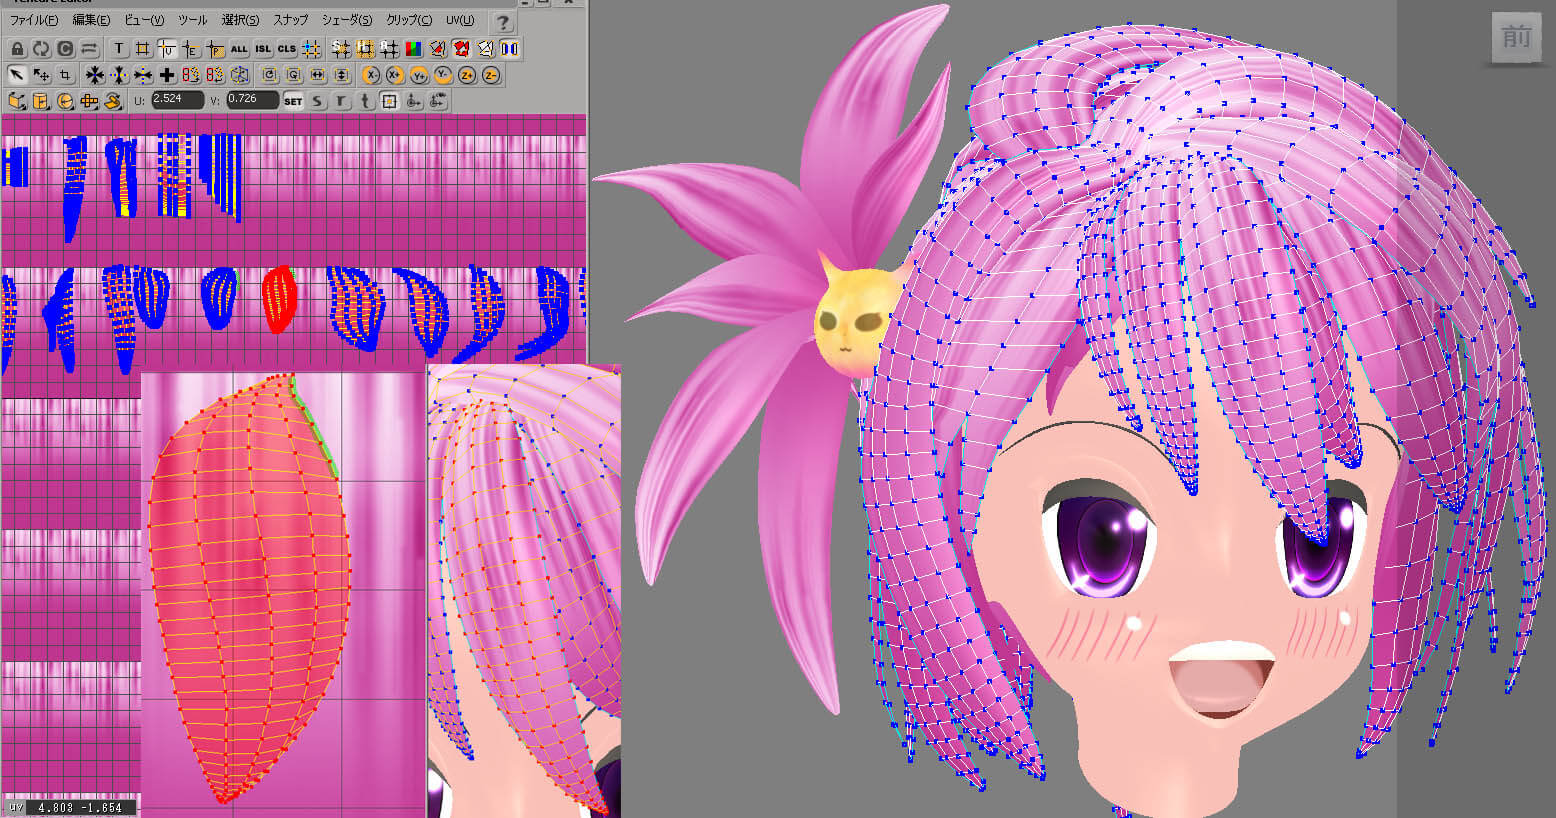 髪の毛の1束毎にUV設定していきます。テクスチャーエディター上では、以下図のように設定していきます。 Next texture is for shadows , set hair parts each UV. Texture Editor setting is shown as below. 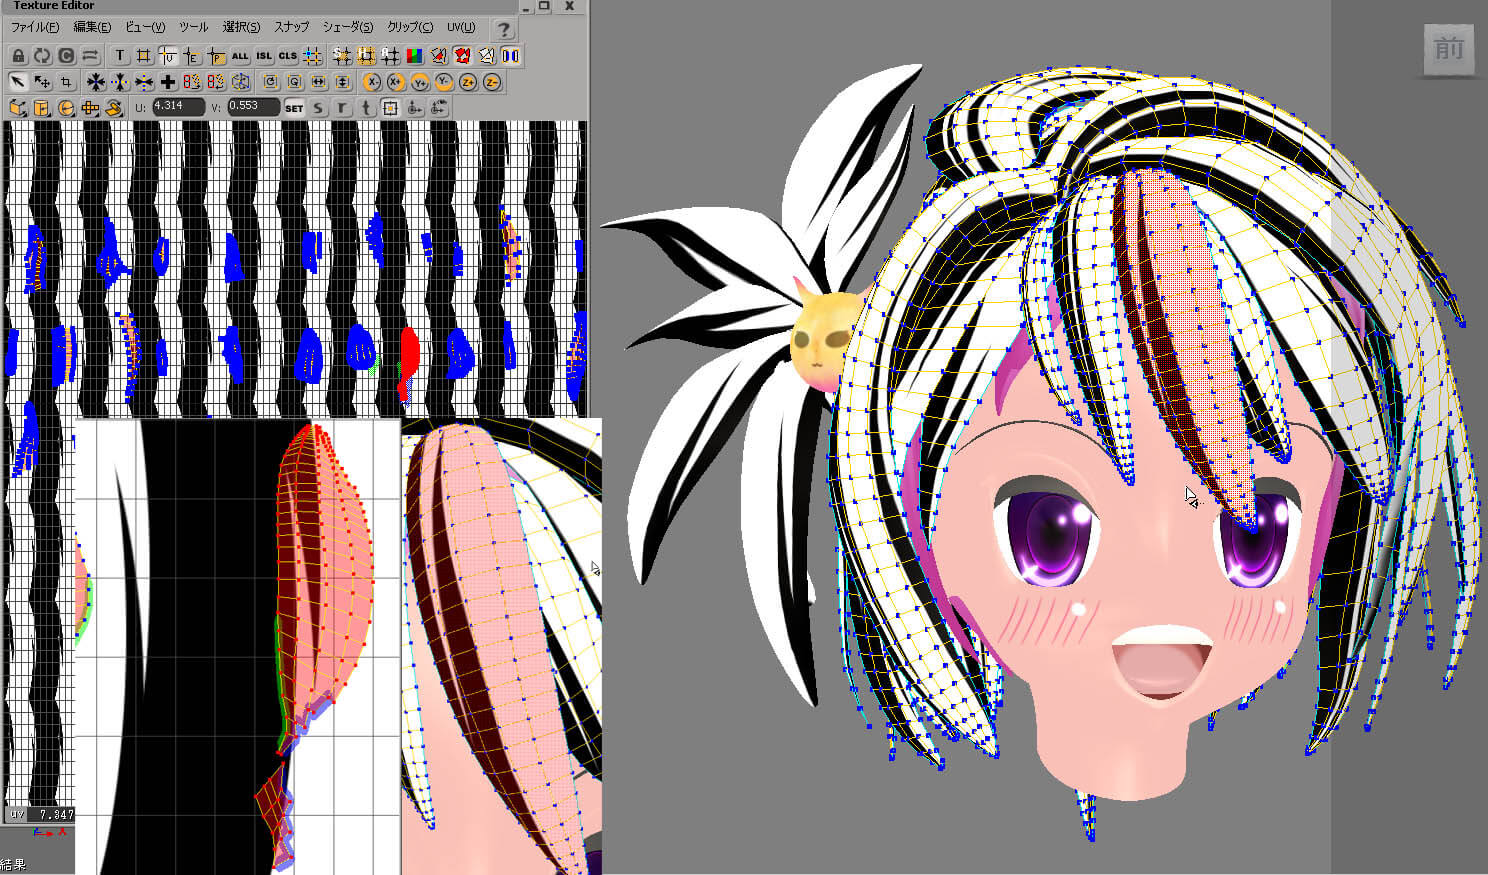 ハイライトの位置変化をアニメーションに付けたい場合は、このテクスチャー・コーディネイトの UV値にアニメーションを設定します。 Next texture is for highlight, you can animate hair hilight by animating this UV coodinate. Texture Editor seting is shown as below. 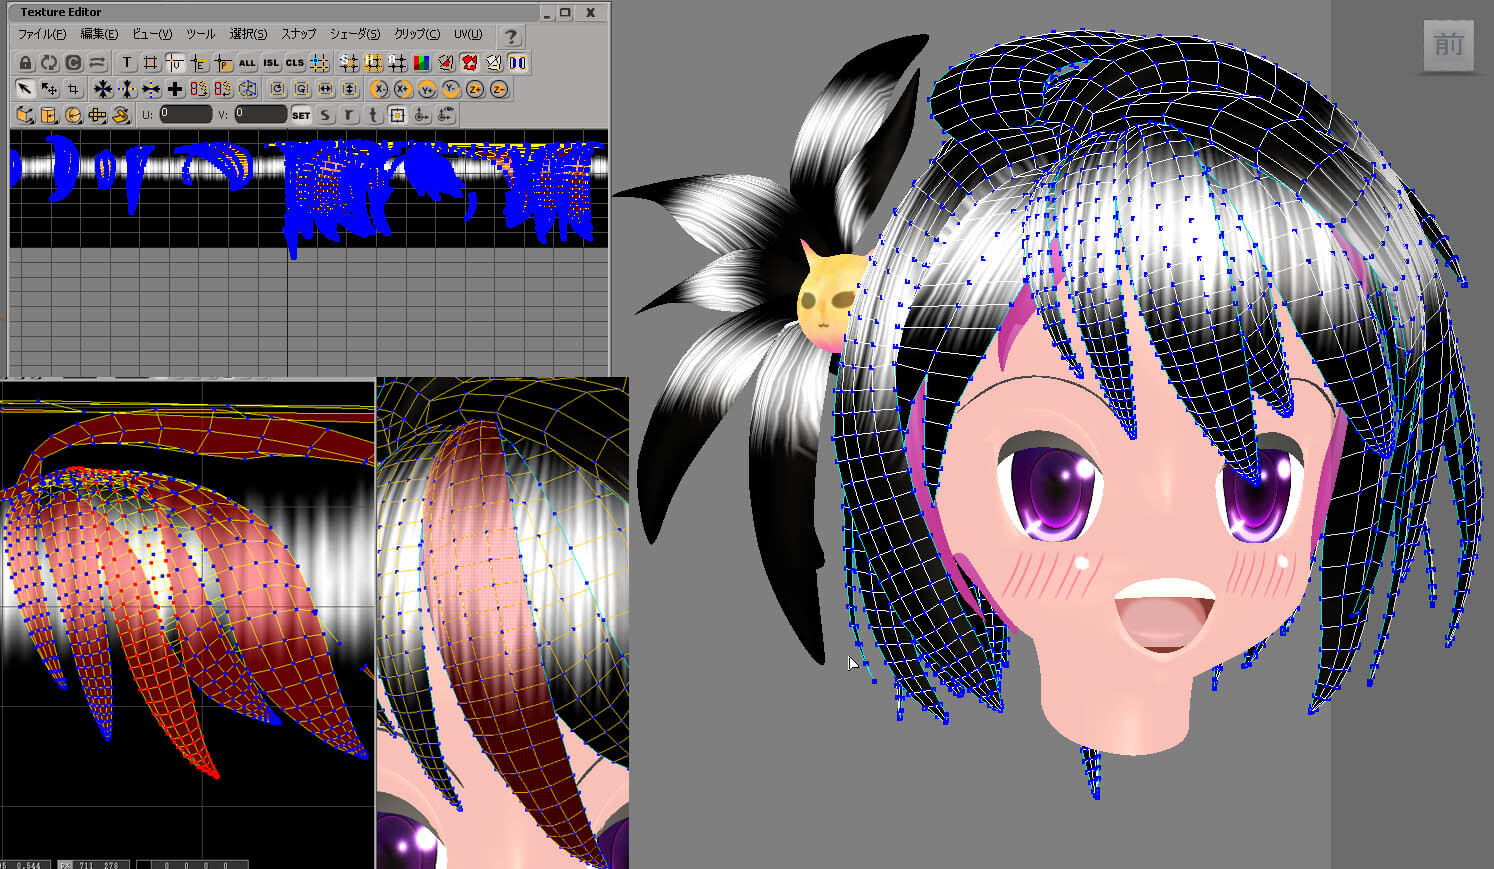 ポリゴンの表と裏の色を別設定して色の違いを出せるように Front-Back_Swich ノードを使って分岐を作ってあります。 また、接続の途中に Scalar_Change_Range が挟まれていて、色調整がここでも出来るようにしています。 Mix_8colors のモードも混合、加算限界、明るく、追加など色々と違う方法で接続されています。 Than, put them into material connection in RenderTree. I used Front-Back_Swich to change colors in back & front , Scalar_Change_Range to more easier mixing colors. Mix_8colors mode has , Mix , AddBound, Lighter, Add , for better look. 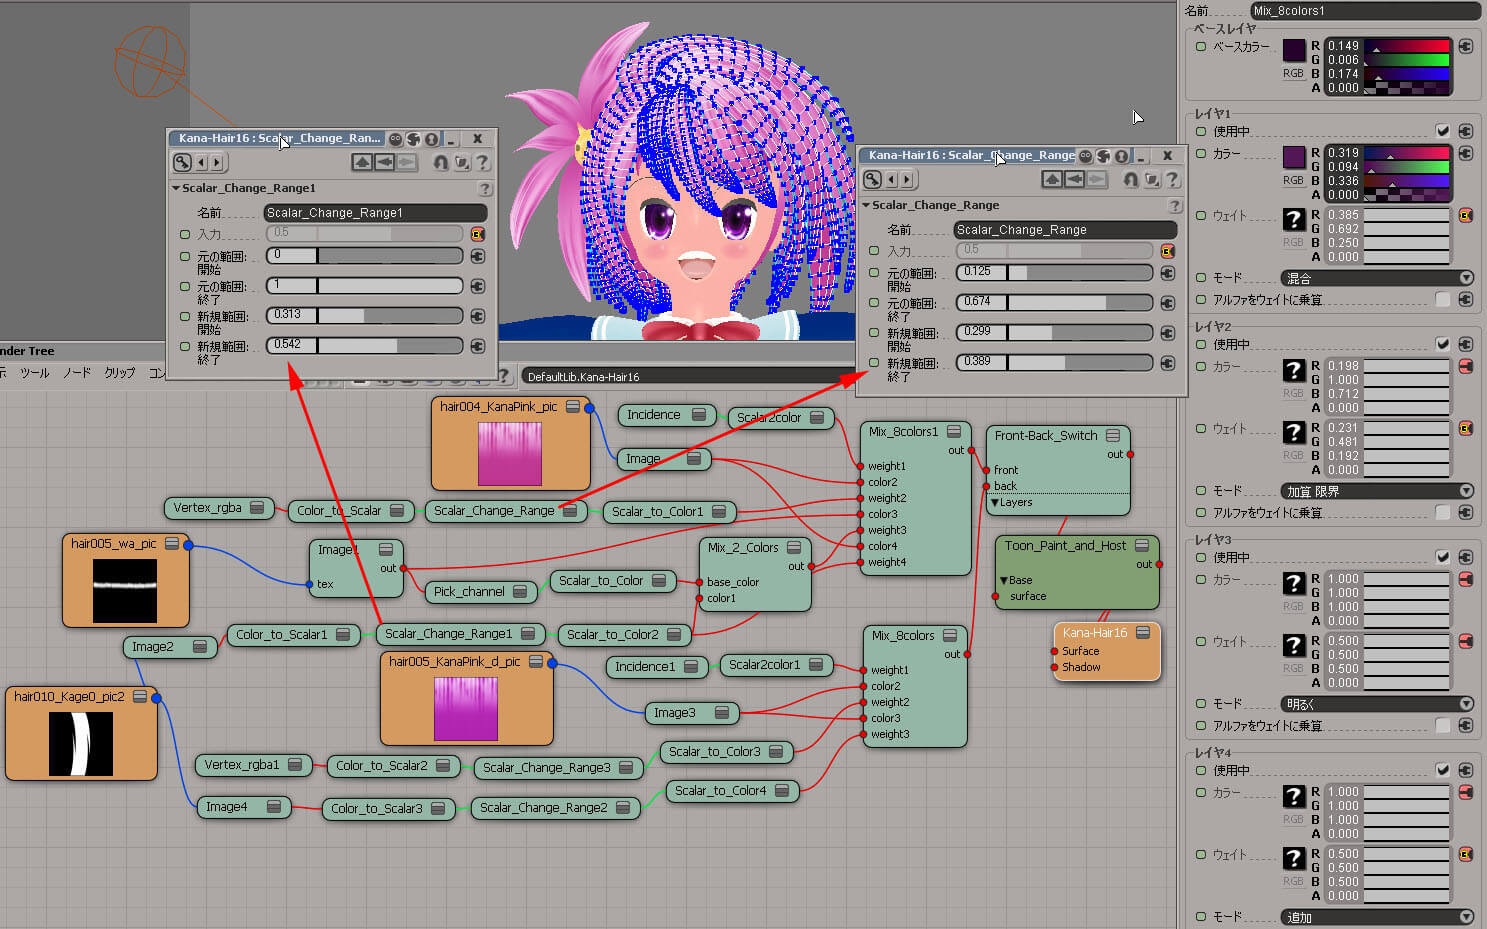 肌の色を少し褐色にしてみました。 And last, I changed the cheek texture and a little browny skin color to show her lively. 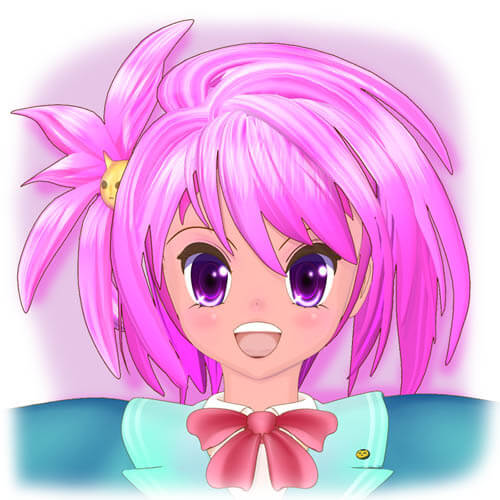 |
| 髪の毛; Hair アニメーション:Animation 動きが付くようにボーンの作成とエンベロープ設定です。 今回はあまりボーンの関節数は増やしませんでしたが、また後で設定を変えるかもしれません。 I did only few bones to make hair move , and set envelope to this.  Enveloping is just a endurance. Fix it until you feel good. 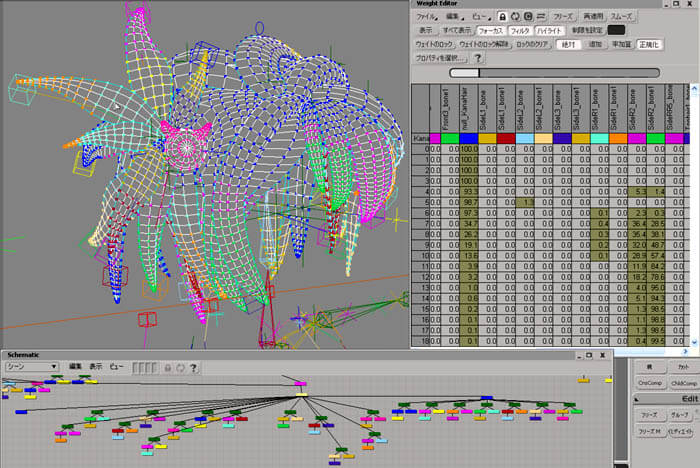 Set Effectors to show as Box , and put them into a Group for easier animating. 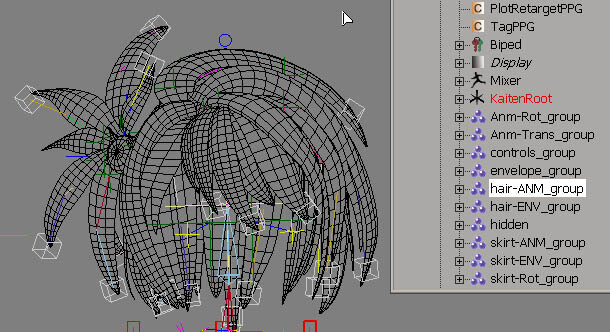 |
| アニメーション;Animation MotionBuilder&ICE 今回は骨構造が 2キャラで共通になっている...ということで、 既に ICE で構築された、 MotionBuilder のFKを Softimage の IKにモーション・リターゲットして キャラクターのアニメーションにすることが簡単に出来てしまいます。 Since both Characters has the same Rig (Bone Name)... I already have retarget system usine ICE to do MotionBuilder'FK to Softimage's IK, It's easy to set MotionCapture data to new character , now. 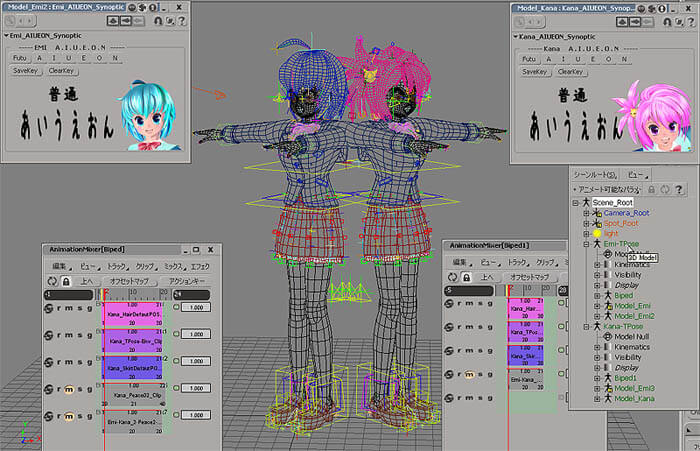 https://www.comtec.daikin.co.jp/DC/UsersNotes/Ritaro/tutorial/chara_14-toon/ Motion Data is from what we have taken before. Link above. 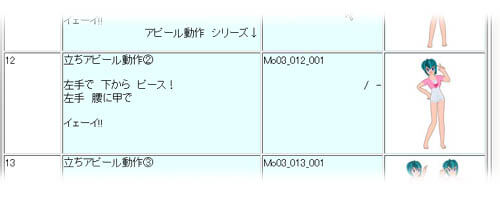 下図では既にキャラクタライズされています(フルボディー IK で動く状態)。 そのシーンにモーションデータを FBX Merge で持って来ます。 このデータには複数のモーションデータが入っているので、その中からMo03_012_001 を Actor に選択します。 (見せる為に右にずらしました、本当は中央に立ってます) When making the Biped Rig, also made the Shadow Rig which is imported to MotionBuilder using FBX file format. Below shows already Characterized the imported Shadow Null Rig, also input the Motion Data using [ >FBX Merge] . As this Motion Data has many takes , chosed Mo03_012_001 to Actor. 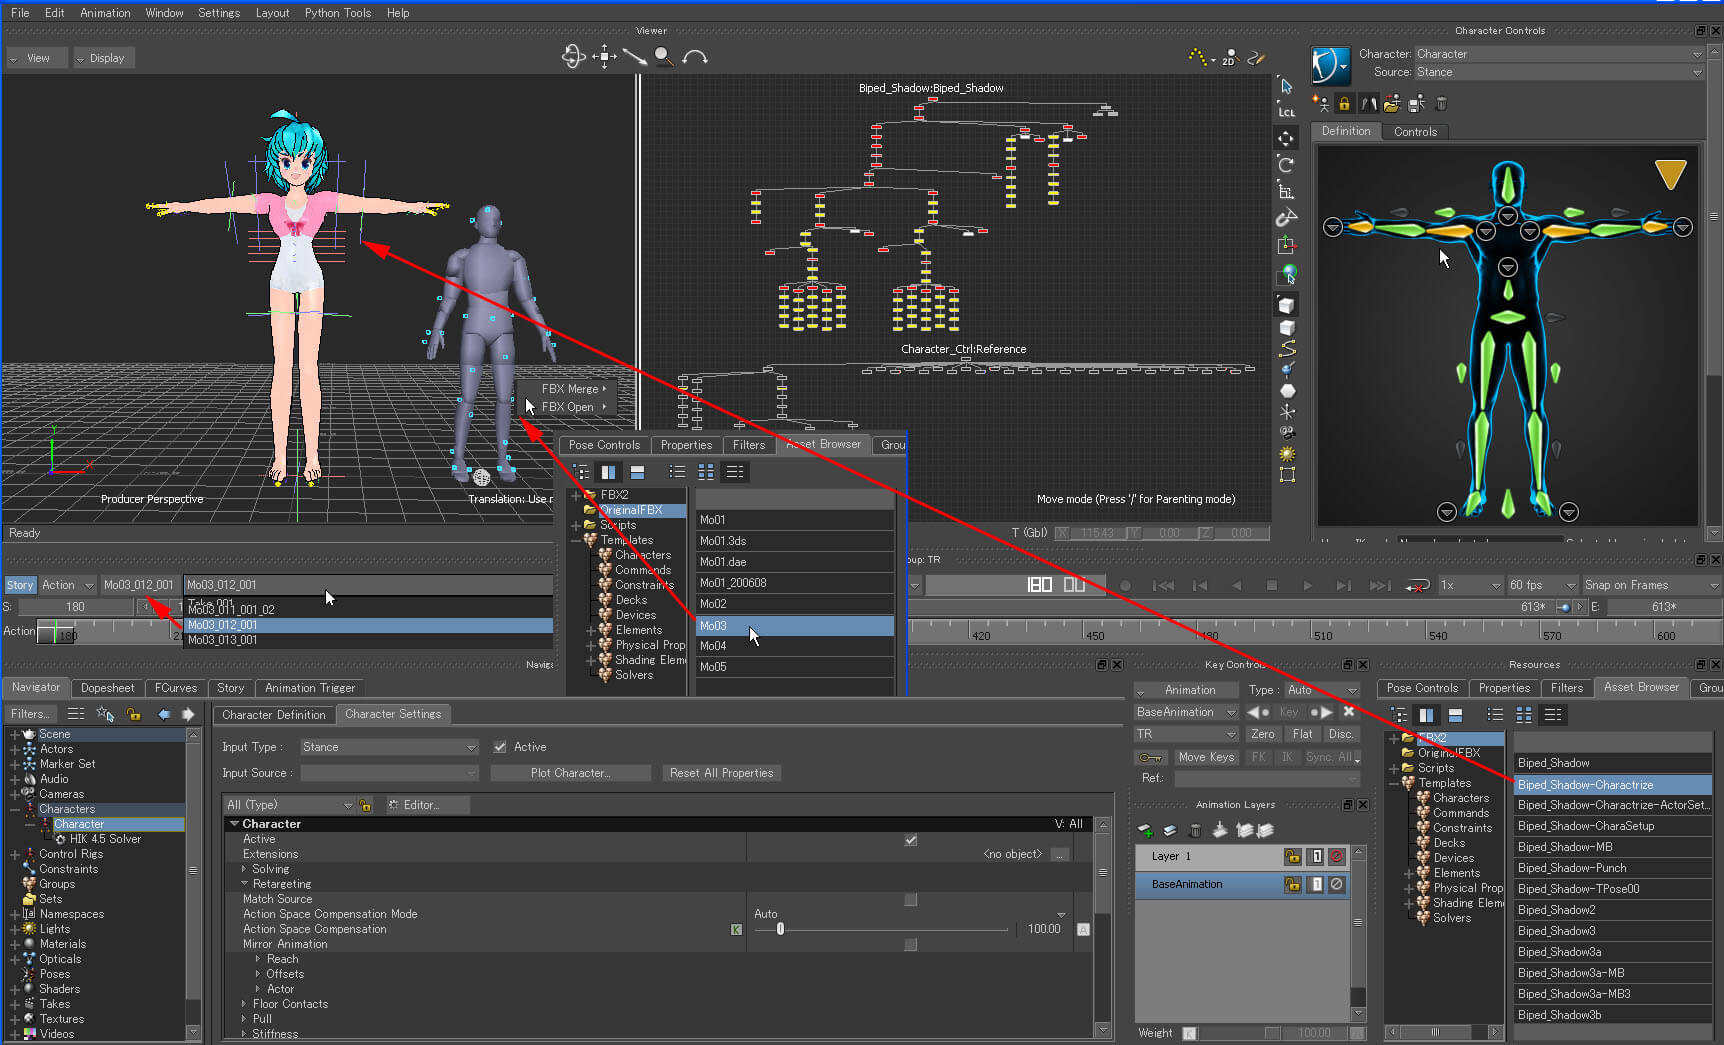 MotionBuilder 2013 この時点でアニメーションの編集をしてキャラクターの動きをより良くします。 キャラクターの骨構造体を選択し、 Animation > Plot Selected (All Properties...) で表示される設定画面は今回はそのままで[Plot] を実行します。 すると、下のタイムラインには毎フレームキーが打たれている状態になりますウロコみたいに The Character will move like the Actor. After fixing more animation, select all Character's bones and do Animation > Plot Selected (All Properties...) This time with using default settings, [Plot] the animation. You can see the timeline has keys all frames.  FBX形式で出力します。 Still those bones selected, export using File > SaveSelection... Select Takes you want, or export all Takes. 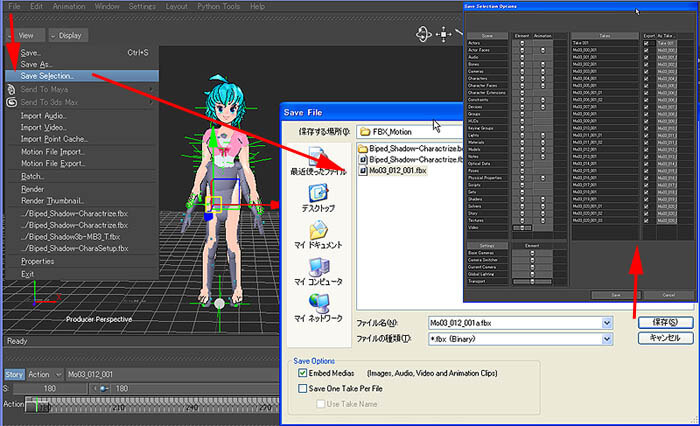 Softimage の BipedGuide で作成された XSIRig の IKにリターゲットしている ICE が仕込んであります。 仕組みとしては、全Null を一旦BuildArrayで配列を作成し、 IKの移動部分に SelectInArrayを使ってグローバル値を設定しているものです。 <一部解説>https://www.comtec.daikin.co.jp/DC/UsersNotes/Ritaro/tutorial/ICE-Komanuki/#04 ただし、両腕・両足の IK骨は3点から UpVecter を ICE で計算して設定しています。 ここにファイル > Crosswalk > FBX の読み込みから MotionBuilder から出力した FBXファイルを指定します。 In this Scene below, there is a retarget system using ICE, which dose Motionbuiler FK Null animation to Softimage IK-Rig animation. What ICE is doing is, making array using BuildArray with All nulls that cames from Motionbuilder, and than using SelectInArray to set GlobalTranslation to each moving things in Softiomage IK-Rig, but bothside arms and legs has Upvecor that ICE calculate using 3points. To this scene , import FBX that you exported form Motionbuilder using File>Crosswalk > import FBX. 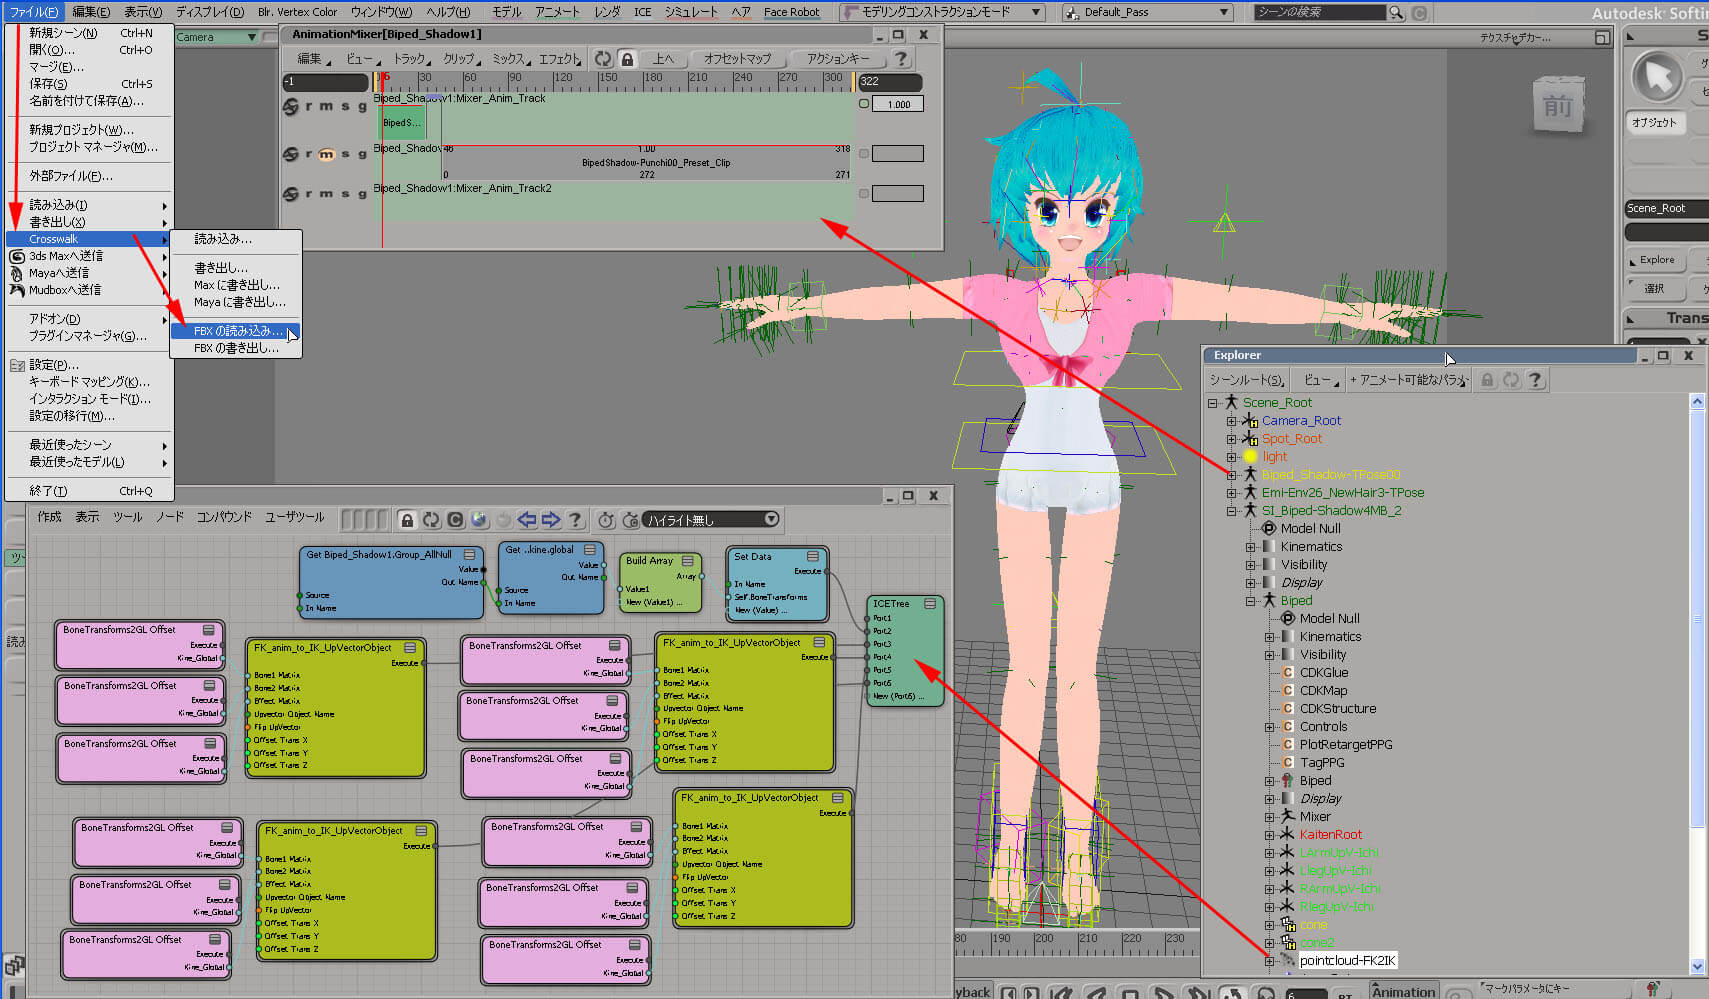 設定画面に◎アクションソースとして読み込みが追加されていますので、これを選択します。 含めるタブにて、カメラ・ライト・マテリアルとテクスチャーはチェックを外します。 アニメーションタブにて、複数の Takes がある場合は読み込みたいものを選択します。タイムラインは例えば 60FPS 指定したい場合に有効にします。 2013Version has better FBX import that makes clip in Softimage Scene Mixer. Check OFF , Camera・Light・Material and Texture , set Takes. If the Motion is 60 FPS, check Timeline's frameRate. 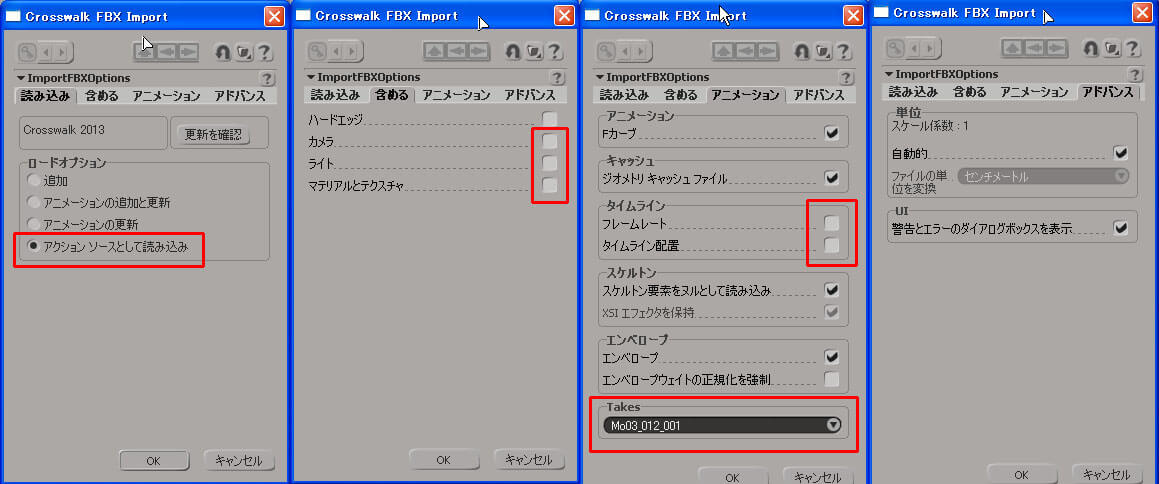 その Clipを ShadowRig の AnimationMixer にドラッグ&ドロップすると SoftimageRigに動きが連動するようになっています。 そうしたら、いつもの作業と同じく、キャラクターRig のアニメーションを設定する部分を選択して 移動と回転値を Plot しておきます。 Press [OK] button, than the Moton will be a Clip in Mixer under SceneRoot. Drag&Drop this Clip into Shadow-Rigs AnimationMixer which will be retarget to Biped-Rig. As usual workflow, Plot Rotation & Translation of the Biped-Rig's Animation. 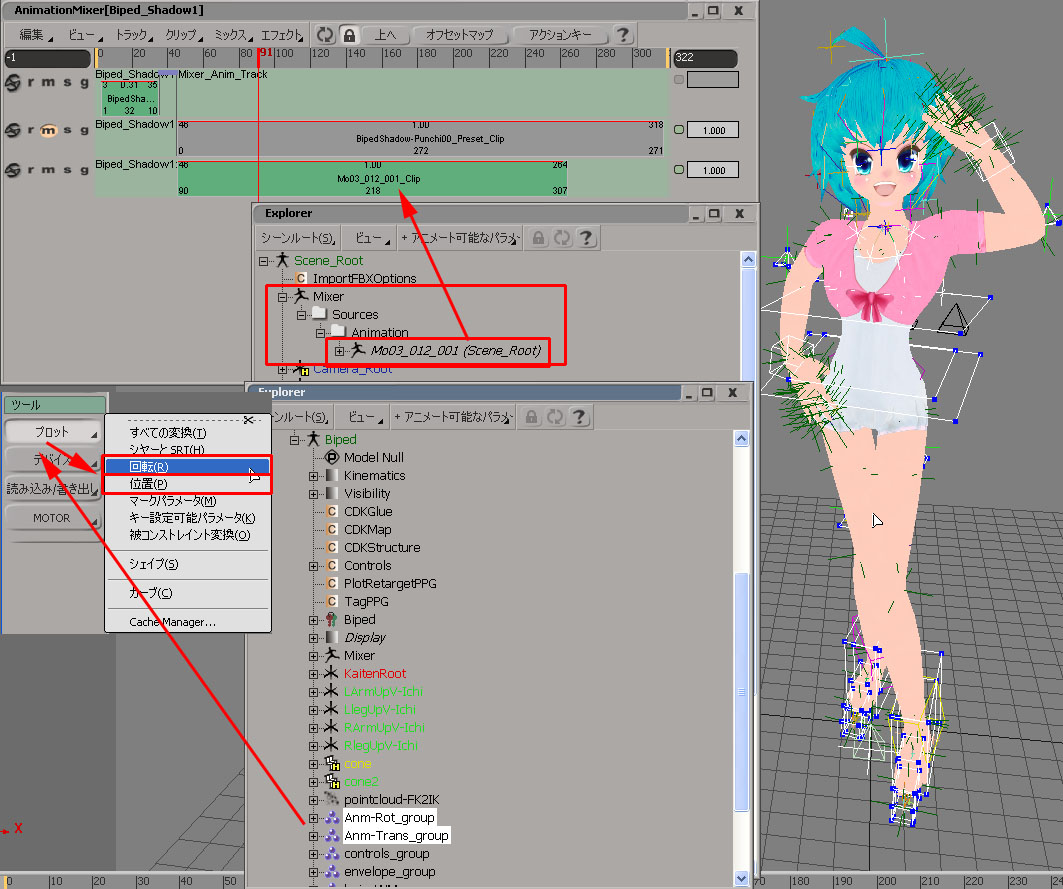 アニメーションの付いたオブジェクトと全選択し、アクション > 格納 > アニメートパラメータ-Fカーブを選択し。 表示される設定画面にて、アクションに付ける名前、 イン/アウトのフレーム数、ソースをクリップとしてミキサに登録にチェックを入れて、[ OK ] ボタンを押します。 するとその名前の Clip が AnimationMixer 上に表示されます。 After Ploting, make a Clip inside Character-Rig for easy use. Select all object that has animation data, than do Action>Store>AnimatedParameter FCurves, set name of the clip , in&out frames and check Add Source as a Clip in the Mixer. Then a Clip is made with the name inside Character's Animation Mixer.  ファイル名を指定して [OK] ボタンを押して保存します。 With right mouse button,chose Source and in ActionPPG chose Save Preset. Set it's file name , [OK] to save. 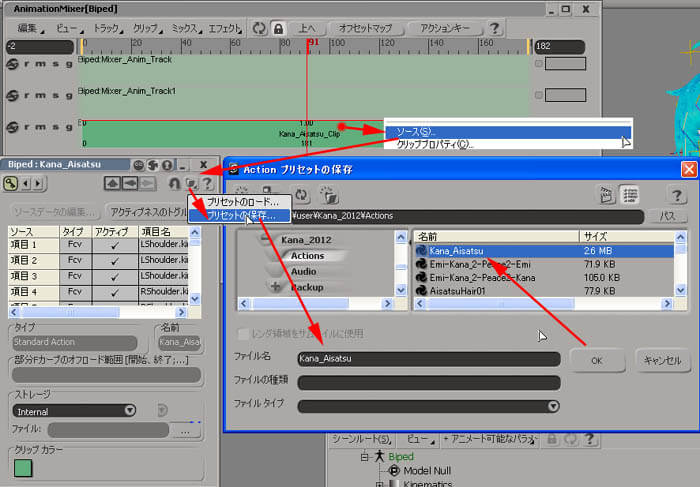 このキャラクター用の AnimationMixer の空白トラック上で、右マウスボタン選択からファイルからソースをロードを選択し、 先に出力した Clip名 を指定して読み込みます。 するとキャラクターRig にモーションの動きが乗りまます。 この状態で、アニメーションの付いて無い指、髪の毛、スカートそして音声とあわせたフェイシャルアニーションを付けて行きます。 Back to Character Making Scene, import the Clip you have saved into this Character's AnimationMixer. More Animation to be set , like Fingers,Hair,Skirt and also FacialAnimation with CharacterVoiceAudio. 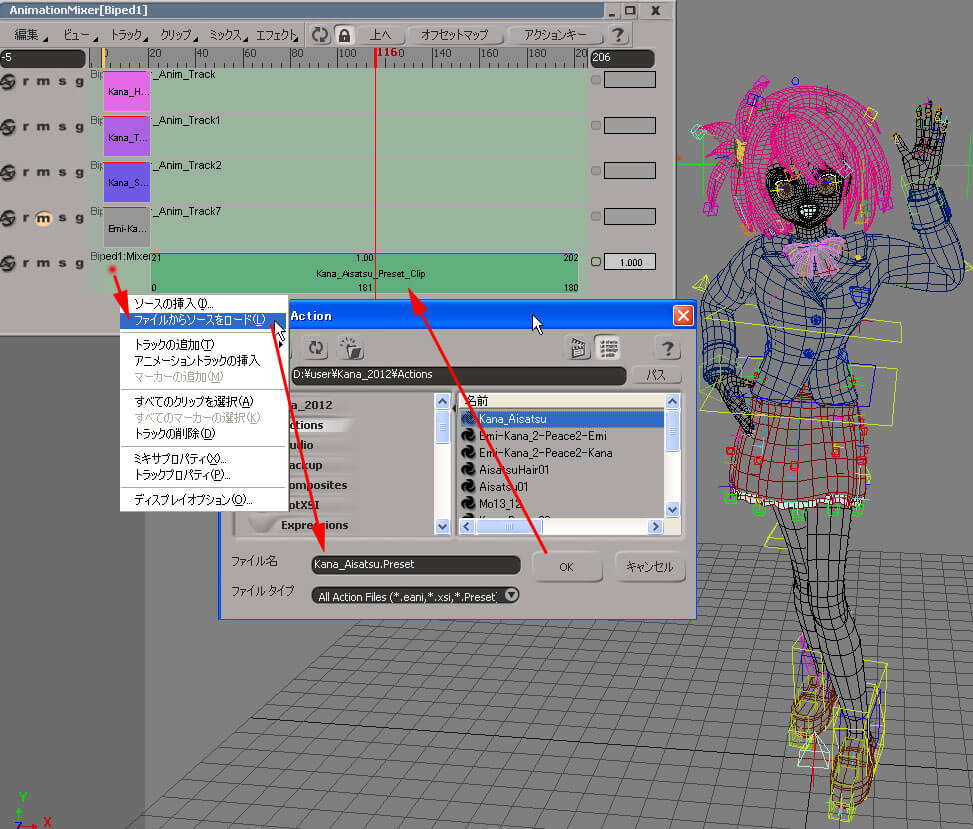 |
よろしく; Yoroshiku
|
| という訳で、次回もこのキャラクターが続くようです。。 乞う、ご期待!!
|