- ITソリューショントップ
-
製品・ソリューション
-
ダイキンのIT
 製造業向けITソリューション
  建設業務改善ソリューション
  ビル管理業務支援 DK-CONNECT BM
 FILDER CeeD TOP
  FILDER CeeD 電気 TOP
  Rebro D TOP
 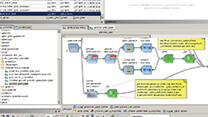 データ・サイエンス・ソリューション Pipeline Pilot
 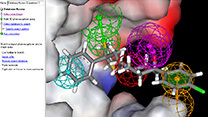 ライフサイエンス向けソフト Discovery Studio
 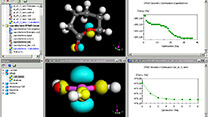 マテリアルサイエンス向けソフト Materials Studio
 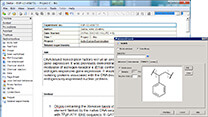 電子実験ノート
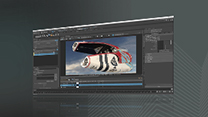 総合3DCG 制作ソフト Maya
 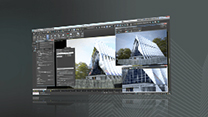 総合3DCG 制作ソフト 3ds Max
 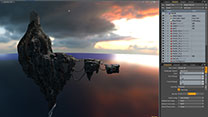 総合3DCG 制作ソフト MODO
 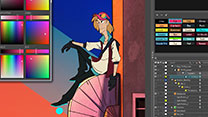 アニメーション制作ソフト Toon Boom
 |
新機能 FlexibleMocap とは;What is FlexibleMocap
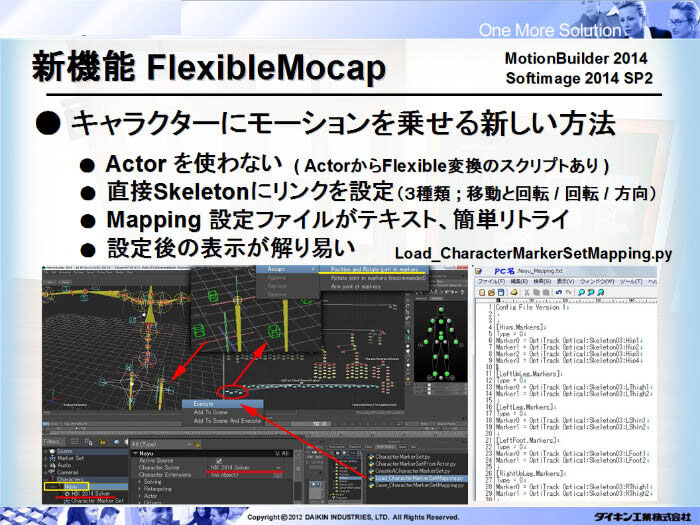 従来からある骨構造体にモーションを乗せ換える Actor に取って代わる機能です。 その内容は骨構造体に直接関連付けを設定できるというものです。 面白いのは、ActorからFlexibleMocap に関連を変換させるツールも用意されています。 (CharacterMarkerSetFromActor.py後でまた紹介します。) この関連性の設定は例えば腰だとモーションデータの4つのマーカー点を選択してそれをどの骨にどう関連させるのか という手順で行えるのですが、上パワーポイントの図右のように設定ファイルがテキストで保存されているものなので、 この設定ファイルをテキスト編集だけでも全てを設定出来てしまう、という便利な方法があります。 (Load_CharacterMarkerSetMapping.py後でまた紹介します。) To begin with, let's talk about what is FlexibleMocap is , which is the new feature from MotionBuilder2014 . It's a motion data transfer to bone structure that can be replacement feature of the Actor . What's better than Actor is , you can link animation straight to the bone nodes with some ajustments . There is also a python tool that can make FlexibleMocap from Actor settings . (CharacterMarkerSetFromActor.py is explained later) This link can be made by selecting Motion data markers and make direct link to whatever bone you want to link with, but more fun is that you can edit the text file which to link with . Using this text file , you can set up all you want . (Load_CharacterMarkerSetMapping.py is explained later ) MotionBuilder全般に言えることですが、大体の設定ファイルは皆アスキーです。 例えば、キャラタライズ用の設定ファイル(Nayu_Biped_Shadow.xml)もテキスト編集できます。 そして、設定し終えると、どこにどのように設定されたのか解る赤い表示が現れるので。 それを見て何度でもテキスト編集で調整すれば良いということになります。 It's likely to say , MotionBuilder settings have many in text files. For exsample , Characterize setting file(ex;Nayu_Biped_Shadow.xm)is also a text file. 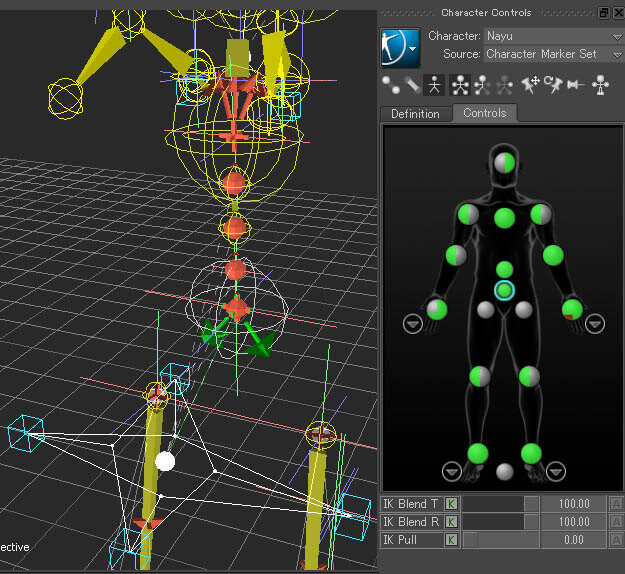 それに対する考え方や準備を提示します。 Then , before speeking the instance , Let's think about what are the needs when the theme is Coordination with Softimage . |
Softimage との連携 ; Coordination with Softimage
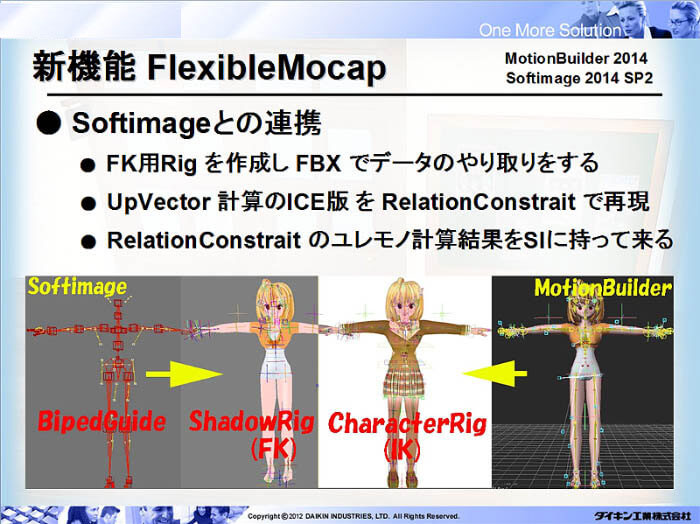 MotionBuilderから来たモーションキャプチャーの動きを、Softimageのキャラクターに乗せたい、というのは言わなくても解っていると言わそうですが。 どこに持ってきたいかが重要で、そのために色々工夫している、ということです。 単にNullの階層構造として(つまりFK)Softimage上で表示したいのであれば FBXをインポートして来て終わりです。(ファイル > インポート > FBXの読み込み) "What's the want " , is the conception to begin with . I know it's about putting the motion capture animation into Softimage character , but "where" is the most important thing , and for that is all the effort done. If only wanting to transfer into Softimage with Null structure(meening FK)is quite simple just import the FBX (File > Import > import FBX... ).  単なるNullの階層構造(FK)とキャラクターの制御Rig(IK-Rig)にどれ程の構造的違いがあるかが下のスケマティック画面で解って頂けると思います。 But thai isn't this story, we want to put the animation to the Character Rig IK, where you often put your keys . See the difference below in skematic view , between Null structure FK and Character Rig IK , and you will knowtice how far the set is. 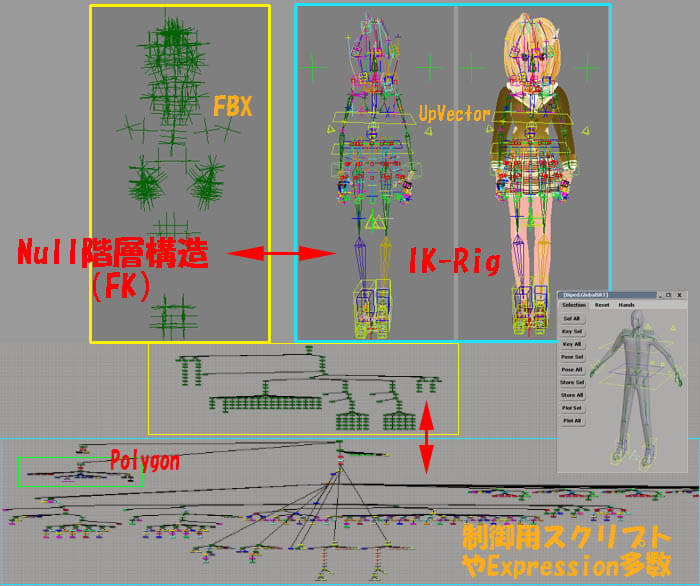 キャラクターのIK-Rigには骨位置を制御するUpVectorや様々なスクリプトやエクスプレッションがたくさん埋め込まれています。 このモーションリターゲットという動きデータの転送が出来る機能の実現を目指したとして、 その為に考えておくこと、用意したいことが上図のパワーポイントの3点です。 To think what setting will it be , to make these differect stucture to be linked with. Inside Characer Rig IK , there is also UpVecters , some scripts and expressions, too. Although if you have the way of Motion retargetting , some other thing you have to prepare , whitch is ●FK用のRigを作成してFBXでデータをやり取をりする Make a FK Rig and tansport data using FBX ●UpVector計算のICE版をRelationConstraintで再現 Calculate UpVector using RelationConstraint ●RelationConstraintのユレモノ計算結果をSIに持って来る Bring Spring like animation made by RelationConstraint to Softimage それぞれを詳しく次に述べていきます。 Each are followed in next chapter. |
FK用Rig の作成;Making FK Rig
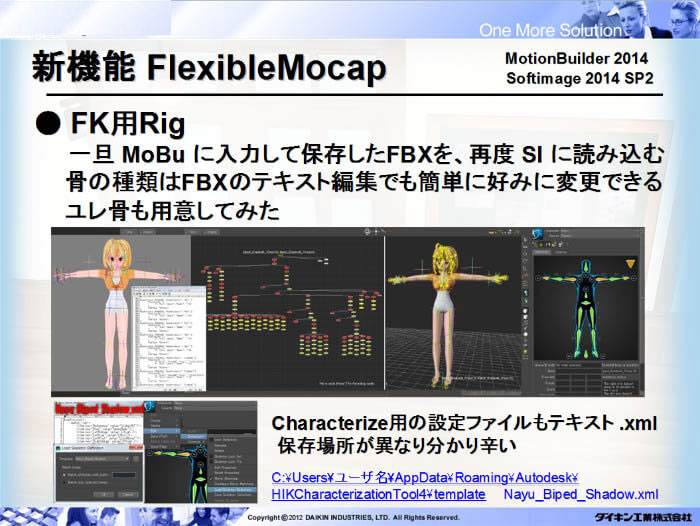 他のページでも説明しています通り、BipedGuideからIK-Rigを作成する時に同時作成できる骨だけの階層構造である BipedShadpw を 一旦MotionBuilderに読み込んでから出力したFBXをテキスト編集すると、自分の意図にあった最適なNull階層構造が作成できます。 MotionBuilder用データ作成を参照 また、MotionBuilder 上でこのNull階層構造体を キャラクタライズしておいて保存しておくと便利です。 キャラクタライズを参照 To make a good link within your Softimage character's IK-Rig to MotionBuilder , you'll have to make a Null bone stucture . Been explain in othe pages in SoftimageUsersNotes , you cane get perfect Null bone structer , using the Biped Shadow Rig bones that is made from BipedGuide when you make the IK-Rig in Softimage . See Making Data for MotionBuilder Also it is usefull to have a scene saved , which scene has been characterrized in MotionBuilder using this Null bone structure . See Characterize 今回の例でもっとも違う所は、HIK のソルバーが HIK 2014 Solver であることが必須ではありますが、 それ以外にも、2個目の目標 UpVector と3個目の目標ユレモノの為に大幅にオブジェクトが増えています。 これらが加わった Null階層構造をキャラクタライズしています。 The most different thing in this page , is the HIK solver , and must use HIK 2014 Solverin MotionBuilder2014. And to do the concept No2 UpVecter and No3 Spring like animatin , the objects are added much more . You have to characertrize this added null structure . 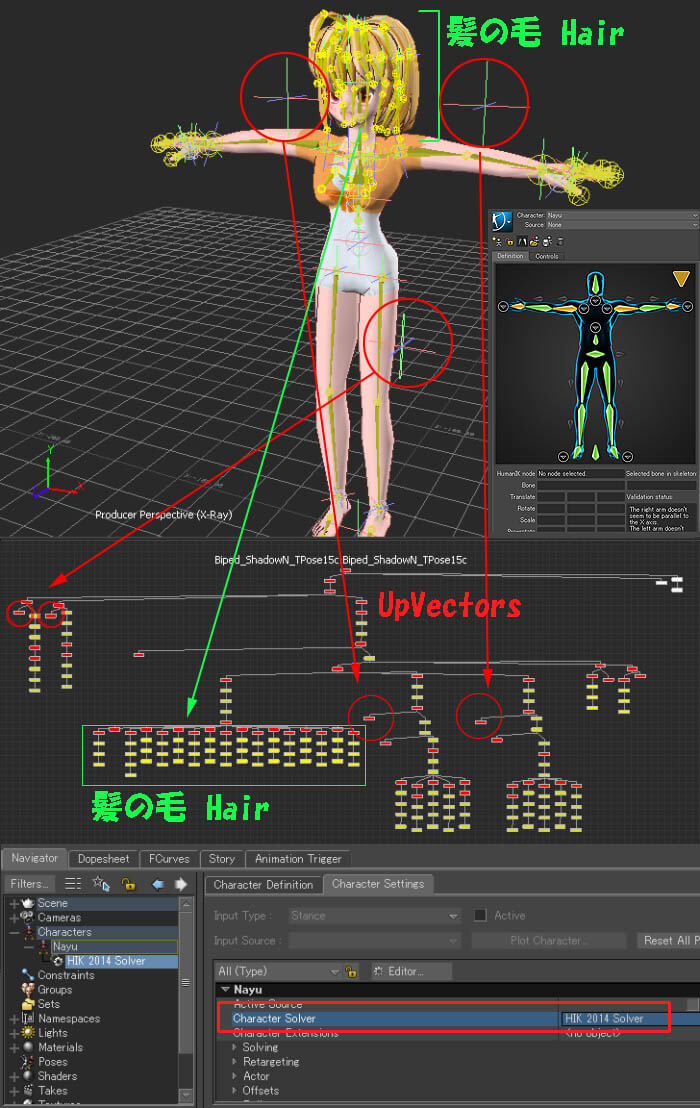 |
UpVector の作成;Making UpVector
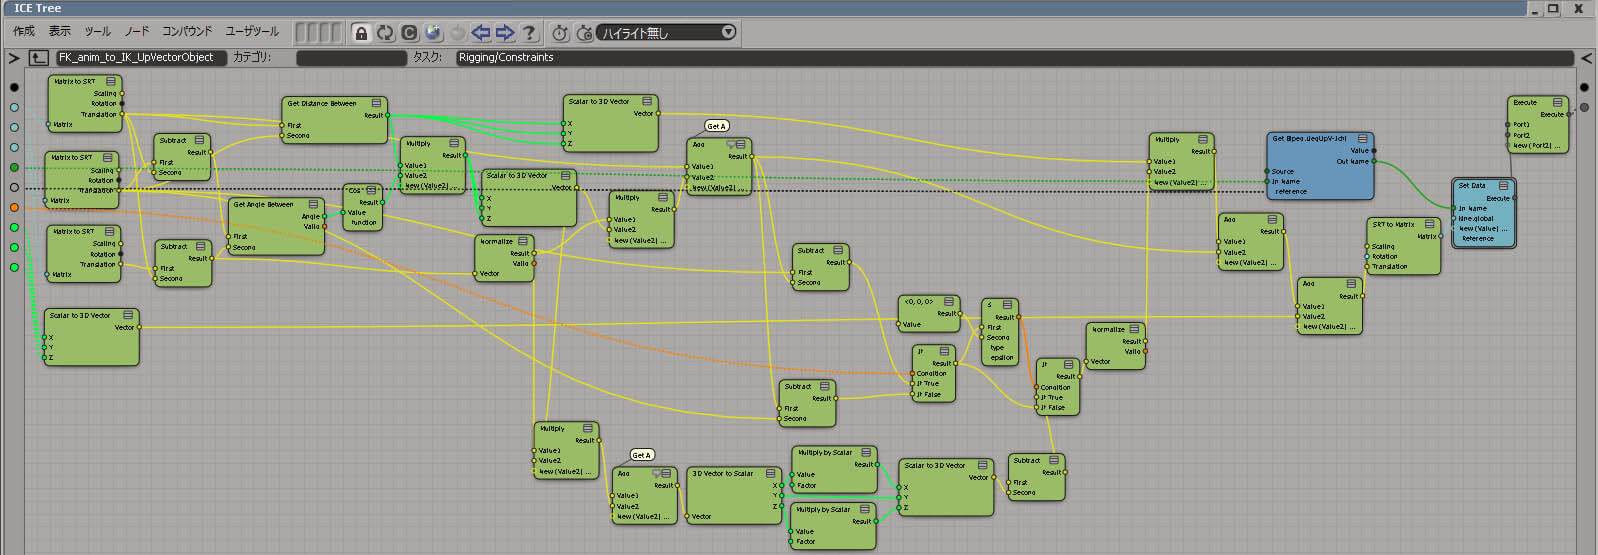
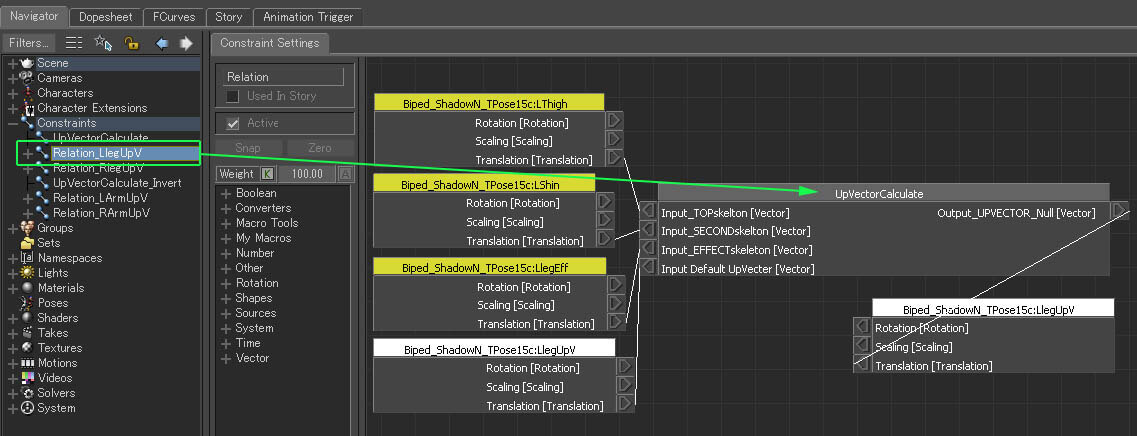
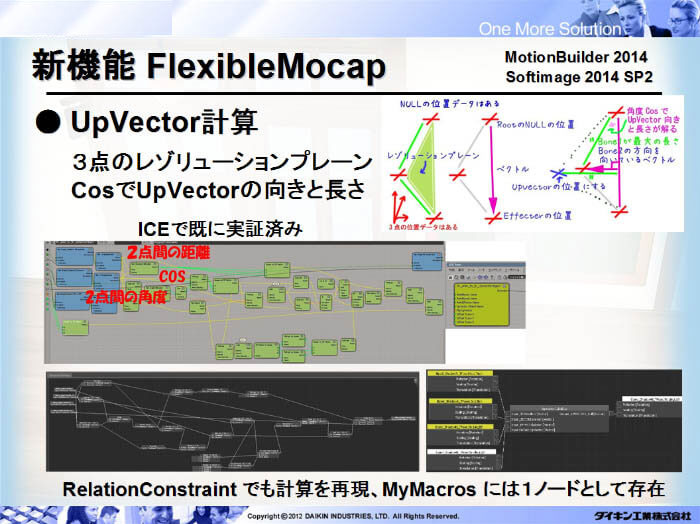 それを計算で導き出して使ったのが ICE版 UpVecter の計算ノードでした。 UpVecter の導き方は上パワーポイントの図を拡大すると..... In FK there is the data of 3 points (ex; Thigh , Shin , Foot) ,but the UpVecter data to move IK does not come from MotionBuilder FBX . There for , previously made a ICE to calculation that data . The way of getting UpVecter was like this . 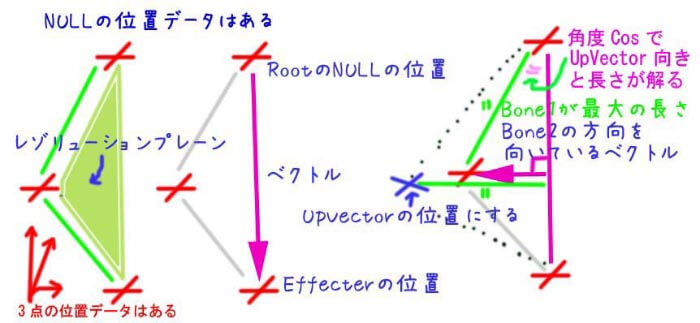 腰と膝、腰と足の2つのベクトルの間の角度から、そのCos角度で直角に向く方向にUpVectoがあるという風にしました。 ICEは1つのノードにまとめられるので、出来上がりはこんなに綺麗です。 The 3 points will come , which will make a triange as called Resolution plane, for example Hip to Nee and Hip to Foot can get 2 vectors , and this COS angle will make the vector towards where UpVector is . ICE nodes can be made to one Compound , so it will look like bellow , very neet . 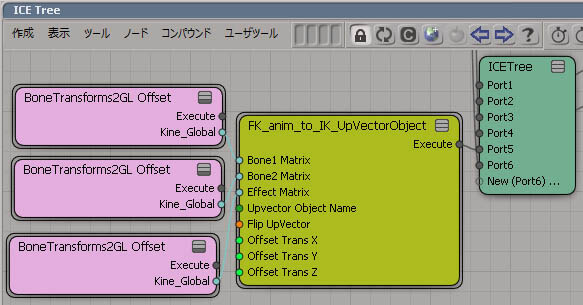 より改善できたら教えて欲しいものです。 But the inside , is like this . Use it in youe own risk , if you can make a better one , please share with . Some explane will be here . 今回作った MotionBuilder 版の UpVector計算 では、 Cos角度が 0 になってしまうと UpVector の位置を特定しにくくなる部分を、 最初のT字ポーズの時にあった位置をデフォルト位置として、限りなく0に近すくとデフォルトの位置に戻す という回避策を取ったものにしました。 MotionBuilder版で作ったのは、ICEを知っていれば RelationConstraint も簡単に作れるのではないかという証明と、 Softimage以外のDCCツールにもUpVectorの計算した結果を利用できると思ったからです。 (逆もありですね、MotionBuilderのRelationConstraintを知っている人は、SoftimageのICEを組む事が出来るという事の証明にもなります。) The one made in MotionBuilder has some changes , thinking of when the COS angle comes to 0 , the UpVecter position is unstable . So made a workaround to move the UpVecter to it's default position . The reason to make MotionBuilder version , was to make an evidence of if you know ICE then you can make RelationConstraint one , and also you can use the the UpVector result to other DCC tool then Softimage . (But also true if you know MotionBuilder's RelationConstraint , then it is easy to make ICE in Softimage) では、さっそく RekationConstraint版 UpVecter計算ノードをご紹介します。 左足を例に取って組んで行きます。 So let's do the RelationConstraint version of UpVector calculation . The example is showing left leg . 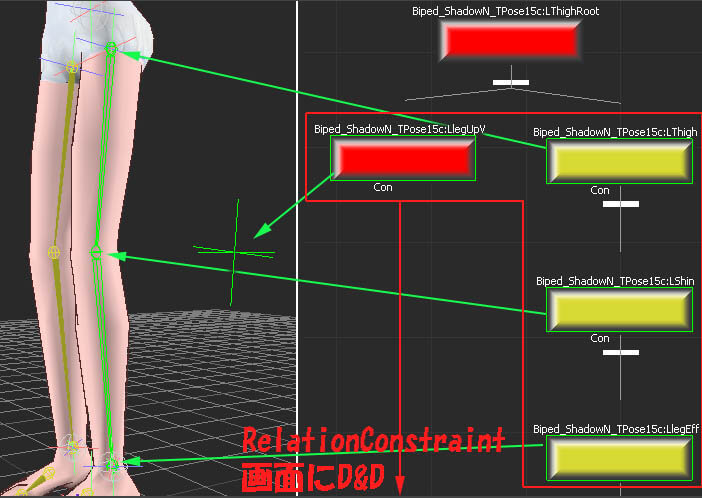 当然、求めた結果を受け取るのは UpVectorなので、これを1つD&D して Reciverノードを作成します。 RelationConstraint画面についてはRelationConstraintを利用したスプリング的な動き参照 最初は、これら固有のオブジェクトの値で作成していきますが、ICE版のノードのように1つのノードとして扱えるように MacroTools内のMacroInputVectorとMacroOutPutVecterに置き換えます。 First, select 4 objects and Drag&Drop those into Constraint settings Window with + Alt Key and make 4 Sender nodes . Also the result will be caluclate to UpVector , so D&D and make one as a reciver node . see Spring like animation using RelationConstraint In the begining , you use these actual nodes , but like ICE , to make it as one compound , you switch these sender and reciver to MacroInputVector and MacroOutPutVecter which can be found inside MacroTools . 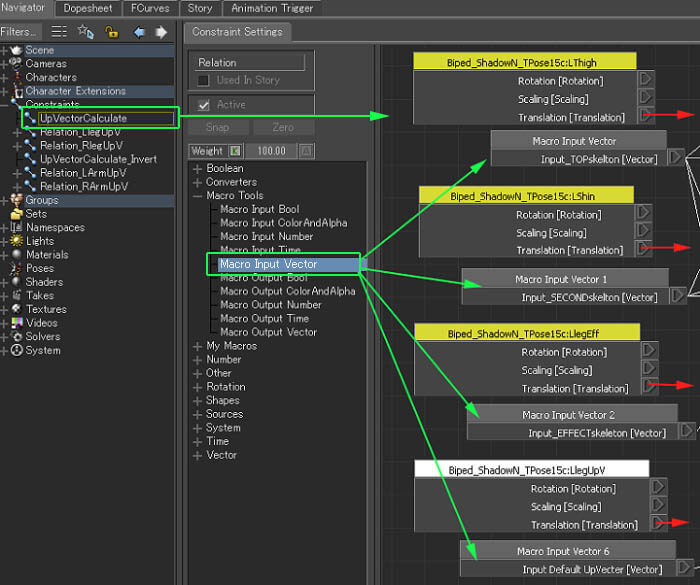 良く見ると、UpVectorCalculate_Invert がありますが、これはアップベクターの位置が反対の時に使えるように作りましたが 途中のノードの接続が逆になっているだけのものです。 これらノードは、ICEのように1つのコンパウンドとして書き出す、ということが出来ないのですが、 これらだけが入ったシーンとして保存しておけば、他のシーンにはマージで読み込むことで 他のシーンでも使うことができます。 When you use MacroTools , the nodes are shinkup to one node(ex ; UpVectorCalculate) than you can link actual senders and reciver to that new node . To see furter in this secne , you will notice a Node name UpVectorCalculate_Invert which was the one to place UpVectors in back of skeletons . There isn't a way to export this one MacroNode as in ICE Compound, but you can save it as a scene , which can be loaded into other scene by loading Merge Scenes. で、全体的な図です。大きな画像にリンクしています。(RelationConstraintのノードは横に長いので1画面に収まりませんね) 腰と膝までの距離と2つの方向から角度を得てCos値とさっきの距離から腰と爪先線上の直角にアップベクターに向く位置と距離を導き出しています。 一方、Cos値からFCurveNumberノードにつないでいるのは、ほとんど0度になってしまう場合には元々あった位置に近すくような感じにしています。 FCurveNumberノードは編集が出来、カーブが98%になるまでは値が0なのに、超えると100になる極端なカーブになっています。 それの値は最後のMiddlePointノードのウェイト値になっていて、最初に入力したUpVectorの位置がここのV2につながっているだけです。 So here is the all links . (Large size image attached) Using length of Hip to Nee , and 2 Vector , COS parameter and the length will make a the way to Upvecter within Hip to foot vector . The other data from COS node goes into FCurveNumber node is the workaround of getting COS 0 angle, which has a FCurve inside [edit] , most part untill 98% = 0 , and above that is 1 which makes to mix default positon to reciver . 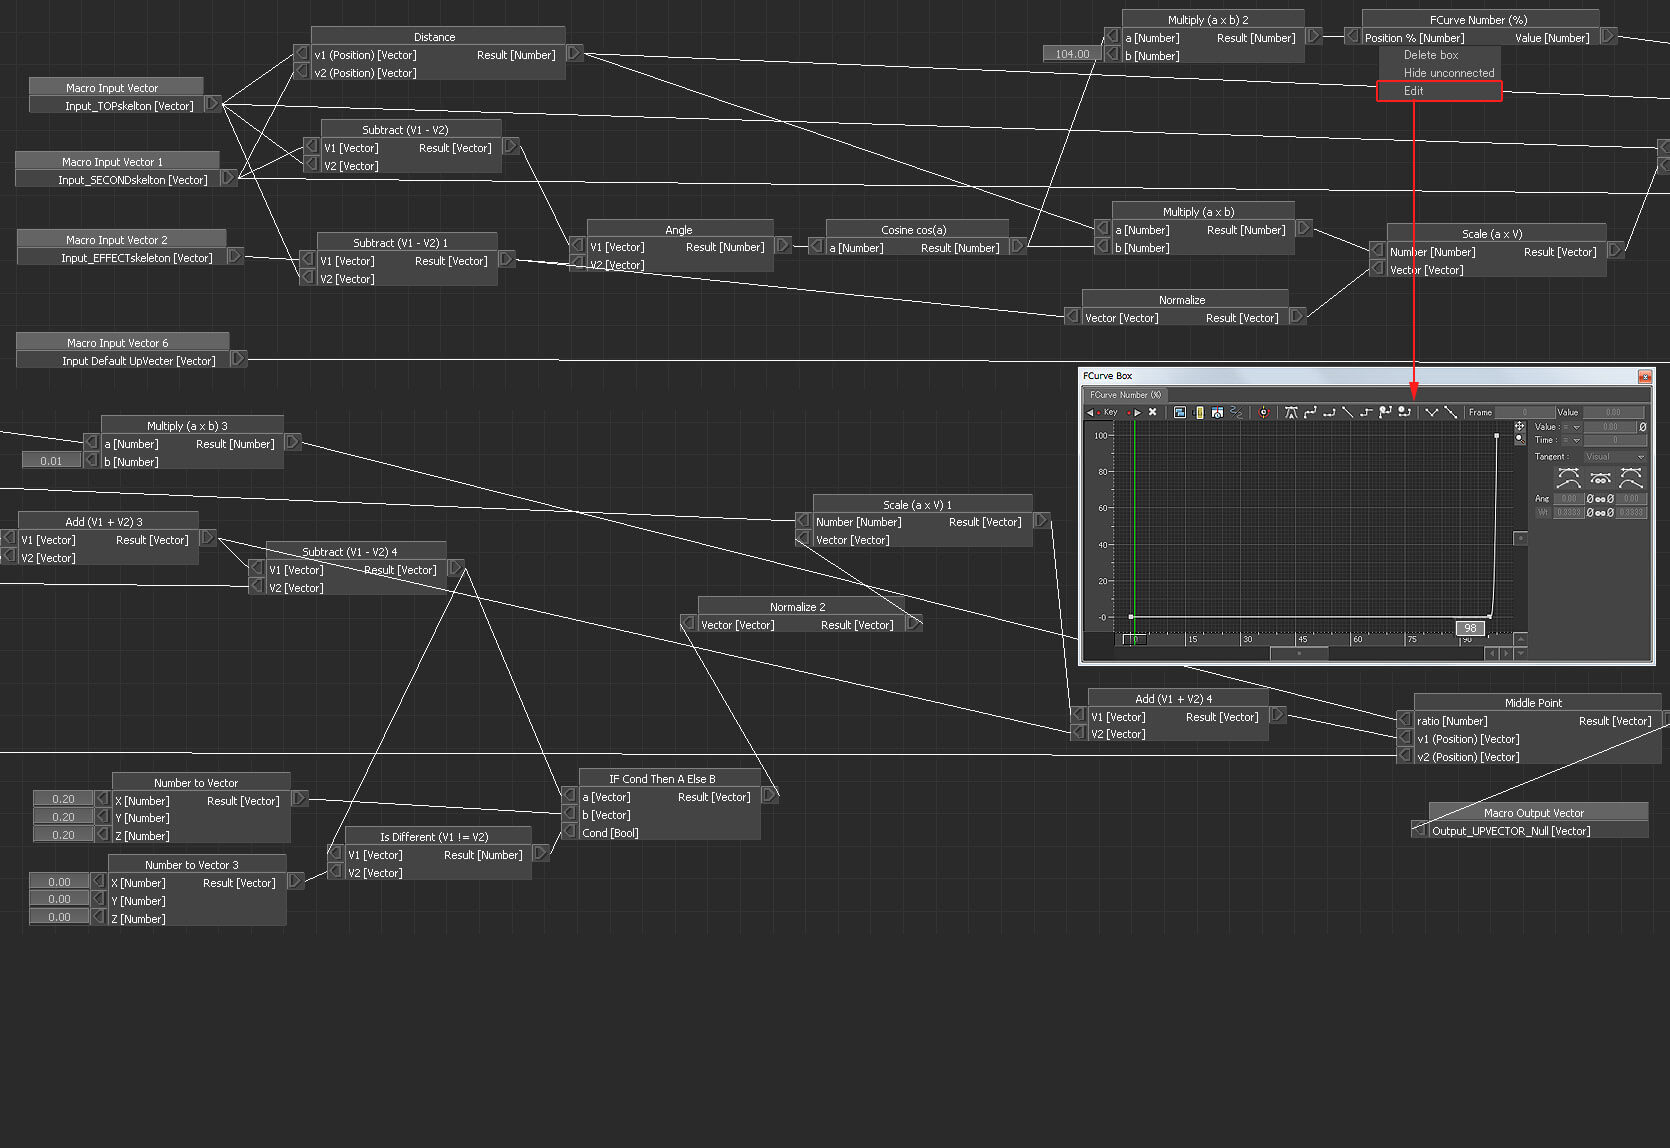 拡大画像あり ↑ LargeImageAttached そしてより良いものが出来たなら、フィードバックをお願いしたいところです。 Make it yourself to get use to RelationConstraint, and if you found more effective one share it with us. |
ユレモノの作成; Making spring like animation
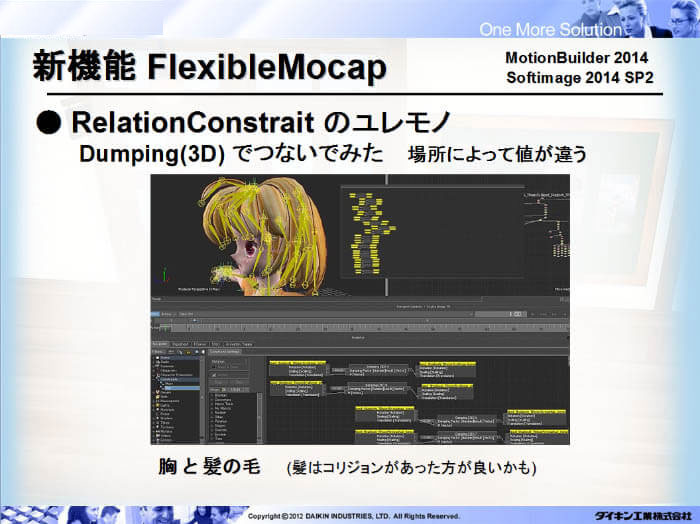 頭に髪の毛が当たるので、衝突判定付きのものの方が良かったかも知れません。 今回は Dumping ノードをつないだものでやってみました。 数が多いのでこんなにありますが、つないでいるノードが1種類です。 As an experimental , the resault of MotionBuilder's spring like animation inport to Softimage was done. Might be better having collide but just a Dumping node was used . Having many nodes but only Dumping node with different parameters. 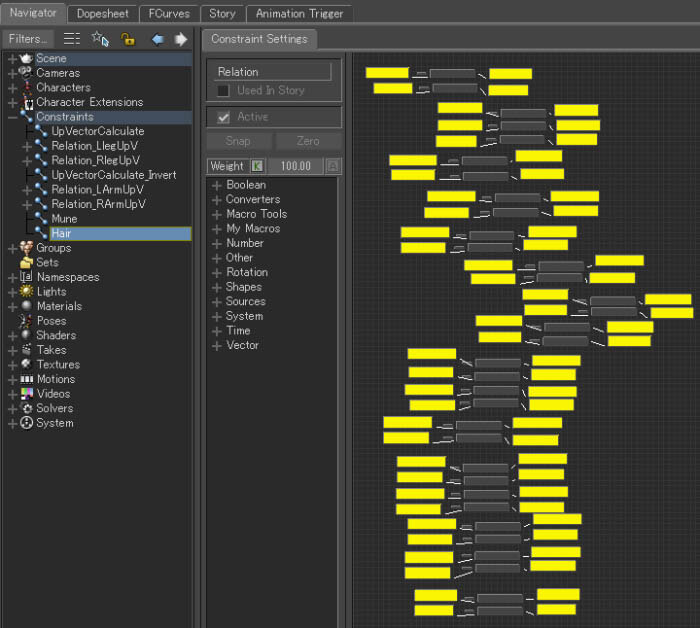 The Damping Facter is larger in how near to root . 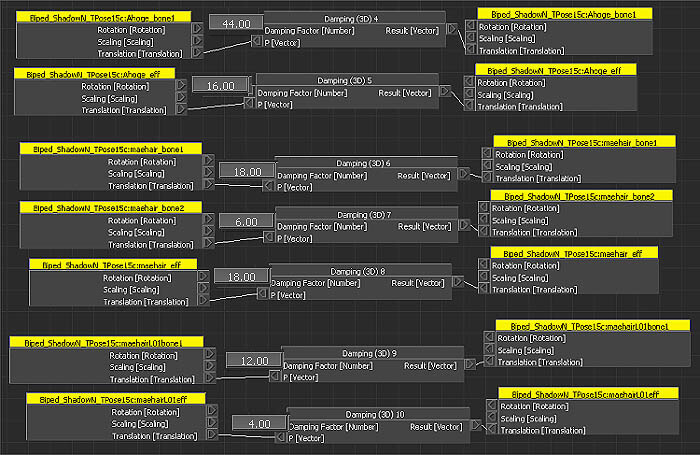 胸は回転にもDumppingを入れてあります。 Some Damping in her chest ,too. 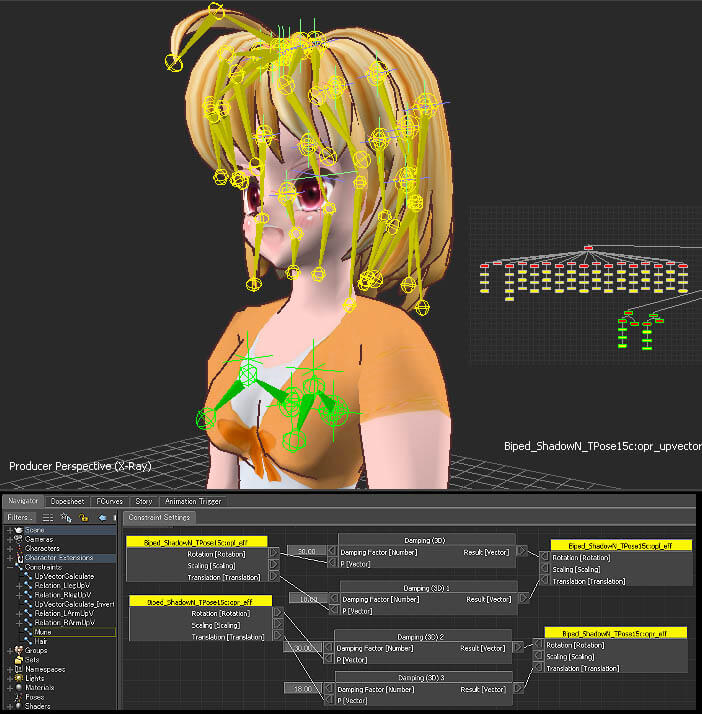 再度検討してみます。 So, as these features are ready to go , let's think about the workflow to use . |
ワークフローの考察; Observations of Workflow
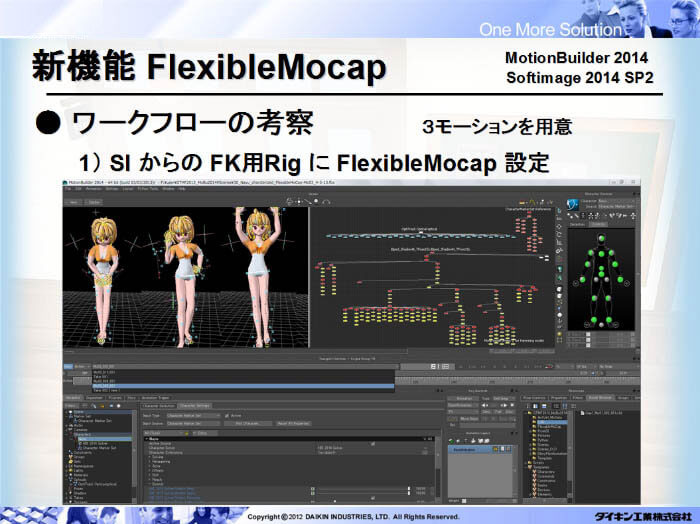
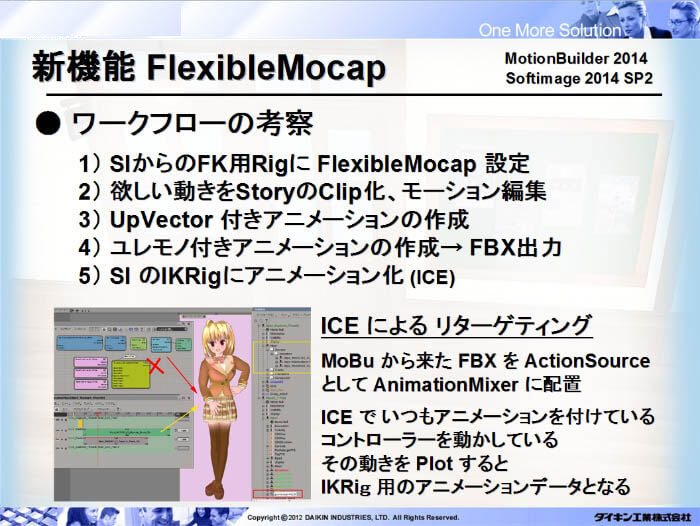 最後に大きな課題がもう1つあります。それは ICEによるリターゲットです。 ですが、前述の通り、以前ここで ICE で UpVector を計算 していたのですが、 今回はMotionBuilder の RelationConstraint でやるので、その部分は無くなりました。 そして、実は仕組みとしては簡単なので、最後に紹介して今回の課題をクリアしていきましょう。 The research above is precondition. The last and the most one is left which is MotionRetargeting using ICE. But as showd already , calcutation of UpVector was made in RelationConstraint than in ICE , the rest of ICE retargetting is not so problem , even very easy . It will be shown in nest page . では、改めて今回の作業内容をまとめ、その順番で一気に完遂するまで作業を記述します。 各工程での細かい手順は、自分が後で見て理解できるよう、きちんとメモっておく事をお勧めします。 The story will be told along with the workfow , right though to the end . Study each section as your knowledge , and fix it to your own workflow . ●SoftimageからのFK用RigにFlexibleMocap設定 Set FlexibleMocap to FKRig which is from Softimage ●欲しい動きをStoryのClip化、モーションの編集 Set needed Animation to Story's Clip, Editing Motion ●UpVecter 付きアニメーションの作成 Making Animation with UpVector ●ユレモノ付きアニメーションの作成 → FBX出力 Making Spring like animation → Export FBX 次ページへ To NextPage ●SoftimageのIKTigにアニメーション化 Put to Softimage IK RIg Animation |
Softimage からのFK用Rig に FlexibleMocap 設定;Set FlexibleMocap to FKRig which is from Softimage
 前もって準備したFK用の Rig を読み込みます。 右上 CharacterControls 項目の 各骨の関連付け(Definition) は済ませてあり、(キャラクタライズ の ControlRig を作成する前まで) 左下 Navigatorタブの Character > Nayu(キャラ名) の ソルバーはHIK2014Solverであることを確認します。(他のソルバーでは動作しません) 右上 CharacterControls 項目の Source をNone から Stance に変え、 右上 CharacterControls 項目の Source をNone から Stance に変え、 表示される項目から [Biped]を選択してキャラクタライズ させます。(この状態を保存しておくと便利です。) Let's begin . Imput the FK Rig that had been made beforehand . The Definition at the Right above CharacterControls menu has been done (see Characterize Definition part) The Definition at the Right above CharacterControls menu has been done (see Characterize Definition part) Check the Left bottom Navigator Tab Character > (Character name)Ex; Nayu has solver of HIK 2014 Solver(Othe solver dosn't work). In the Right above CharacterControls menu , change the source , from None to Stance select [Biped] from the popup menu and finish characterizing. (Save this scene will be convenient) 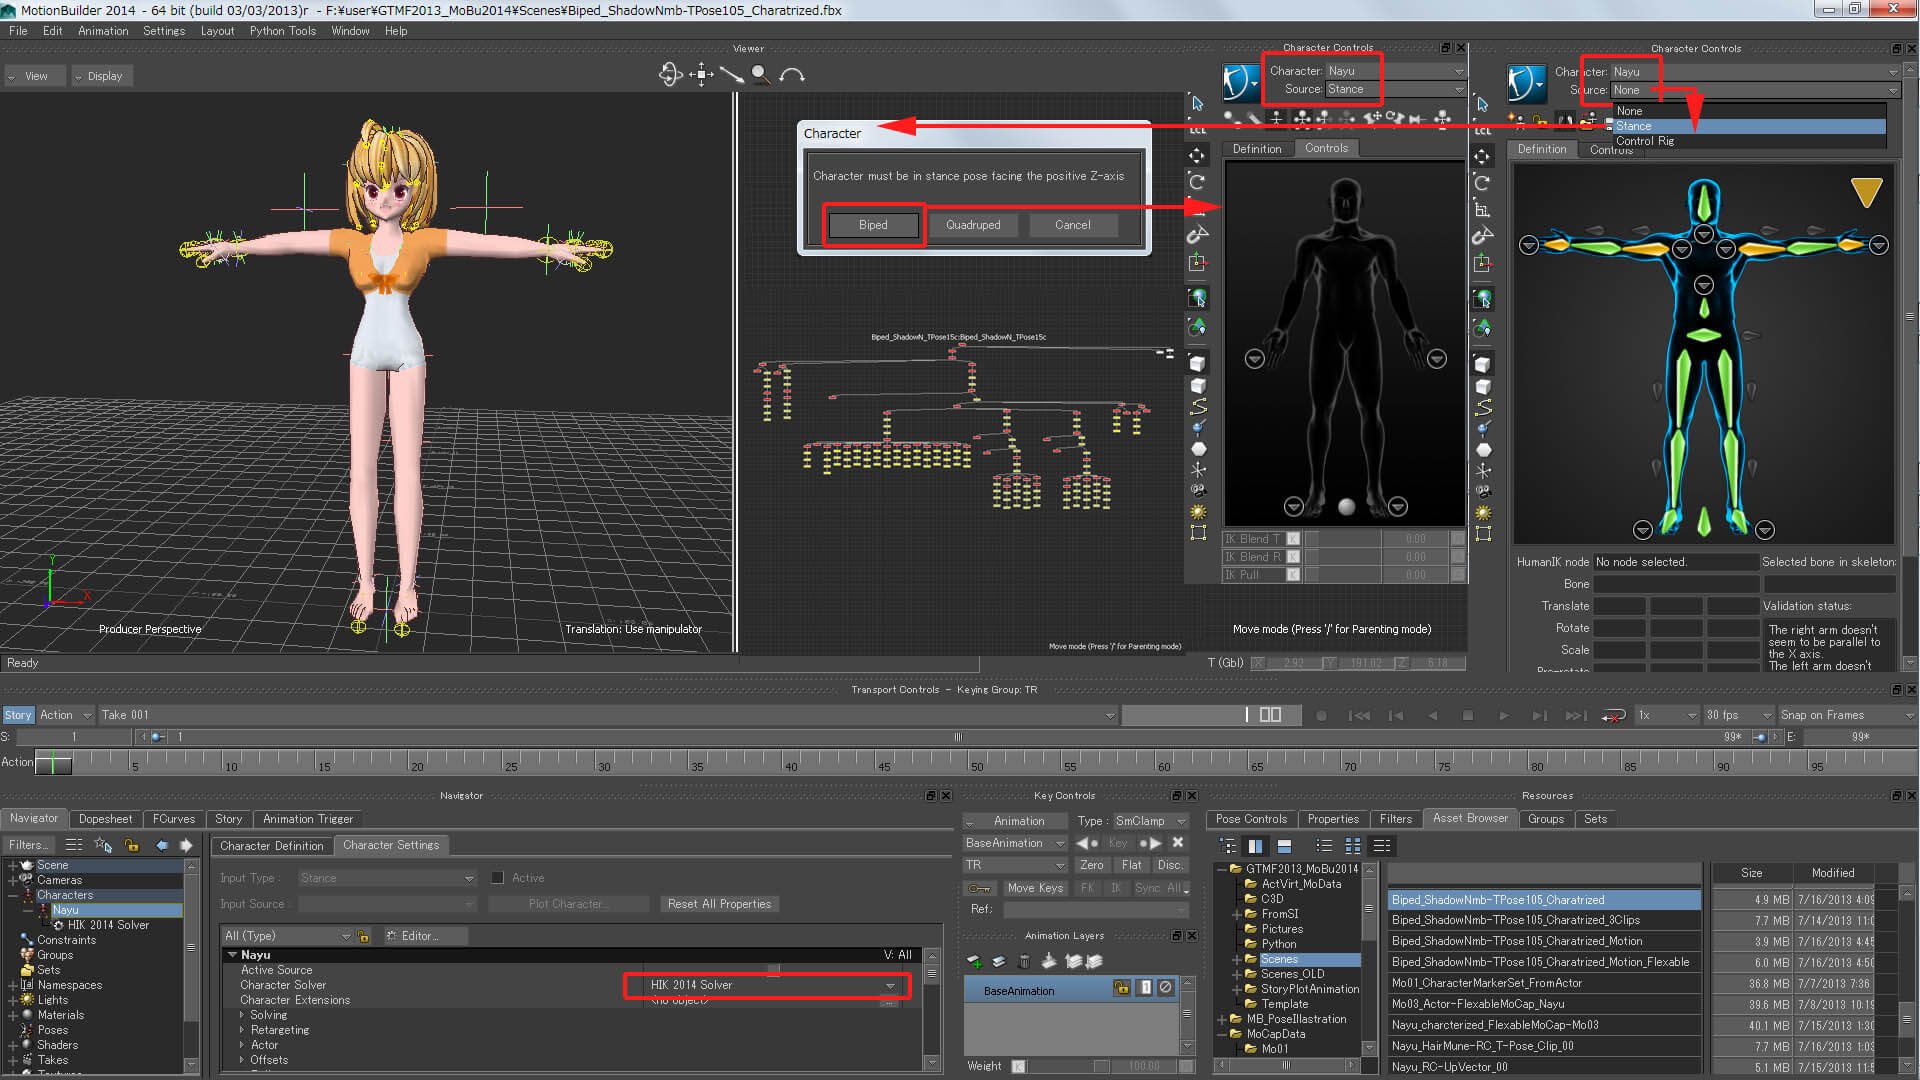 拡大画像あり ↑ LargeImageAttached モーションのマーカーをキャラクターとほぼ同じ位置に移動と拡大で合わせます。 Then , D&D a motion capture data(Ex ; Cap_Mo01_002_001) with C3DImport to View port , which has a TPose in it . Make the Markers Transform and Scale to fit to you character . 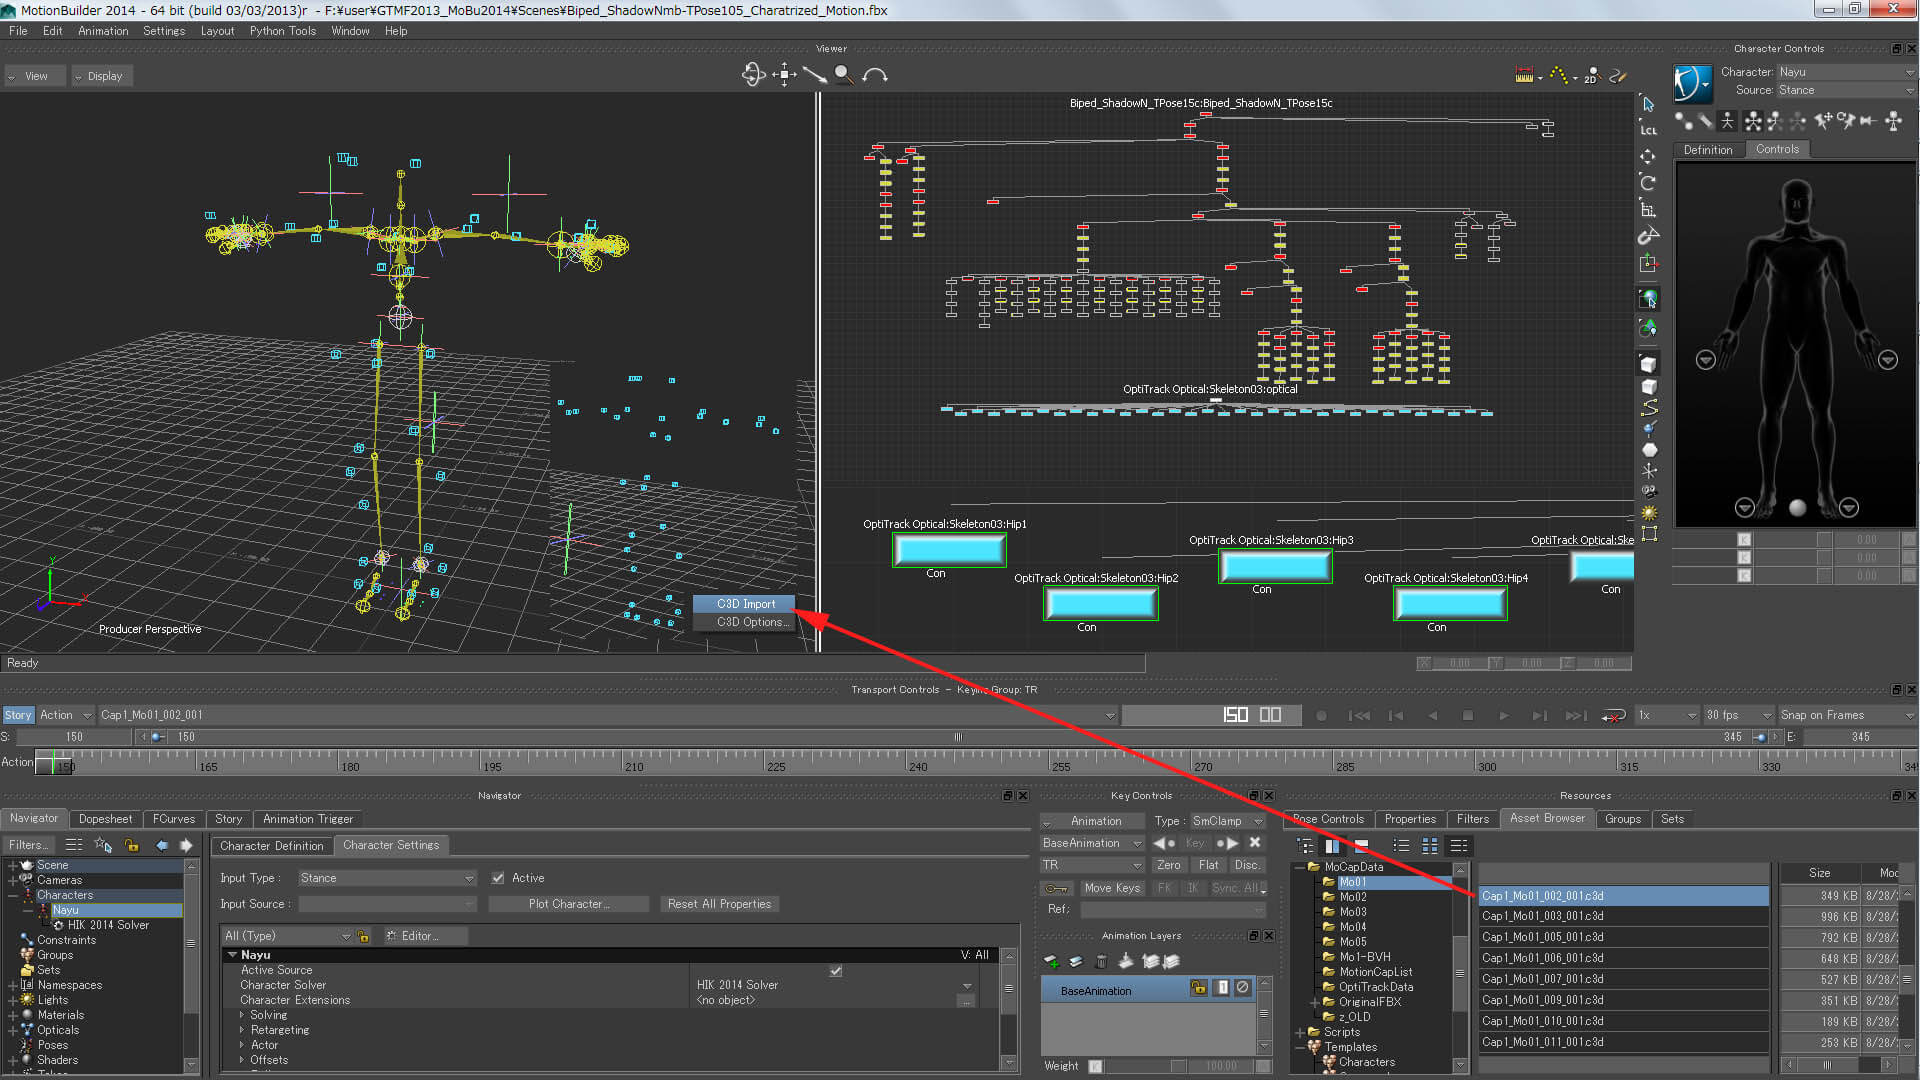 拡大画像あり ↑ LargeImageAttached ネームスペースを含めたフルネームだと、OptiTrack Optical:Skeleton03:Hip1 から Hip4 までを選択し、 Altキーを押しながら Biped_ShadowN_TPose15c:UpperBody にカーソルを合わせます。 すると、ポップアップのメニューが表示されるので 推奨(recommended)が付いているPosition and Rotation joint in markers(移動と回転)を選択します。 View画面上で各マーカーとUpperBody 間にリンクされた白色の表示と、赤色の十字マークが表示されます。 また、右上の CharacterControls 項目でキャラクターの Source がCharacerMarkerSetに切り替わったことに注目してください。 Contros 画面にも Hip にあたる部分に緑色の選択ポイントが作成されています。 更に、左下のNavigatorタブでも、Marker Set と Characters 内に CharacerMarkerSet が追加されています。 実はもうこれで動きます。フレームを再生するとマーカーの動きに従って腰の動きでキャラクター全体が移動するはずです。 Must start from character's HIP . Notice , the Markers has FullName with namespace , this must be remembered afterwards. Select OptiTrack Optical:Skeleton03:Hip1 to Hip4 , with + Alt Key , D&D to where Biped_ShadowN_TPose15c:UpperBody is. PopUp menu will appear , choose [recomended] which is Position and Rotation joint in markers In the view port , you can see a white line linhing 4 markers to the UpperBody object , with red + marked on . Also in the Control menu , a green selective point is appeared , and most important is , Character's Source is changed to CharacterMarkerSet . You can find CharacterMarkerSet in Navigator Tab , too. At this time , the character already moves with Hips movement. 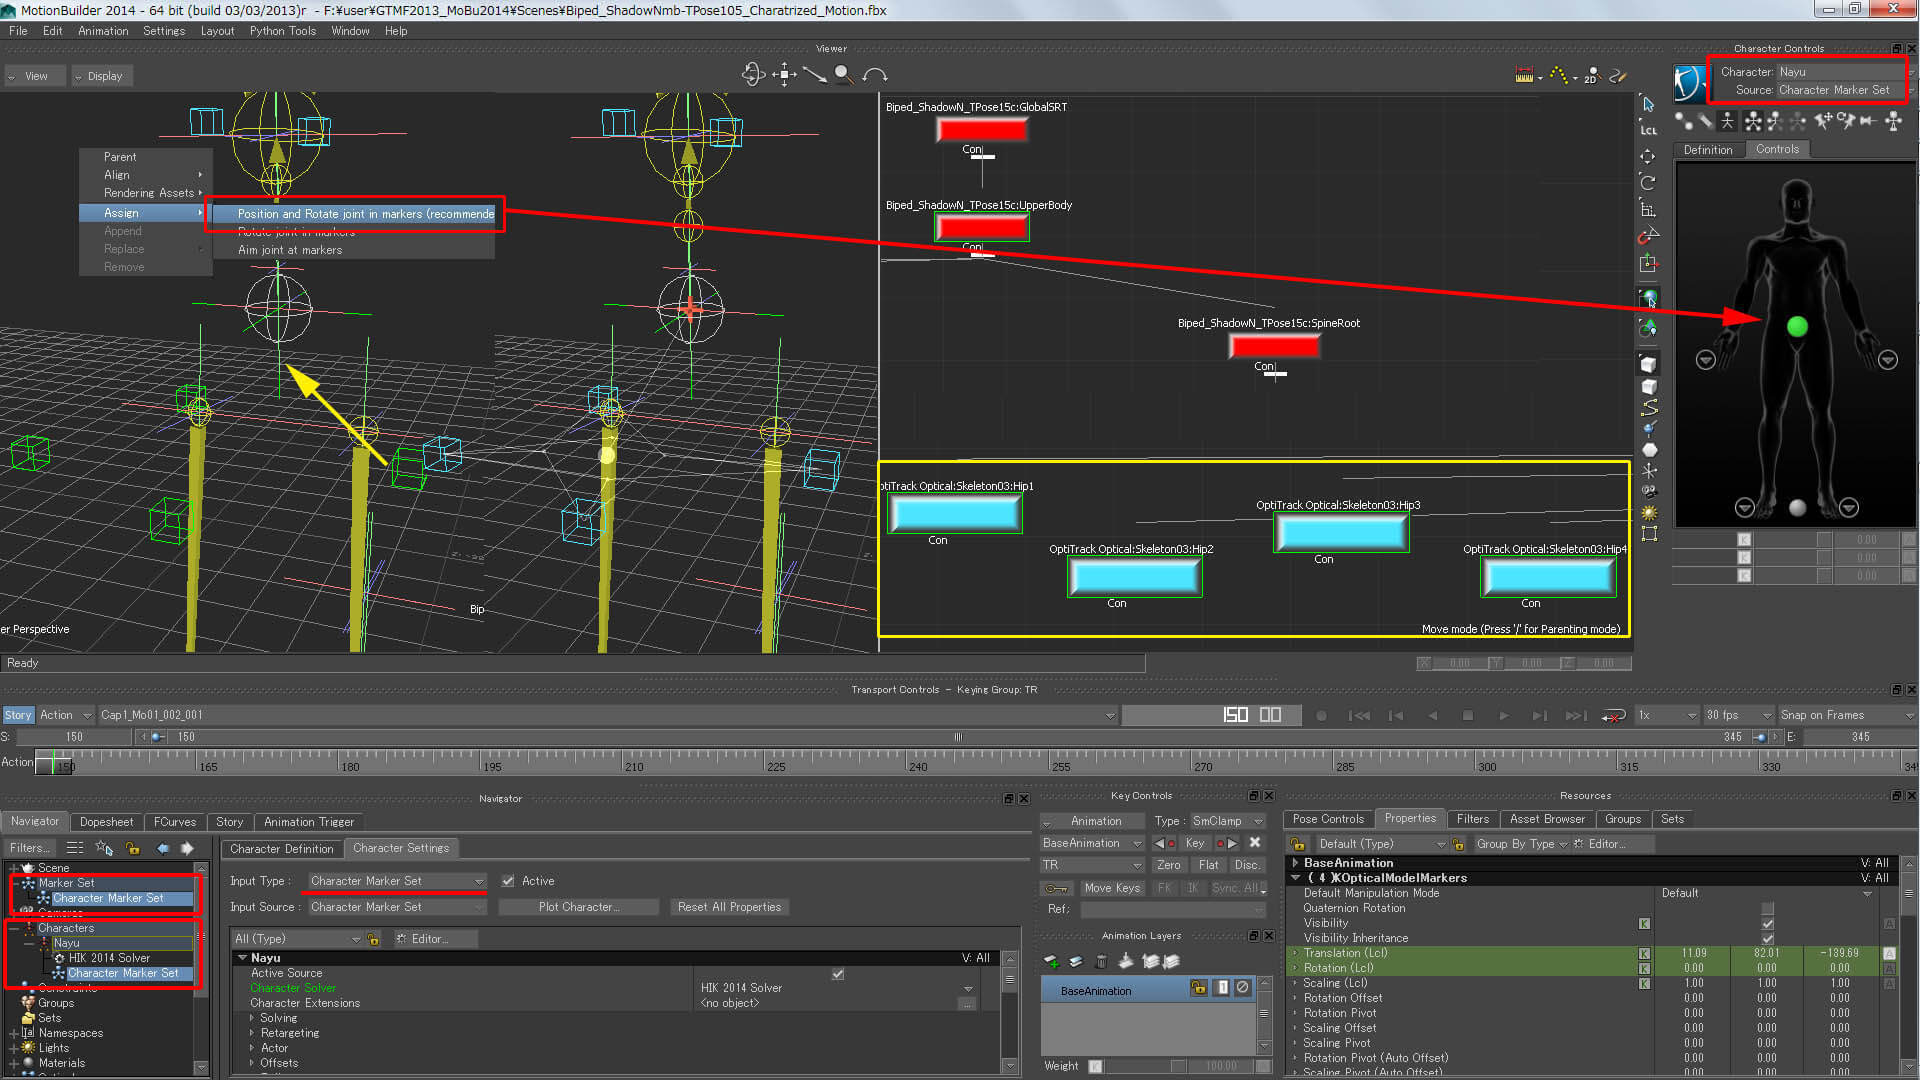 拡大画像あり ↑ LargeImageAttached 今度は背骨(Spine)を設定していくのですが、ポップアップのメニューの推奨(recommended)が付いているのは Rotation joint in markers(回転)になっていると思いますので、それに従って設定します。 次の3つのマーカーはOptiTrack Optical:Skeleton03:Chest1 から Chest3 までを選択し Biped_ShadowN_TPose15c:ChestBone_Root に Position and Rotation joint in markers(移動と回転)で接続します。 >> 一旦ここまでのシーンを保存しておくと後で続きが出来ます。 これを一体分やると完成するはずです。 The same markers can be set to different FK Null bones . Next is setting to Spines , the [recommened] is change to Rotation joint in markers , so do so. Next 3 markers OptiTrack Optical:Skeleton03:Chest1 to Chest3 is set to Biped_ShadowN_TPose15c:ChestBone_Root with Position and Rotation joint in markers . >> Save this scene . Doing to all bones will make it up . 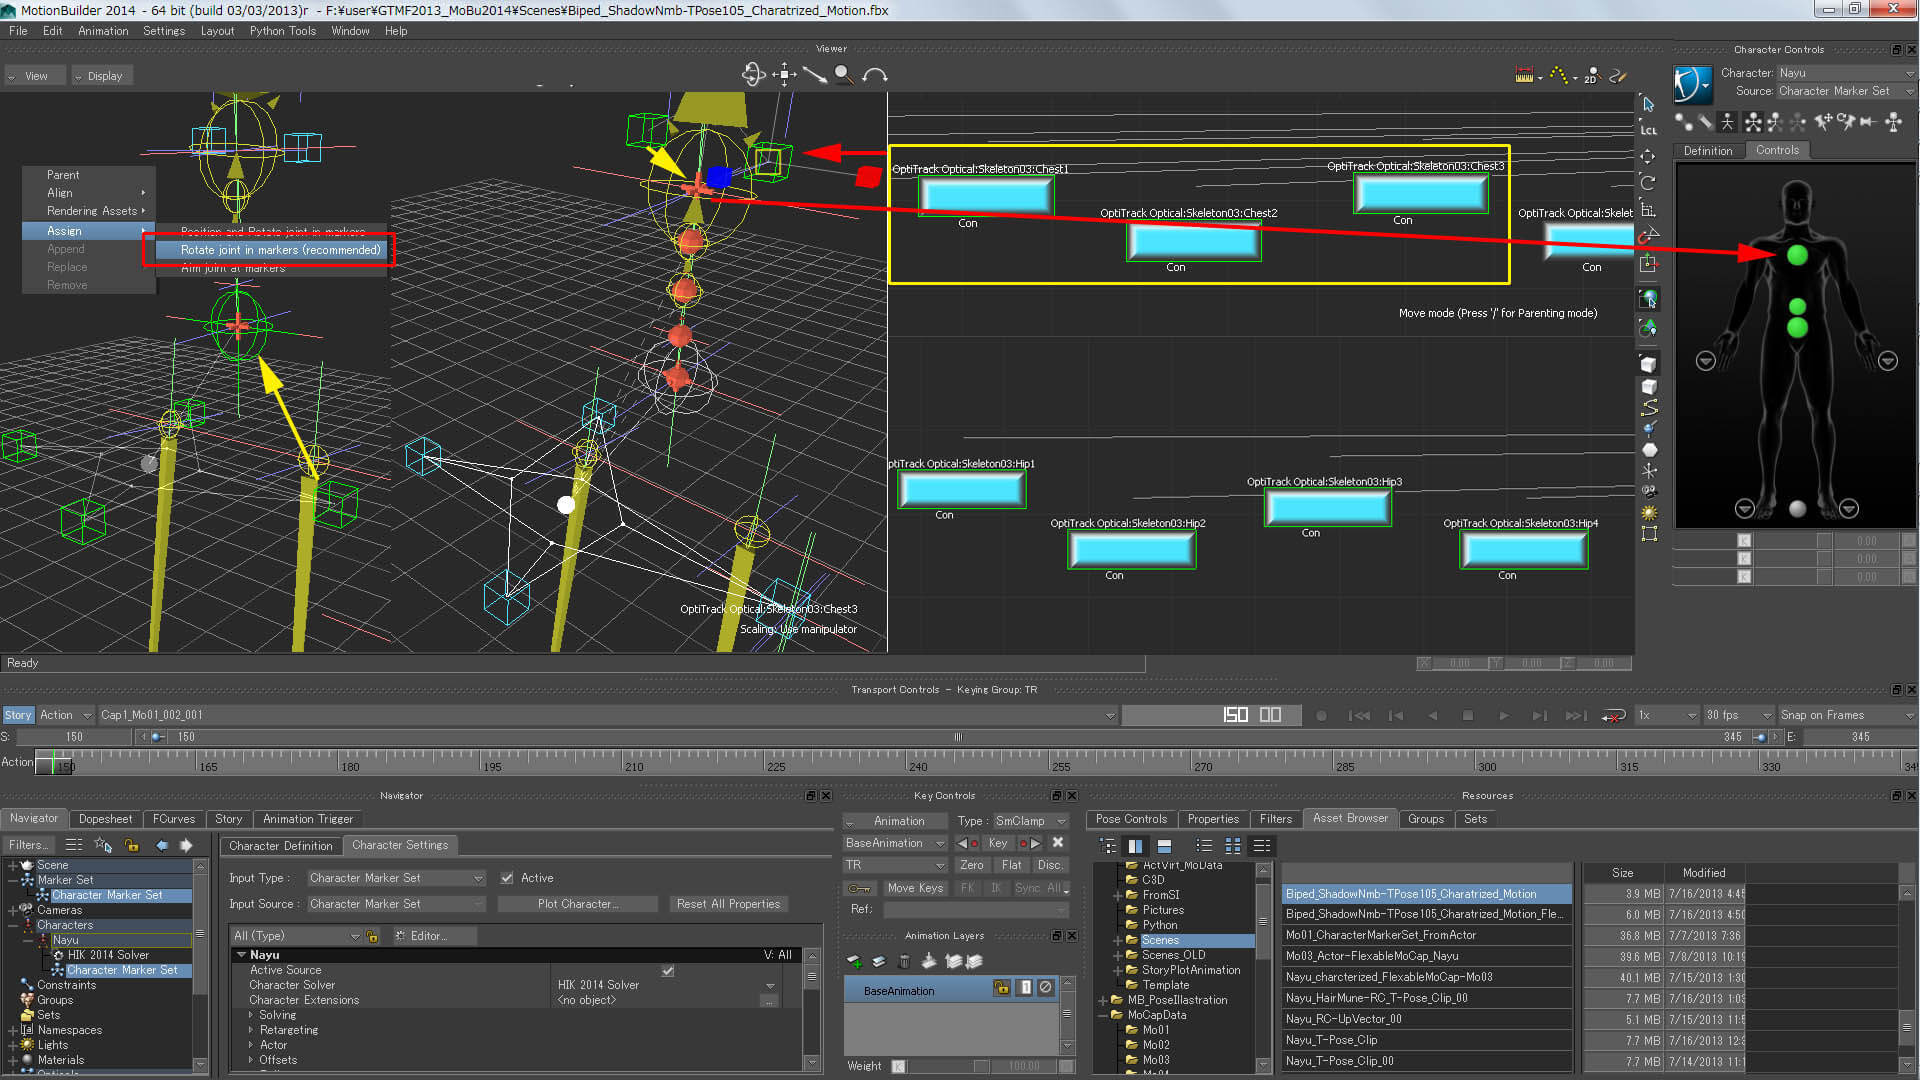 拡大画像あり ↑ LargeImageAttached 実はこの設定情報はテキストで保存と読込 が出来るのでそれて行っています。 更に、以前のActorを使った設定からも FlexibleMocap の設定が出来るようですので、 そこから引き継げばいきなり良いスタートが出来るのではないかと考えてみました。 But, the rest of this setting was not done by this way . This FlexiableMocap setting can be made by a simple text file and can be Save / Load . Also FlexiableMocap setting can be made from Actor setteings , so you can accomplish using already existing settings ., そこで、まずは一旦、Actorから FlexibleMocapの設定 を作ってみる手順を紹介します。 Then , let's get a setting from existing Actor settings. 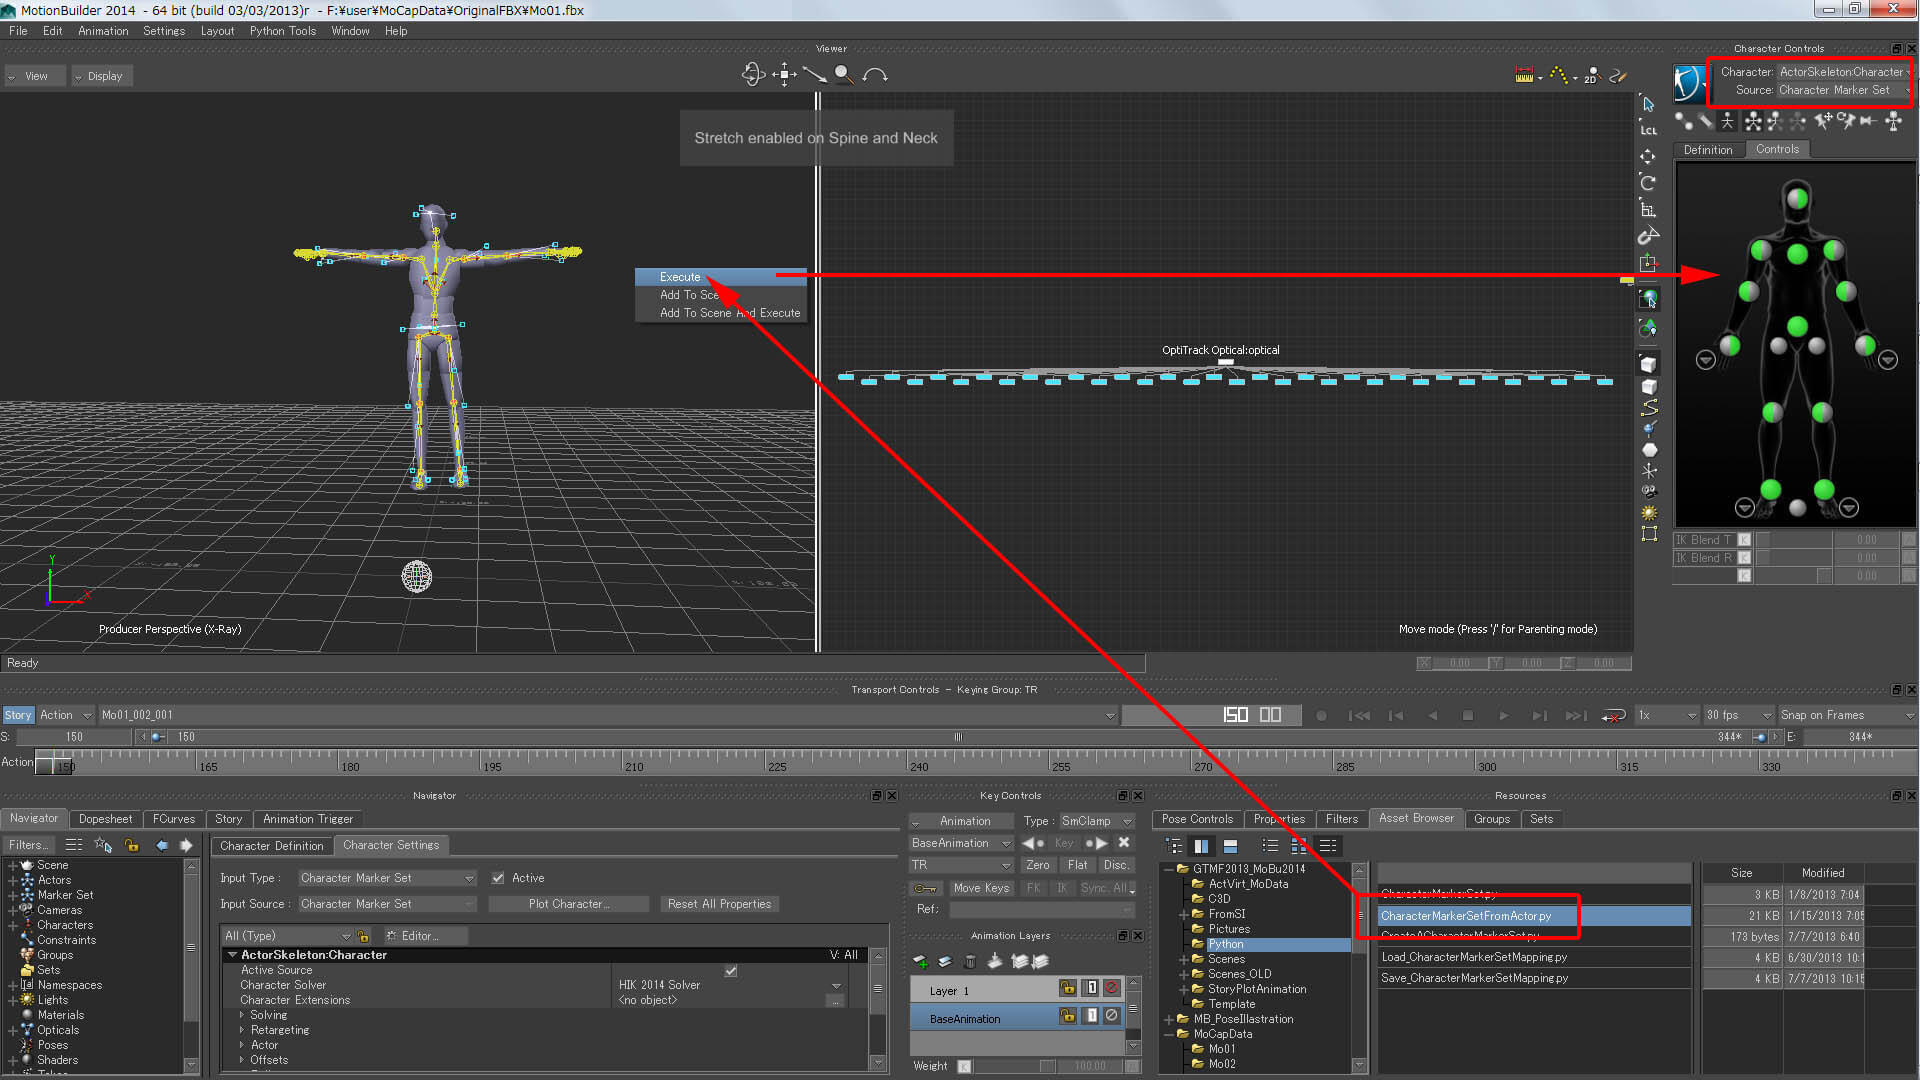 拡大画像あり ↑ LargeImageAttached 上記と同じモーション(例;Cap_Mo01_002_001)であるが、Actor付きのデータを読み込みます。(D&D > FBX Open > Cap_Mo01_002_001) Actor が表示され、右上のCharacteControls 画面は Character ; Actor / Source : Mapping となっているはずです。 この状態で、CharacterMarkerSetFromActor.pyを実行させます。 実はこのスクリプト CharacterMarkerSetFromActor.py はインストールされているディレクトリー C:\Program Files\Autodesk\MotionBuilder 2014\bin\config\Scripts\Samples\Character内に存在します。 Open a MotionCapture data (Ex ; Cap_Mo01_002_001) with Acter inside .(D&D > FBX Open > Cap_Mo01_002_001) An Actor will appear , and in the Right above CharacterControls window , Character ; Actor / Source; Mapping is shown D&D this python script CharacterMarkerSetFromActor.pyto main view and Execute it. This script is in the installed deirectory which is C:\Program Files\Autodesk\MotionBuilder 2014\bin\config\Scripts\Samples\Character (1)この CharacterMarkerSetFromActor.py をView画面上にドラッグ&ドロップして、表示されるポップアップのメニューからExecuteを選択して実行します。 すると、[Stretch enabled on Spine and Neck] なんて表示されるの、どこかをクリックして表示をなくすと、 右上のCharacteControls 画面をCharacter ; ActorSkeletonCharacter/Source : CharacterMarkerSet が選べるはずです。 この設定が欲しいのです。 そこで、今度はこの設定を保存してくれるスクリプトSave_CharacterMarkerSetMapping.py を実行させます。 (2)この Save_CharacterMarkerSetMapping.pyをView画面上にドラッグ&ドロップして、表示されるポップアップのメニューからExecuteを選択して実行します。 実行結果は解りにくい場所にC:\Users\ritaro\Documents\MB\2014-x64\config(C:ユーザー/ [ユーザー名] /マイドキュメント/MB/2014x64/Config) [PC名].[キャラクター名]_Mapping.txtという変なファイル名で出力されます。 (1)D&D CharacterMarkerSetFromActor.py to main view , choose [Execute] in the popup menu . Then [Stretch enabled on Spine and Neck] will appear , click anywhere to go on , In the CharacterControle window , you can choose Source as CharacterMarkerSetnow. We want this settings . So then execute this script Save_CharacterMarkerSetMapping.py (2)D&D Save_CharacterMarkerSetMapping.py to main view , choose [Execute] in the popup menu . The result has been done ,but in difficult place to find . It's in C:\Users\< user_name >\Documents\MB\2014-x64\config with a file name [PC_name].[Character_Name]_Mapping.txt. 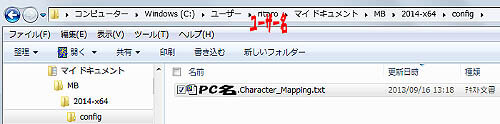 このテキストを開くと、こんなことが解ります。 This file is what actualy saved ,PC-Name.Character_Mapping.txt Openning this in text editor , you will knowtice ..... 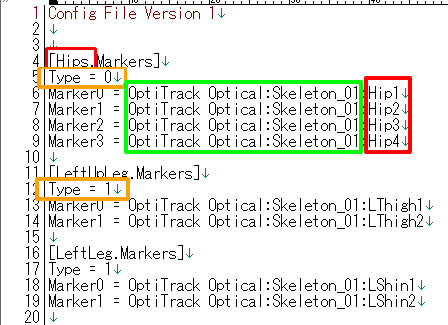
そこで、今回のキャラクター用に編集したものがこちらのファイルです。 >> PC-Name.Nayu_Mapping.txt 編集したのは、マーカーのフルネームを合わせて事、追記したのは Spine1 から Spine4 までを書いたことぐらいです。
Such as done , this is the one for this character >> PC-Name.Nayu_Mapping.txt 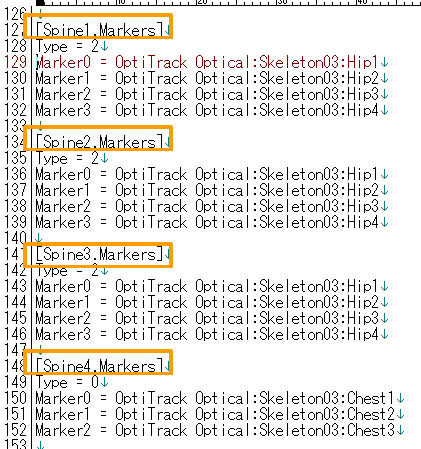 C:\Users\ritaro\Documents\MB\2014-x64\config(C:ユーザー/ [ユーザー名] /マイドキュメント/MB/2014x64/Config)内に保存し、 今度はこの設定を読み込んでくれるスクリプトLoad_CharacterMarkerSetMapping.pyを実行させます。 先ほど、腰までを設定したシーンの続きから始めます。 Next , place this PC-Name.Nayu_Mapping.txt under C:\Users\< User_Name >\Documents\MB\2014-x64\config run this script Load_CharacterMarkerSetMapping.py. (3)この Load_CharacterMarkerSetMapping.py をView画面上にドラッグ&ドロップして、表示されるポップアップのメニューからExecuteを選択して実行します。 (3)D&D Save_CharacterMarkerSetMapping.py to main view , choose [Execute] in the popup menu .  拡大画像あり ↑ LargeImageAttached 設定ファイルは必ずバックアップを取っておいて作業をすすめると元に戻しやすいです。 Run this script till you find the favorite settings . Do keep a backup file , so that you can go back to what was last . 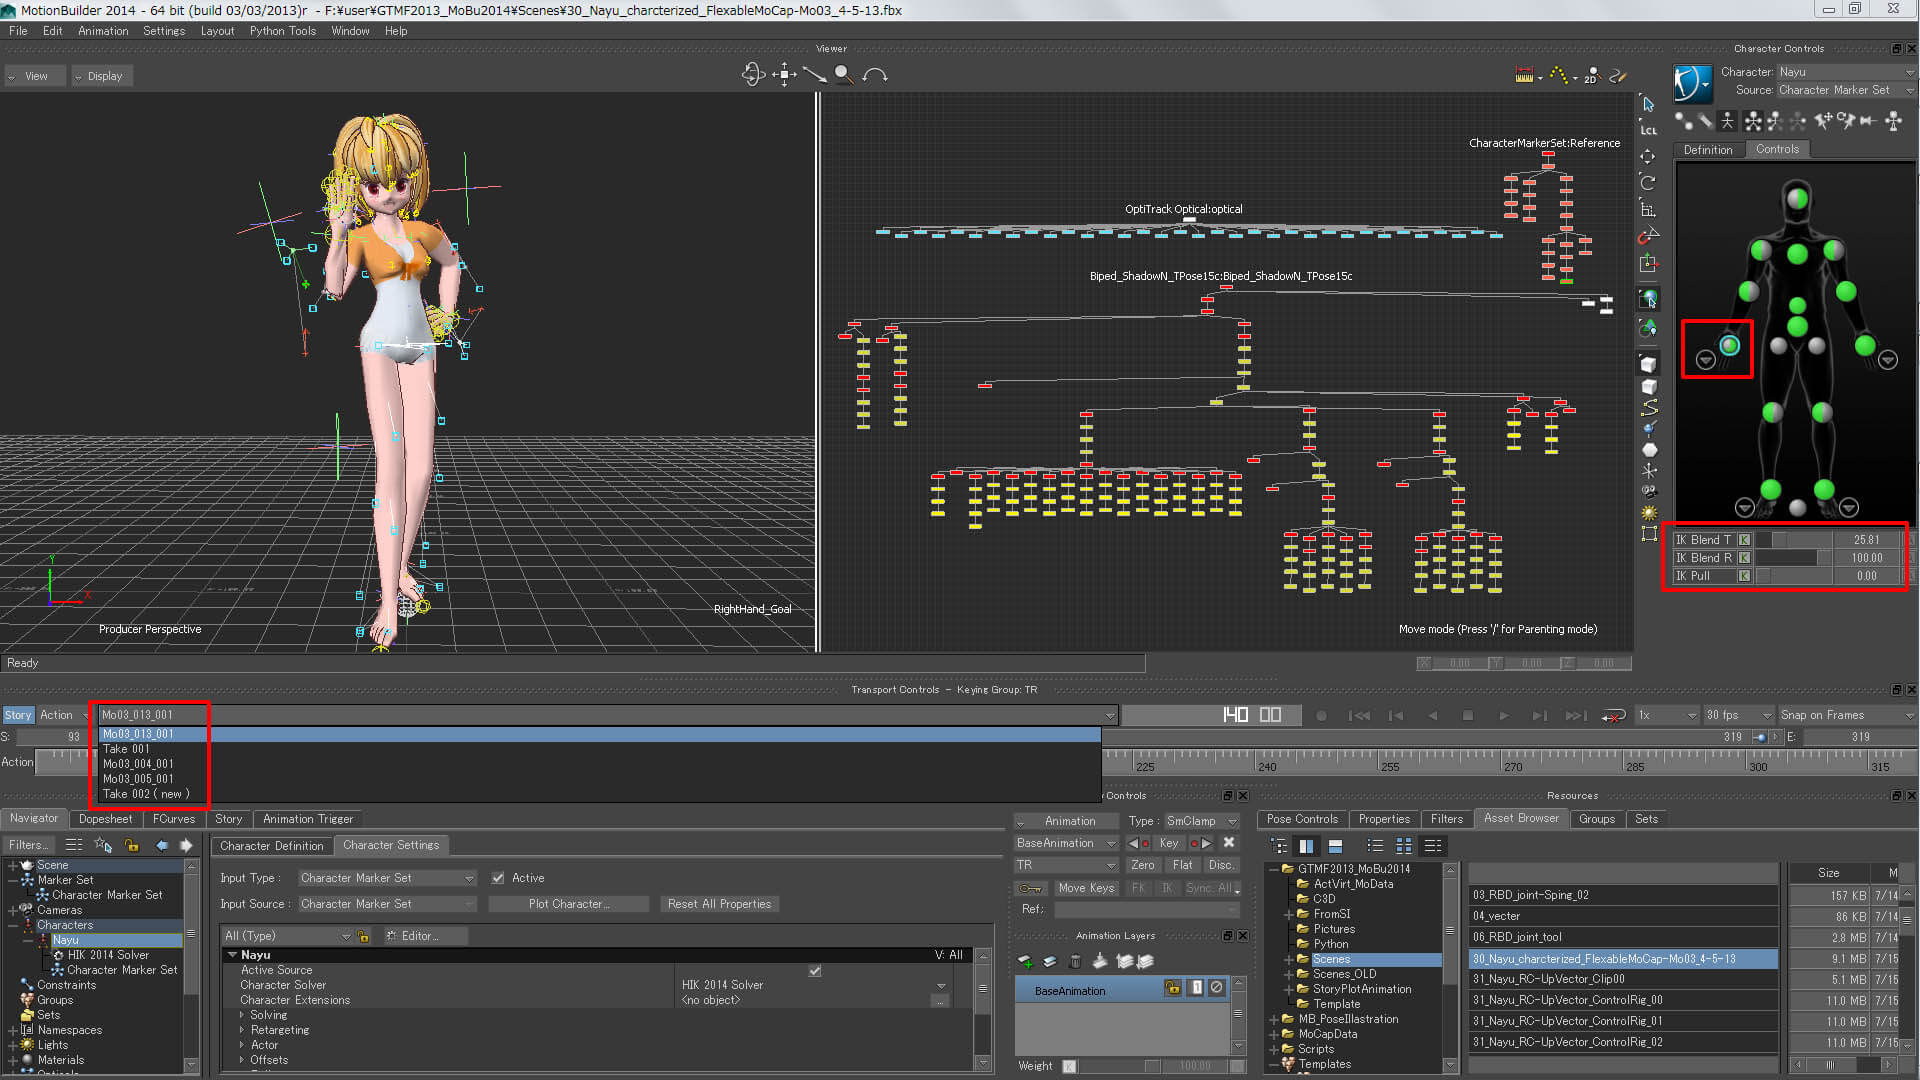 拡大画像あり ↑ LargeImageAttached モーションデータの動きと好みの動きの調整は、右上の CharacterControls 画面下のIK Blend T / IK Blend R の値を変更するだけでも出来ます。 If done , run in a scene with 3 motions , like in the Powpoint picture above . More character animation fixing can be done in CharacterControls Window , Sliding IK Blend T /IK Blend Ramounnt. |
欲しい動きをStoryのClip化、モーションの編集;Set needed Animation to Story's Clip, Editing Motion
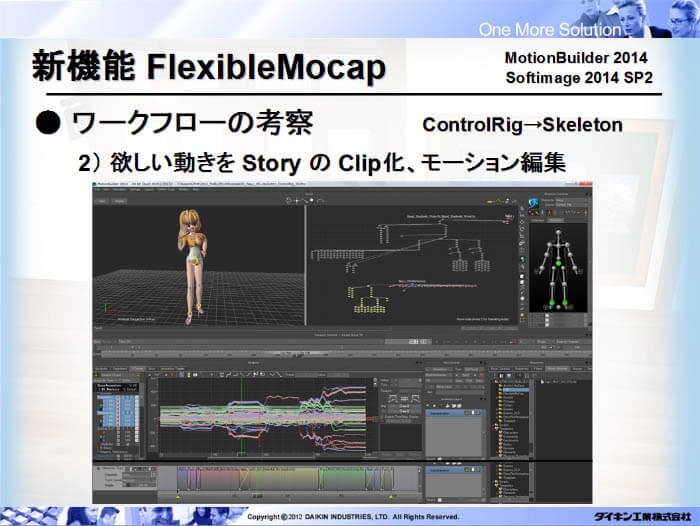 では、編集してうまい具合に1つ一連の動きに編集していきます。 色々なやり方があるかと思いますが、Softimageを扱っている方は AnimationMixer に慣れていると思うので StotyタブにあるClipを使った編集で行いたいと思います。 3 Motion has been tranfered to the skeleton . Next is editting the animation to fit as one animation. Many way can be thinked of , but Softimage users are familiar with AnimationMixer feature , so edit using Clip in Story tab .  拡大画像あり ↑ LargeImageAttached 欲しい動きのフレームの前後を設定します。(例; 開始 94 終わり 312 フレーム) タイムライン左上の [Story] のボタンが有効である青色であることを確認し、 Navigatot 項目の Storyタブを開くをTrackが表示させます。 Choose the Take (Ex ;Mo03_005_001) you want it to be in Clip first , set the start and end frame in timeline (Ex ;94 - 312 ) . Click the [Story] button in above timeline and make it tern Blue , open the Story Tab and show the tracks . (1)2段ある下側の何も無い部分を右マスククリックして表示されるメニューからInsert > Character Animation Track を選択します。 (2)CharacterTrack が出来るので、その中の Character 欄が [none] になっているので[キャラクター名(例;Nayu)] に設定してあげます。 (3)右上 CharacterControls 項目内の青色ボタンからBake(Plot)> Bake(plot)Skeletonを実行させます。 この時、キャラの骨構構造体を選択するとタイムライン上が全てキー設定されているはずです。 (4)CharacterTrack 上から右マスククリックして表示されるメニューから Insert Current Tale を実行させると、Tale名のClipが出来上がります。 同時に、右上 CharacterControls 項目内でCharacter;NayuSourceが Noneになり、StoryのClipだけで動くようになります。 (1)The track window is splitted in 2 part , RMB the lower part where nothing is there now , select Insert > Character Animation Track from the popup list menu . (2)A CharacterTrack has been made , change [none] to the character name (Ex ;[ Nayu ])in the Character Pulldown menu . (3)From the Blue button in the right above CharacterControls Window select Bake(Plot)> Bake(plot)Skeleton . After this , when you select skeleton structure , key appear in timeline in every frame . (4)RMB the CharacterTrack , select Insert Current Tale from the popup menu . A Clip will be made with Take name . At same time , in the CharacterControls Window , Character Source will change to [none] and the character will move using Story Clip data . 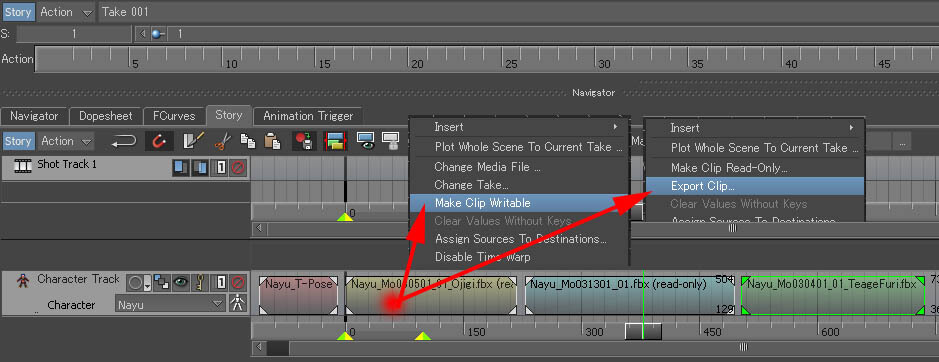 拡大画像あり ↑ LargeImageAttached が表示されるので、任意の場所に各Clipを書き出し保存することができます。 やり直しの為、とモーションライブラリーを作成するという意味でも、モーションを Clip として保存しておくのは後々便利かと思います。 Make 3 motions to 3 Clips , if it is in (Read only) , set it toMake Clip Writable , And then do Export Clip.. , save clip to any directory . For redo and also for making a motion library, saving motions to Clip is very usefull .  そして動きのタイミンだけは合わせておいて、あとは動きをざっくりと仕上げていきます。 ここからは、この一連の動きを元にアニメーションの編集をしていきます。 MotionBuilderにおけるアニメーション編集の強みは、なんと言ってもAnimationのLayerとフルボディーIKです。 そこで、この一連のClipの動きをControlRigで扱えるようにします。 Next , cut the Clip with Razor tool the unwanted part , and mix Clips to fit the animation . At this point , the movements timing is the most important thing , animation itself can be fixed more later . The most outstanding feature in MotioBuilder is AnimationLayer & FullBodyIK . So , to use this feature , transfer this animation to Control Rig . 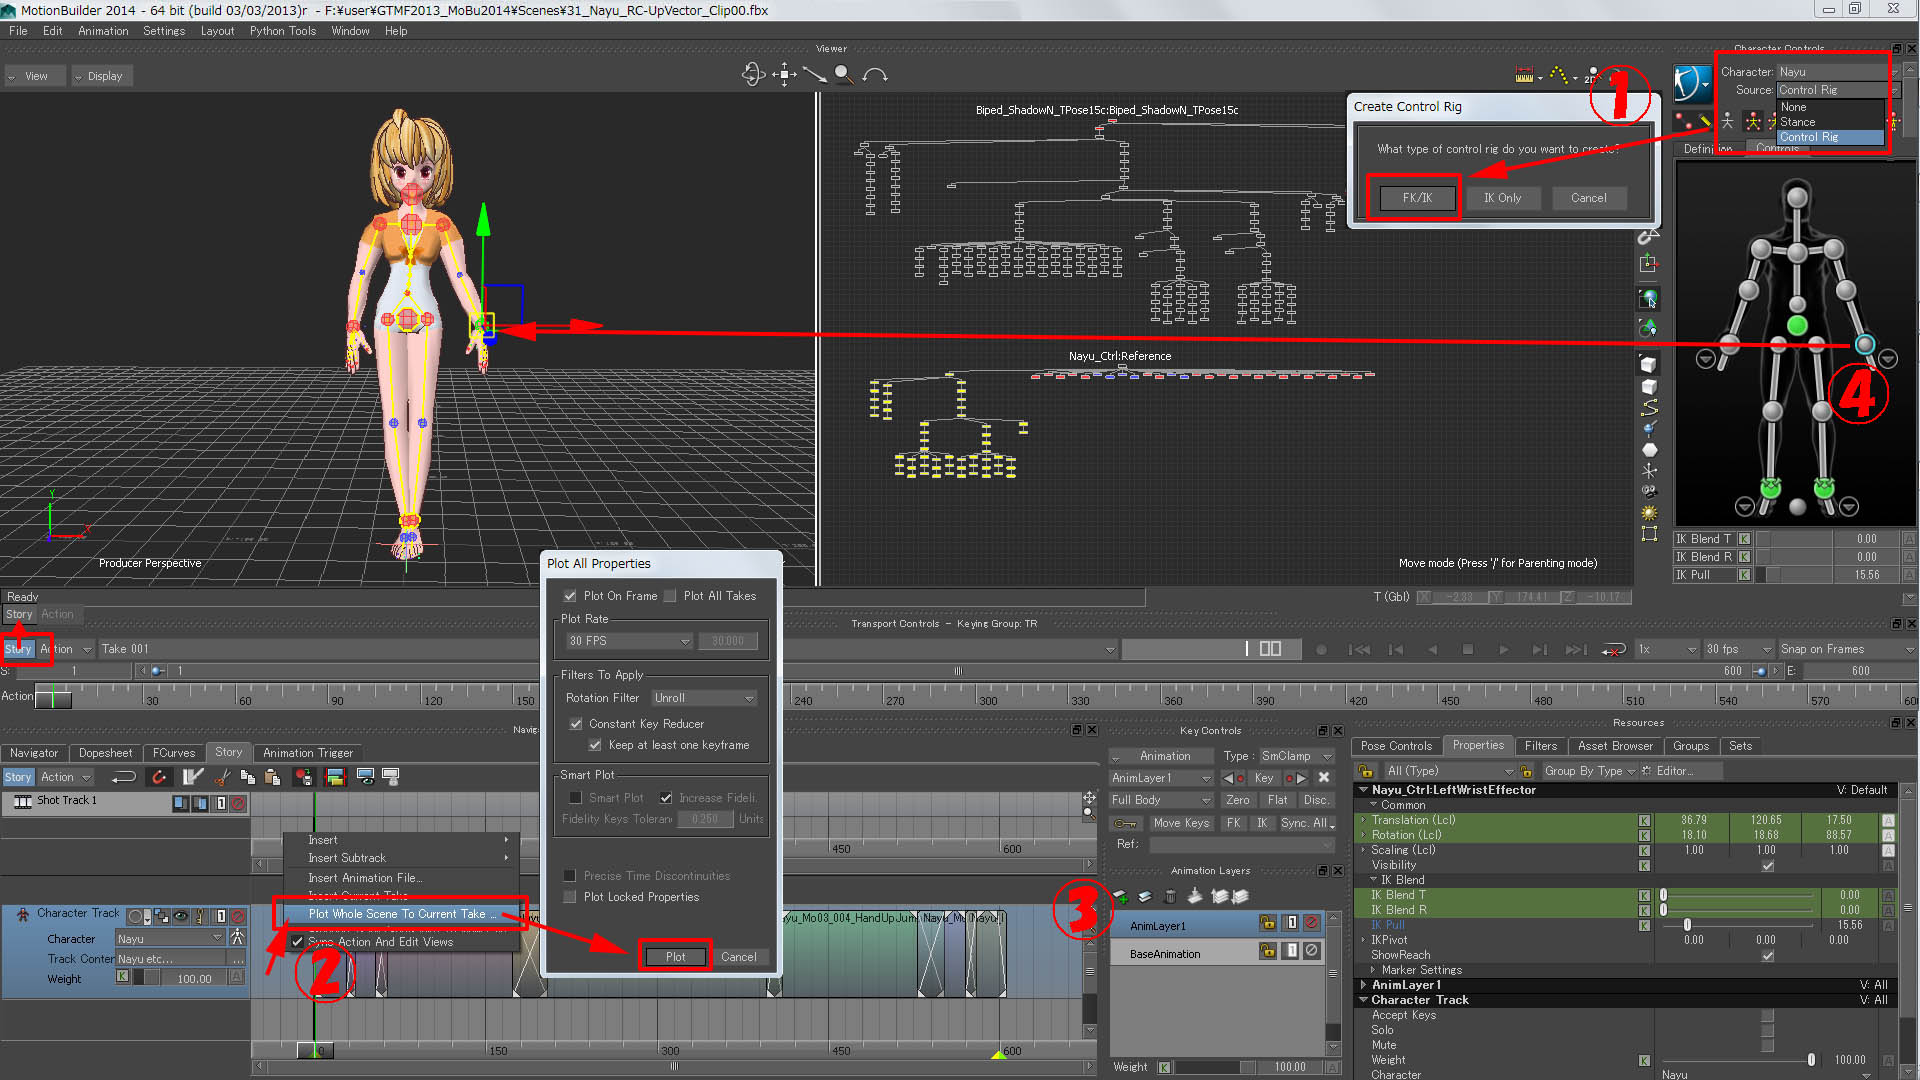 拡大画像あり ↑ LargeImageAttached (2)CharacterTrack上を右マウスクリック>PlotWhole Scene To Current Take .... を選択して、表示されるメニューから [Plot]を押します。 タイムライン左上の青色の「Story」 を押してグレーにしすると、もうファンクションカーブで ControleRig が動いています。 (3)AnimationLayer1 を作成し、 (4)ControleRig を動かしてキーを打ったものはLayer1に登録されるようにします。 (1)In the right above CharacterControls Window , change Character Source to [ControleRig] chooze[FK/IK] from popup menu . (2)RMB the CharacterTrack , select PlotWhole Scene To Current Take ...from the popup menu . chooze[Plot] from popup menu . (3)Make AnimatonLayer1 (4)If you set a key on ControleRig then the keys will be made inside AnimatonLayer1 . 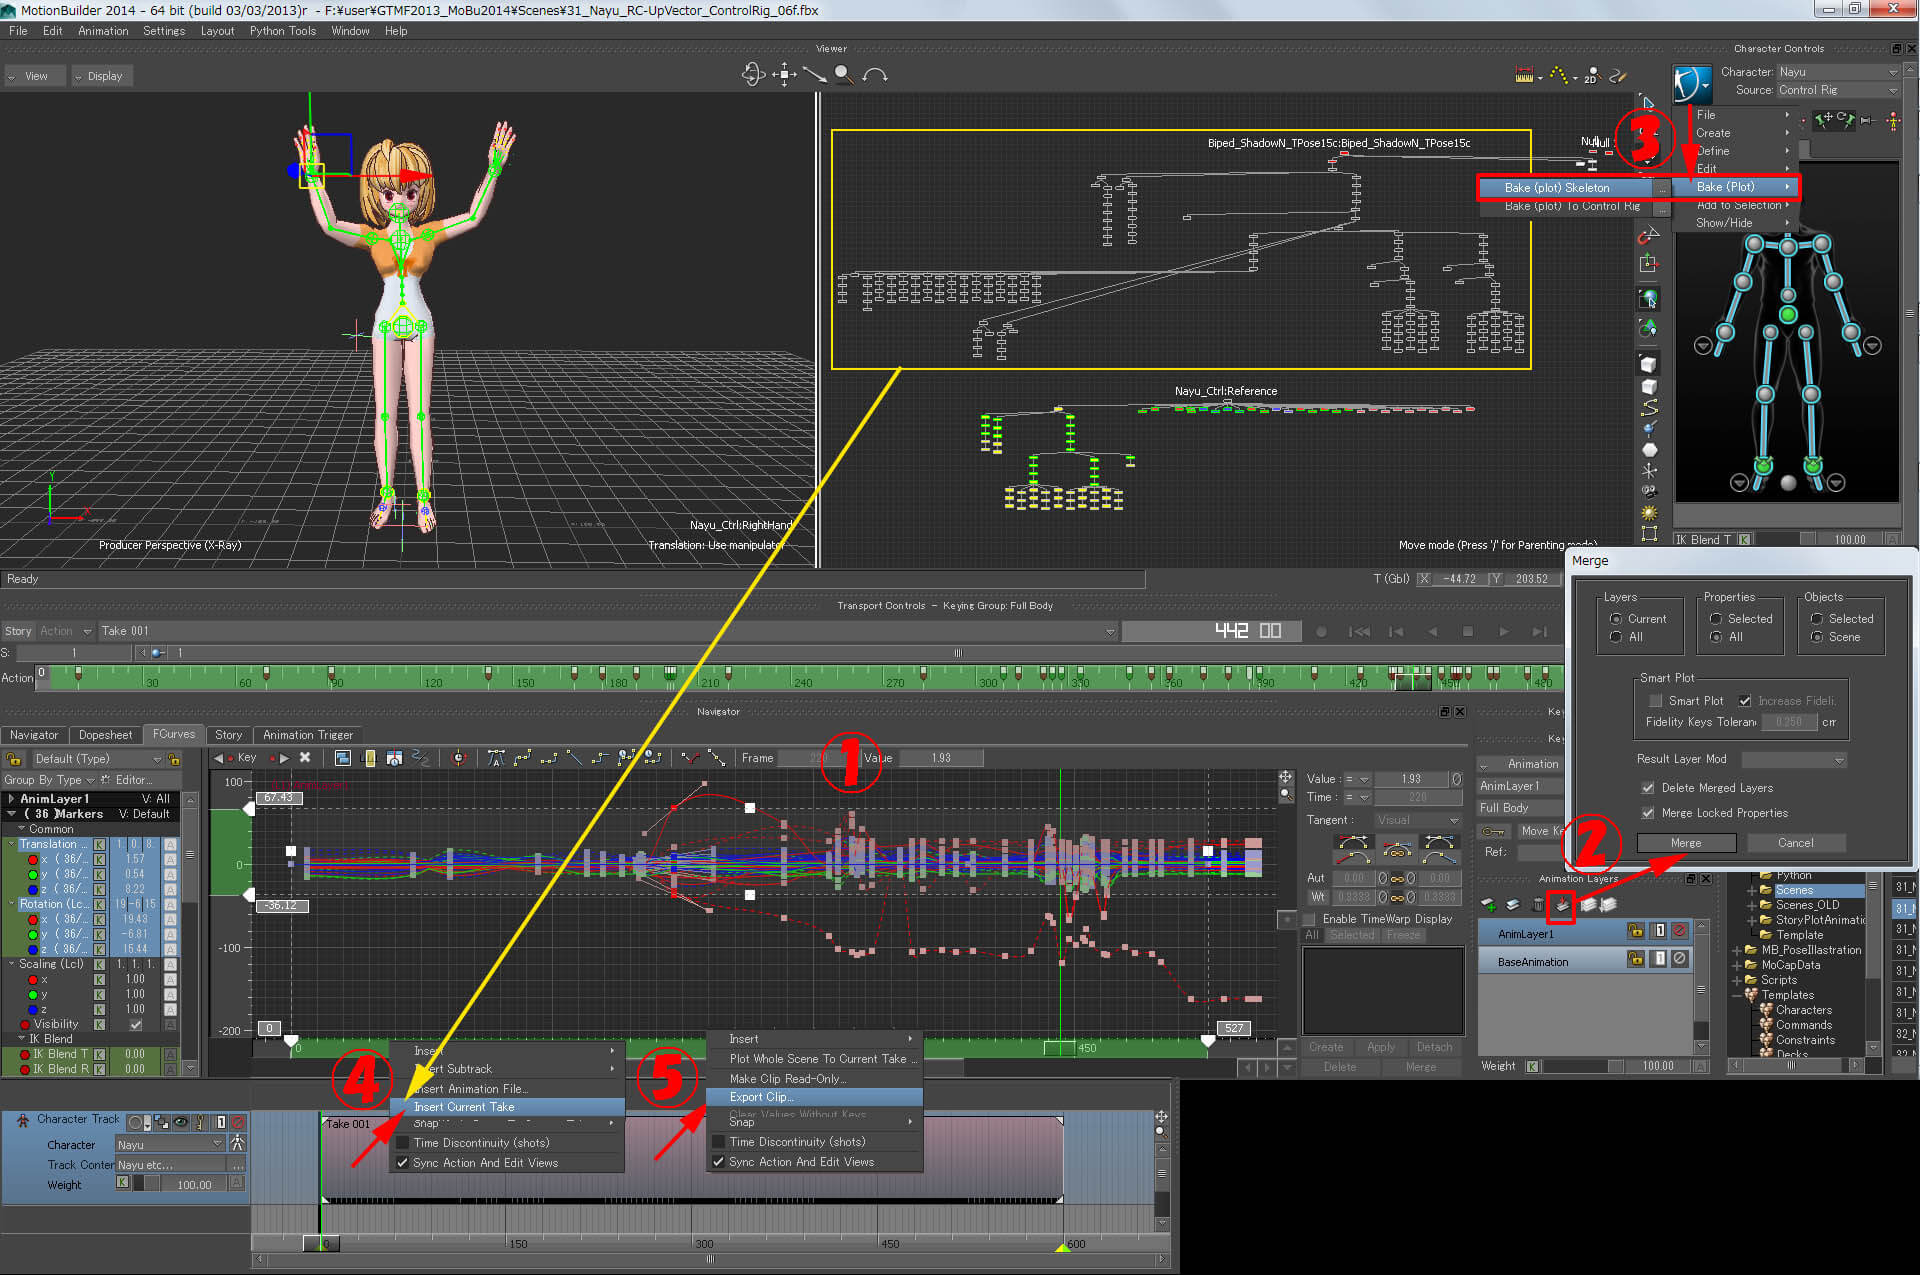 拡大画像あり ↑ LargeImageAttached (2)AnimationLayer1 と BaseAnimation のレイヤを1つの結合します。 (3)右上 CharacterControls 項目内の青色ボタンから Bake(Plot)> Bake(plot)Skeleton を実行させます。 再び骨構造体にアニメーションが乗ってきます。 (4)CharacterTrack上から右マスククリックして表示されるメニューから Insert Current Tale を実行させると、Tale名のClipが出来上がります。 (5)出来た Clip 上から右マスククリックして表示されるメニューから Export Clip.. でこのClipを名前を付けて保存します。 (1)The keys set in AnimatonLayer1 , isnt no so close to each other . Fixes are made by reasonable keys , which may have some experience . (2)Merge layer , AnimatonLayer1 and BaseAnimation . (3)From the Blue button in the right above CharacterControlsWindow select Bake(Plot) > Bake(plot)Skeleton . Again, the animation comes back to skeleton structure . (4)RMB the CharacterTrack , select Insert Current Tale from the popup menu . A Clip will be made with Take name . At same time , in the CharacterControls Window , Character Source will change to [none] (5)RMB the Clip , select Export Clip.. from the popup menu, and save clip to any directory . |
UpVecter 付きアニメーションの作成; Making Animation with UpVector
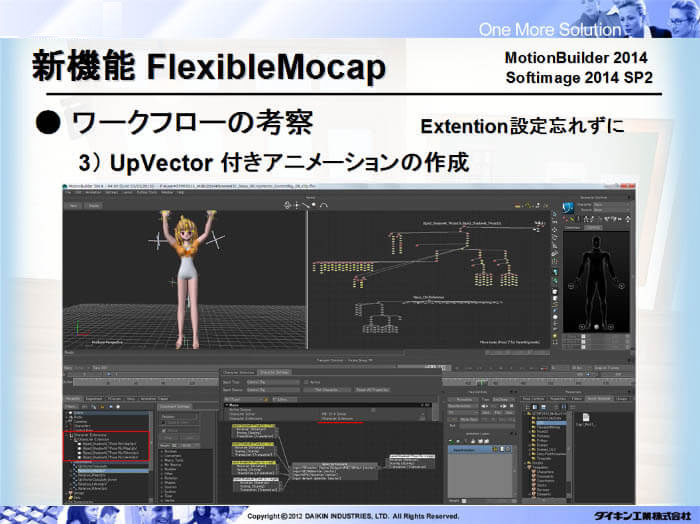 その前に、このRelationConsrtraintを設定してあるシーンには設定が必要なので、それをまず先にします。 In this chapter, we open a scene with the RelationConstraint, and add laodding the Clip we made above to the Story Character Track . But before , we have to make some settings in the RelationConstraint scene . 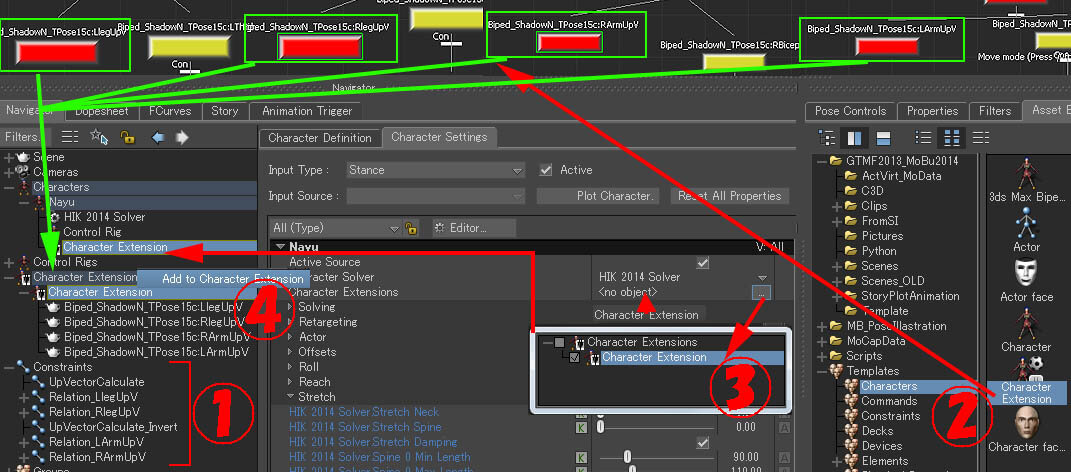 拡大画像あり ↑ LargeImageAttached 付属物をキャラクターに追加認識させるCharacterExtentionを設定します。 キャラクターの付属物としては、盾や剣、帽子、そして髪の毛なんていうものをここで登録出来ます。 キャラクタライズされたシーンを表示します。 To handle objects like UpVector and Hair that are not been included in characterize list, you have to add a setting calledCharacterExtention . Open the scene with the Characterize character scene . (1)RelationConstraint を保存してあるファイルをマージで追加読み込みします。 (2)AssetBrowser から Templates > Characters > CharacterExtention を View画面上にドラッグ&ドロップします。 すると、Navigatorタブ項目内にCharacterExtention ノードが追加されるのですが、キャラクター名(例;Nayu)以下には来ていません。 (3)キャラクター名(例;Nayu)をダブルクリックし、CharacterSettings タブ内CharacterExtention の右側にある [...] ボタンをクリックして 選択ウィンド内で□ CharacterExtention[レ]CharacterExtentionにチェックを入れて閉じると、 キャラクター名(例;Nayu)以下にCharacterExtention が現れます。 (4)View画面上から4つのUpVecterオブジェクトを選択して、AltキーをおしながCharacterExtention上に持って来ると [Add to CharacterExtention ] と表示されるので、それをクリックします。 (1)Marge the scene with RelationConstraint . (2)From AssetBrowser , D&D Templates > Characters > CharacterExtention to view window . When dropped , CharacterExtention node will be added to Navigation Tab but it isn't listed under character name (EX; Nayu). (3)Doble click the character name(EX; Nayu), in the CharacterSettings Tab click the [...] button of CharacterExtention , check in the [] CharacterExtention in the popup menu . CharacterExtention node will appear under character name(EX; Nayu). (4)Select 4 UpVector objects , D&D with +Alt Key to CharacterExtention node [Add to CharacterExtention ] menu will appear , click it . 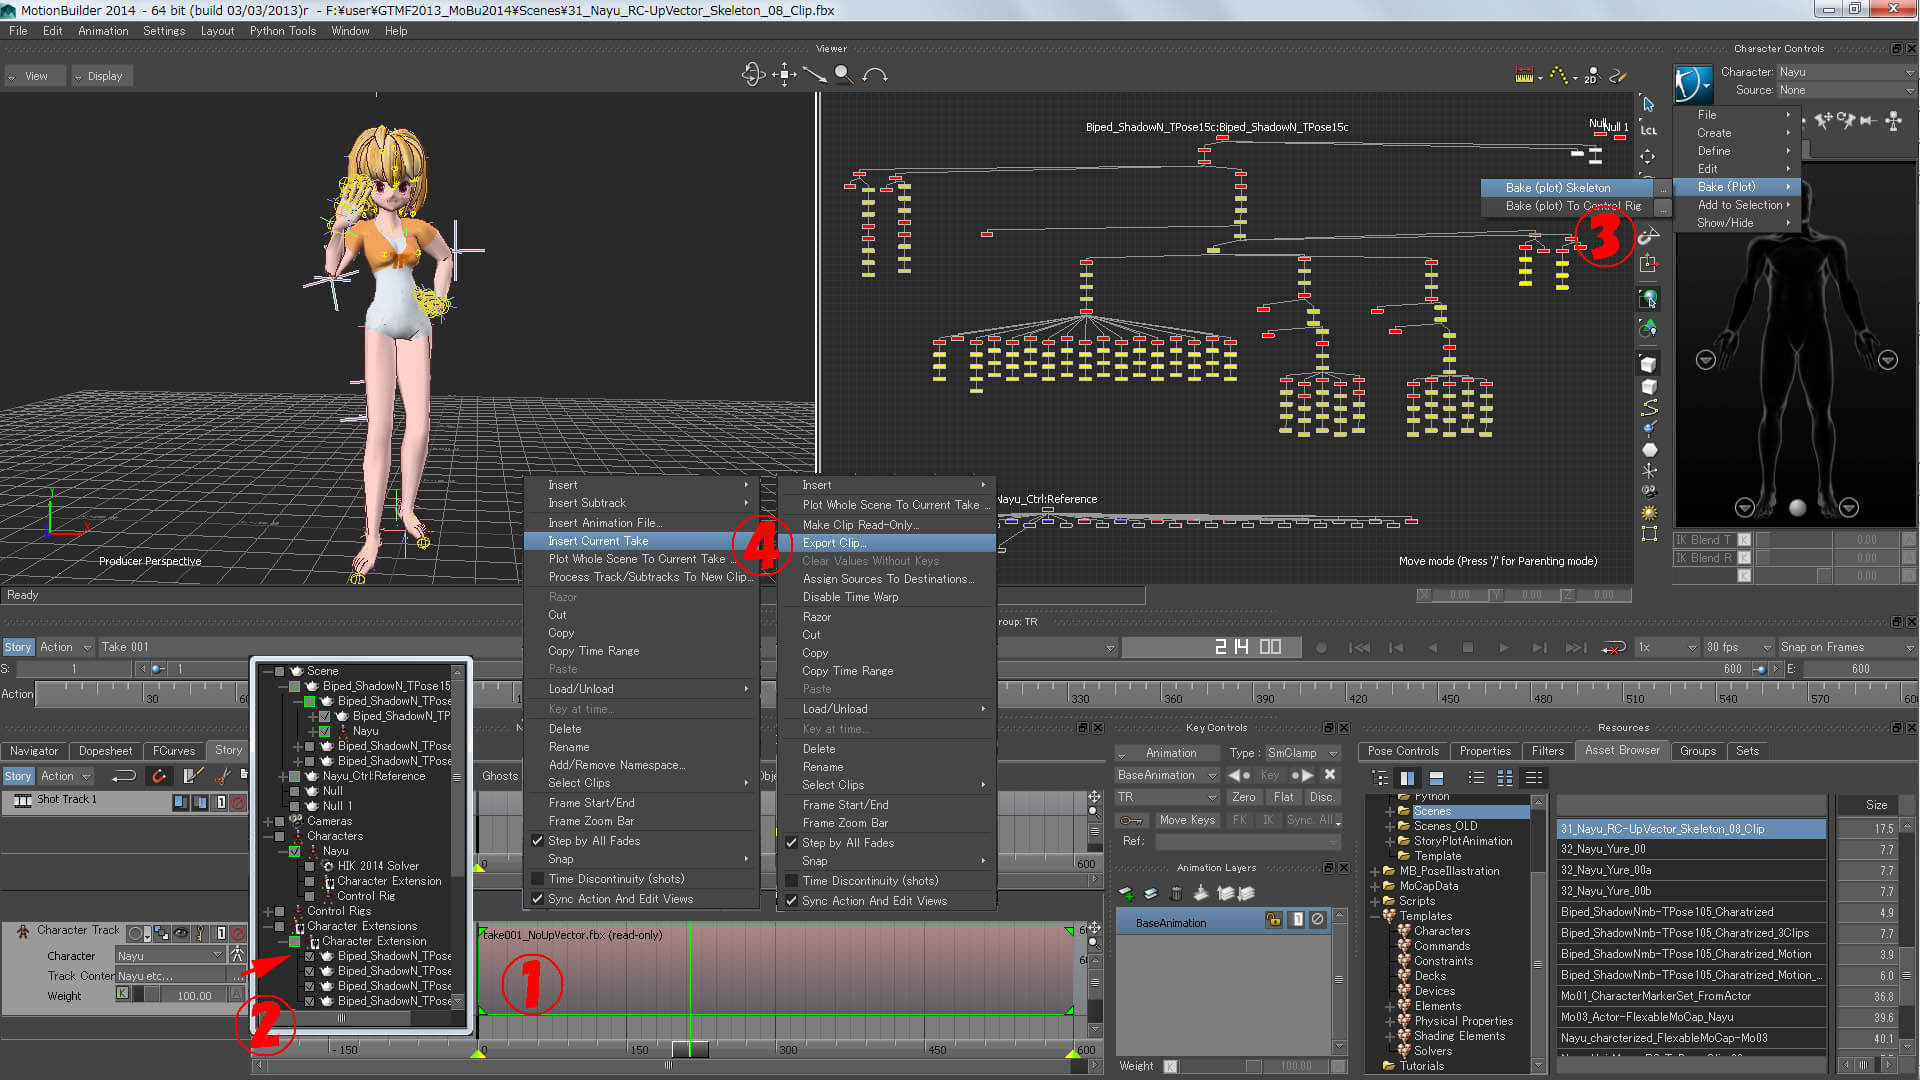 拡大画像あり ↑ LargeImageAttached (1)Insert > Character Animation Track でキャラクターアニメーション用のトラックを作成し、 UpVecter無しのClipを読み込みます。 (2)その際、 Character はキャラ名(例;Nayu)で TrackCounter の[...]ボタンを押して、CharacterExtentionが含まれているか確認します。 (3)右上 CharacterControls 項目内の青色ボタンからBake(Plot) > Bake(plot)Skeleton を実行させます。 これで今回はUpVecterか計算され動いているデータになります。 (4)CharacterTrack上から右マスククリックして表示されるメニューから Insert Current Tale を実行させると、Tale名のClipが出来上がります。 出来た Clip 上から右マスククリックして表示されるメニューから Export Clip..でこのClipを名前を付けて保存します。 OK , let's make the animation with UpVectors . (1)ChooseInsert > Character Animation Track in Stoy and make a Charcter track , load the clip that hasn't UpVecter animation to the track . (2)Check the list in Character name(EX; Nayu)from [...] button , see the CharacterExtention is included . (3)From the Blue button in the right above CharacterControls Window select Bake(Plot) > Bake(plot)Skeleton . This time , the animation is including UpVectors . (4)RMB the CharacterTrack , select Insert Current Tale from the popup menu . A Clip will be made with Take name . RMB the Clip , select Export Clip.. from the popup menu, and save clip to any directory with any name. |
ユレモノ付きアニメーションの作成 → FBX出力;Making Spring like animation → Export FBX
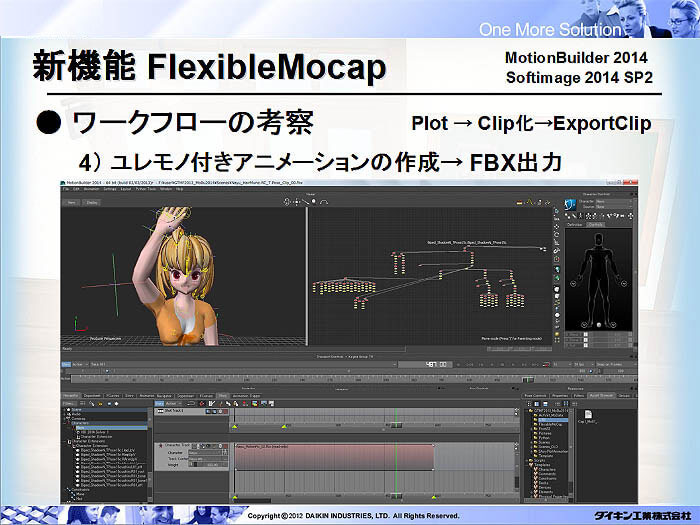 各工程でClipアニメーションを出しているのは、そこの工程でいくらでもやり直しが出来るように、です。 ユレモノの調整は特に多そうです 先ほど作成した UpVector付き Clip をキャラクタートラックに乗せる前に、まずはシーンの設定です。 Last , is a bit experimental . The meaning of saving Clips at each chapter is you can go back to each stage to fix it . This chapter will need more tryout . Again , before loading the animation clip with UpVector , some setting has to be made to the scene . 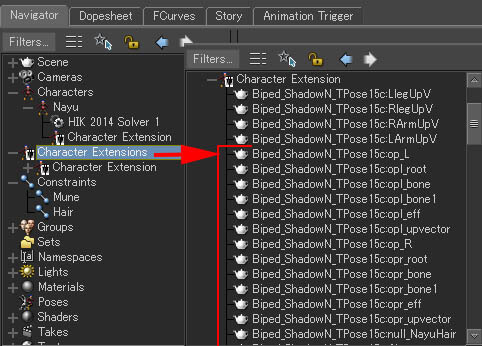 CharacterExtentions 内には胸と髪の毛の全てのボーンが登録されています。 In the Navigation Tab , under Consrtaints there are RelationalConstraint (EX; Mune , Hair) for chest and hair . Also under CharacterExtentions ,all skeleton of chest and hait has been added . 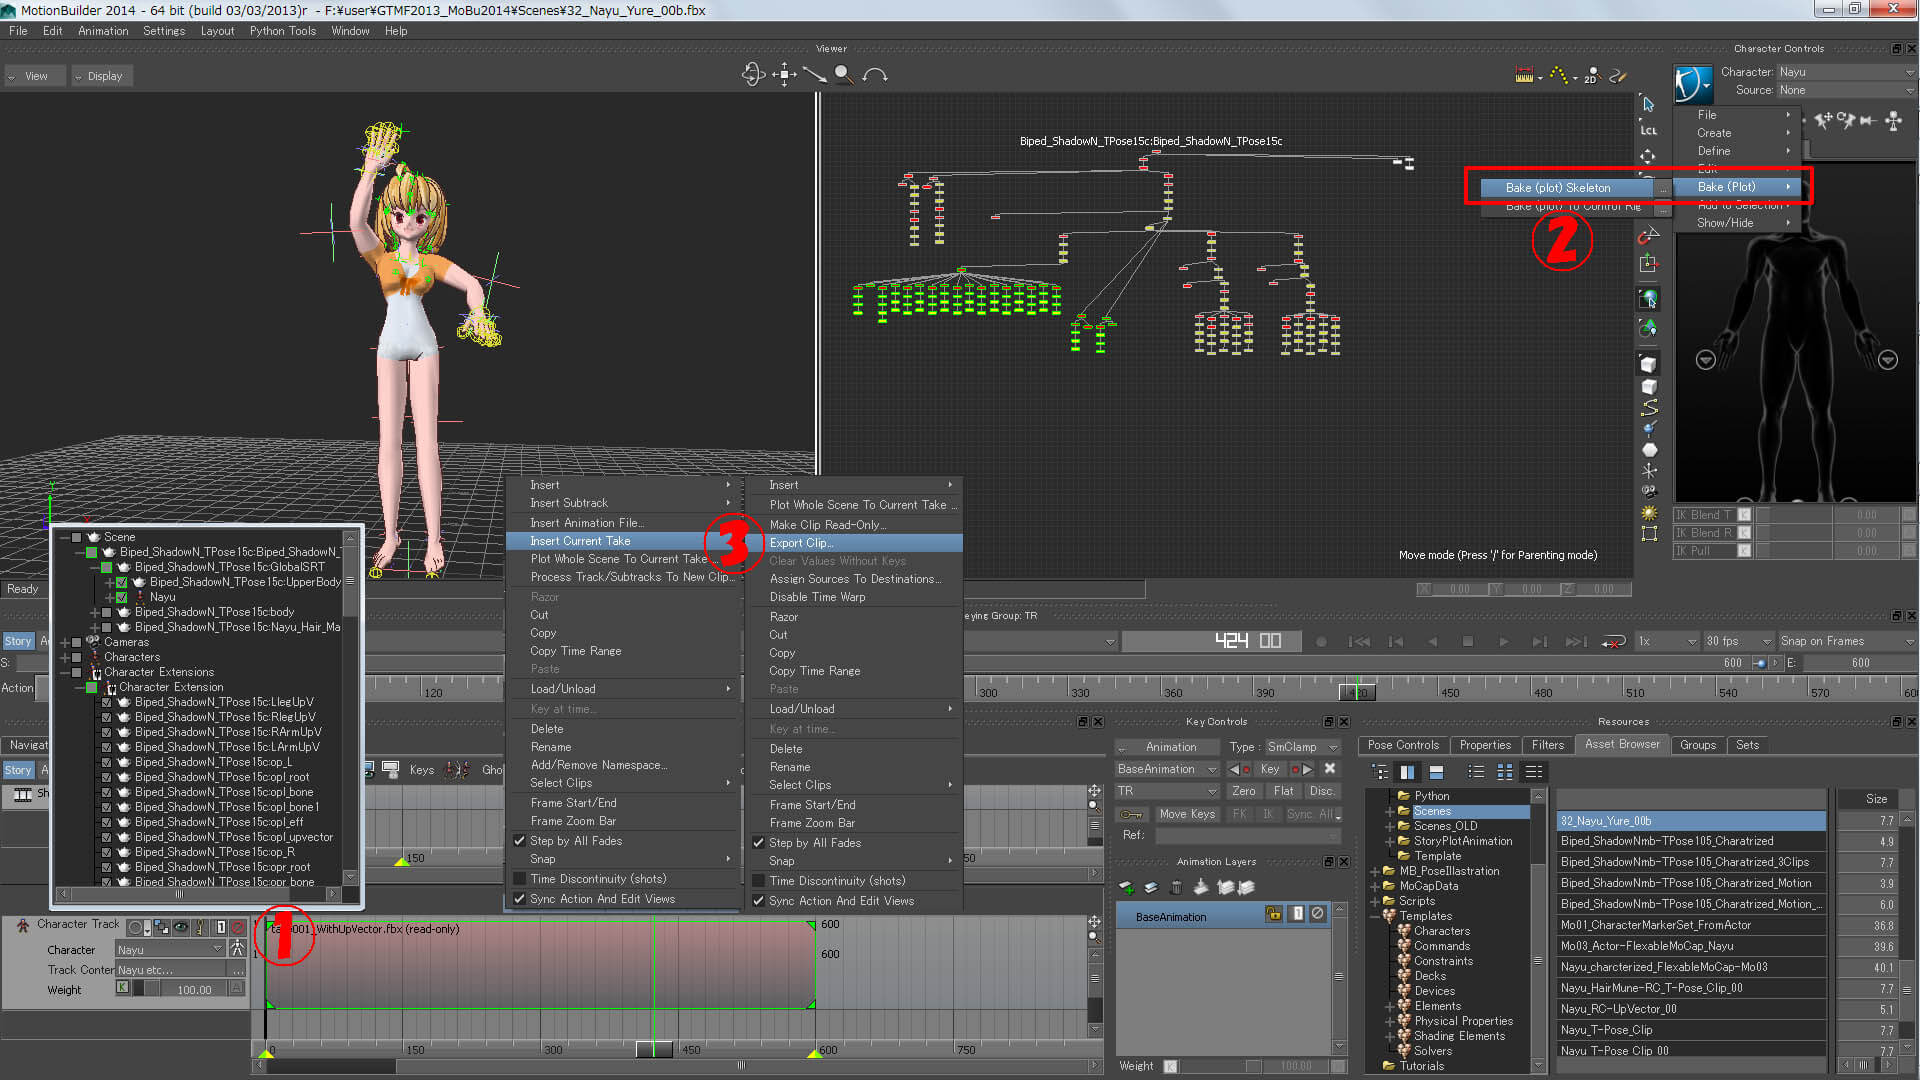 拡大画像あり ↑ LargeImageAttached UpVecter付き のClipを読み込みます。 その際、 Character はキャラ名(例;Nayu)で TrackCounter の[...] ボタンを押して、CharacterExtentionが含まれているか確認します。 (2)右上 CharacterControls 項目内の青色ボタンからBake(Plot) > Bake(plot)Skeleton を実行させます。 これで今回はユレモノ か計算され動いているデータになります。 (4)CharacterTrack上から右マスククリックして表示されるメニューから Insert Current Tale を実行させると、Tale名の Clip が出来上がります。 出来た Clip 上から右マスククリックして表示されるメニューから Export Clip..でこのClipを名前を付けて保存します。 この Clip を Softimage に読み込みます。Null階層に全部のアニメーションが付いているFBXデータになります。 (1)ChooseInsert > Character Animation Track in Stoy and make a Charcter track , load the clip with UpVecter animation to the track . Check the list in Character name(EX; Nayu )from [...] button , see the CharacterExtention is included. (2)From the Blue button in the right above CharacterControls Window select Bake(Plot)> Bake(plot)Skeleton . This time , the animation is including RelationalConstraint. (4)RMB the CharacterTrack , select Insert Current Tale from the popup menu . A Clip will be made with Take name . RMB the Clip , select Export Clip.. from the popup menu, and save clip to any directory with any name. We will import this Clip(FBX)to Softimage . All animation is inside .  RelationConstraint の実行結果をPlot して Skeleton のアニメーションを観察すると、 思った以上のバネの動きになってしまい、形が崩れるフレームもありました。 そこで、RelationConstraint の係り具合のウェイトを調整してみることをしました。 また、有効/無効にすることもチェックで簡単に出来ます。 何回か繰り返して好みの動きをClip化して保存します。 もしかしたら、大きく変化するものや少ないものを幾つかClip化し、 更に調整をすることが良いのかも知れません。、 ユレモノの動きが付いたClipが作成できたとして次に進みます。 この先 Softimage での作業になるところでその2のページへ As this is a bit experimental , the result of RelationalConstraint , sometimes , the plot animation had too mach movement that the shapes was broken . So tried to reduce the effect using Weight parameter in Constraints settings. Also it is easly turn ON/OFF Constraints by checking []Active all . Do some try and find a favorite movement , and take a Clip of it . Perhaps , getting some Clips that are moving a lot and not so and make a blend of it to fit to the scene . Well , suppose we got a favorite one , we'll go to the next step .... ... and further to the next page ... >> ココまでの動き(ユレモノ抑え気味)Result animetion at this point 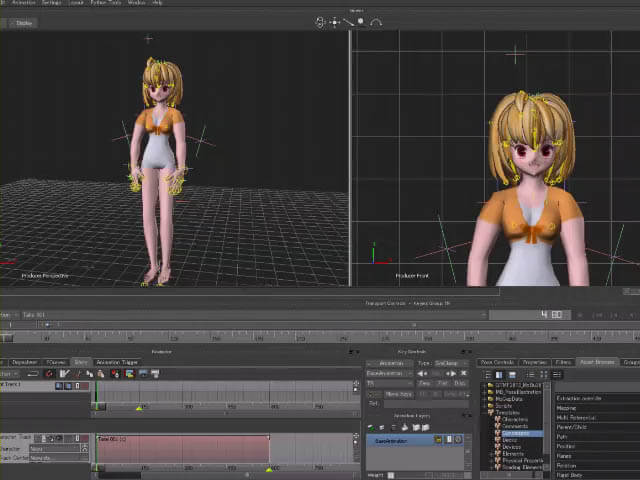 Nayu01.mp4 |
| という訳で、続きはその2になります。 >> 乞う、ご期待!!
|