- ITソリューショントップ
-
製品・ソリューション
-
ダイキンのIT
 製造業向けITソリューション
  建設業務改善ソリューション
  ビル管理業務支援 DK-CONNECT BM
 FILDER CeeD TOP
  FILDER CeeD 電気 TOP
  Rebro D TOP
  データ・サイエンス・ソリューション Pipeline Pilot
  ライフサイエンス向けソフト Discovery Studio
  マテリアルサイエンス向けソフト Materials Studio
  電子実験ノート
 総合3DCG 制作ソフト Maya
  総合3DCG 制作ソフト 3ds Max
  総合3DCG 制作ソフト MODO
 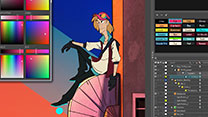 アニメーション制作ソフト Toon Boom
 |
Softimage の IKRig に アニメーション化(ICE);Animation to Softimage IK Rig(ICE)
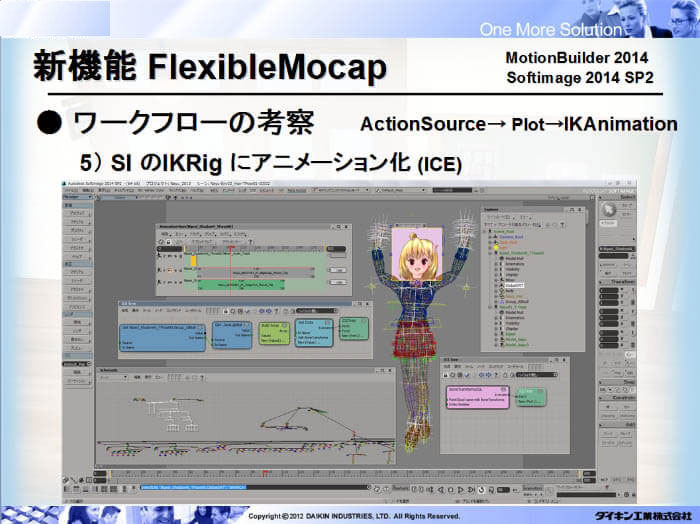 ここからは Softimage、やAfterEffects/Premire まで一気に完成ムービーまでの製作事例となります。 Softimage部分は、ICEによるモーションリターゲッティングの説明をしていませんでした。。 At the seminar GTMF2013 ,the powerpoint page was till here. Beyond this is about using Softimage , AfterEffects/Premiere to accomplish making a video. In Softimage , motion retargeting was done using ICE. |
| FK と IK の用意;Preparing FK and IK まずはMotionBuilder から帰って来るT字ポーズの FBX と Softimage上で用意されているキャラクターの IK-Rig を同時に並べ、その間を ICE でリンクを作れるようにします。 この FBX はもともと Softimage から出力したデータの Null階層構造体なので、位置はバッチリ合うはずです。 ただし、前ページでの図の通り、階層構造が全く違うので、そのローカル移動・回転値は異なるはずです。 そこで ICE を使用するのですが、ICE はグローバル値で移動・回転値が来るので キャラクターのIK-Rigをと合わせる時にはオフセットが必要な場合や アニメーションを設定する場所の工夫が必要な場合があります。 Prepare both in a scene, the TPose FBX that comes back from MotionBuilder and the Softimage IK-Rig for the character rig , and will make links between them in ICE. This FBX was first made in Softimage , so the position of the nulls will be perfectly same . But the Local Rotation/Transform value likely not same . And ICE will be setting Rotation/Transform in Global , so needs some setting to use these numbers . IK-Rig で作成しているキャラクターのシーンを開きます。 そして MotionBuilderから帰って来るT字ポーズのFBX(参照 >> FK用Rig の作成 ) をファイル > 読み込み > FBXの読み込みで入力します。 (1) ロードオプションは◎追加で読み込みます。 Open the scene with IK-Rig, and then File > Import > Import FBX to add FBX exported from MotionBuilder . (1) in Load options , use Add. 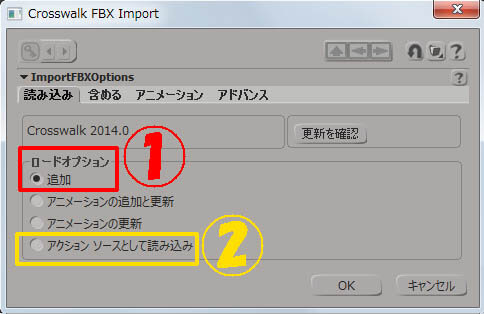 アニメートモジュールにて、アクション > 格納 > アニメートパラメーター-FカーブでTポーズのClip を作成しておきます。 このTポーズのClipは大変重要なので、必ず作っておいてください。 それでは次は、前ページで MotionBuilder の Story 内 Clip として保存した FBX(参照 >> ユレモノ付きアニメーションの作成) をファイル > 読み込み > FBXの読み込みで入力します。 この Clip にはユレモノの動きも含まれていますが、アニメーションしか無いデータです。 (2)今度はロードオプションは◎アクションソースとして読み込みます。 The FBX will be imported under a Model node , make a key at 1st frame and in Animate module , do Actions > Store > Animated parameters - FCurves to make a TPose Mixer Clip . This Clip is very important to get default pose . Next import the FBX made in Story of MotionBuilder . (See Making Spring like animation → Export FBX) This file only has animation data , this time use (2) in Load options , use Import as Action Source. 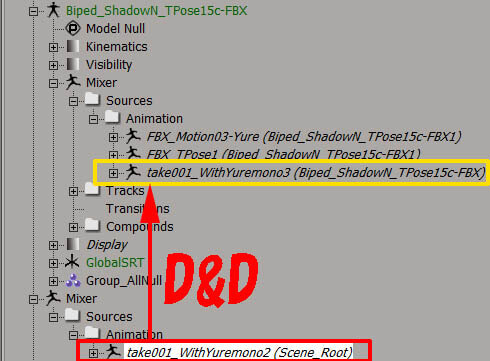 このソースを選択して先程入力したNull階層構造の Model 以下の Mixerの Sources / Animation 上にドラック&ドロップします。 新しいソースが追加されます。 (実はこうしないと、Root直下に出来たMixerノードを削除するとコピー(実はインスタンス)したClipも削除されてしまいます。) A Mixer will be made right under the scene root , and the animation data with a Source Clip . Select this Source and Drag&Drop into the first FBX's null layered structure Mixer Source/Animation . A new Source will be made . (Only making a copy but other way , clip source will be made in instance which will be deleted when deleting the original one)  ミックス > スタンダード トラディショナル ツールで間に動きを補完させておきます。 これで ICE のリンクを構築するデータが整いました。 Place this new source as a clip next to TPoseClip . Do Mix > Standard Tradition tool between these clips. This make a starting point to make ICE Retargeting scene . |
| ICEを使ったリターゲットの構築 ;Making ICE Retargeting ICEを使ったリターゲットは、根本的な設定はそんなに難しいものではありません。 むしろちょっとした工夫をしているところがノウハウにあたるのかも知れません。 まず、キャラクターの IK-Rig の方に PointCloud (プリミティブ > ポイントクラウド > 空)を作成しておきます。 この中にICEを設定します。 FBX で入力された FK の Null階層を全て Group_All と命名したグループに入れます。 この時、このグループに上から登録された順番に ICE の 位置データが用意されるので少し面倒ですが順番を気にします。 最初に GlobalSRT、次に UpperBody~ Head,eff3まで、LShoulderRoot ~各指、RShoulderRoot ~各指、 LThighRoot ~LFootEff、RThighRoot~RFootEff、胸の左右、髪の毛そして UpVector はまとめてでも各骨の間でも解り易いところに配置します。 ICE Retargeting is not so difficult one to construct. Just a few know hows . Make a Pointcloud ((Primitive > Point_Cloud > Empty ) inside Character IK-Rig Model to set ICE inside . Make a Group and set all Nulls in it , name it Group_All . ICE reads this Group nulls from top , so care the order when group in . First GlobalSRT , next UpperBody to Head , eff3 , next LShoulderRoot to all finger , then RShoulderRoot to all finger . LThighRoot to LFootEff , RThighRoot to RFootEff , L and R Bust , Hairs , and UpVectors . 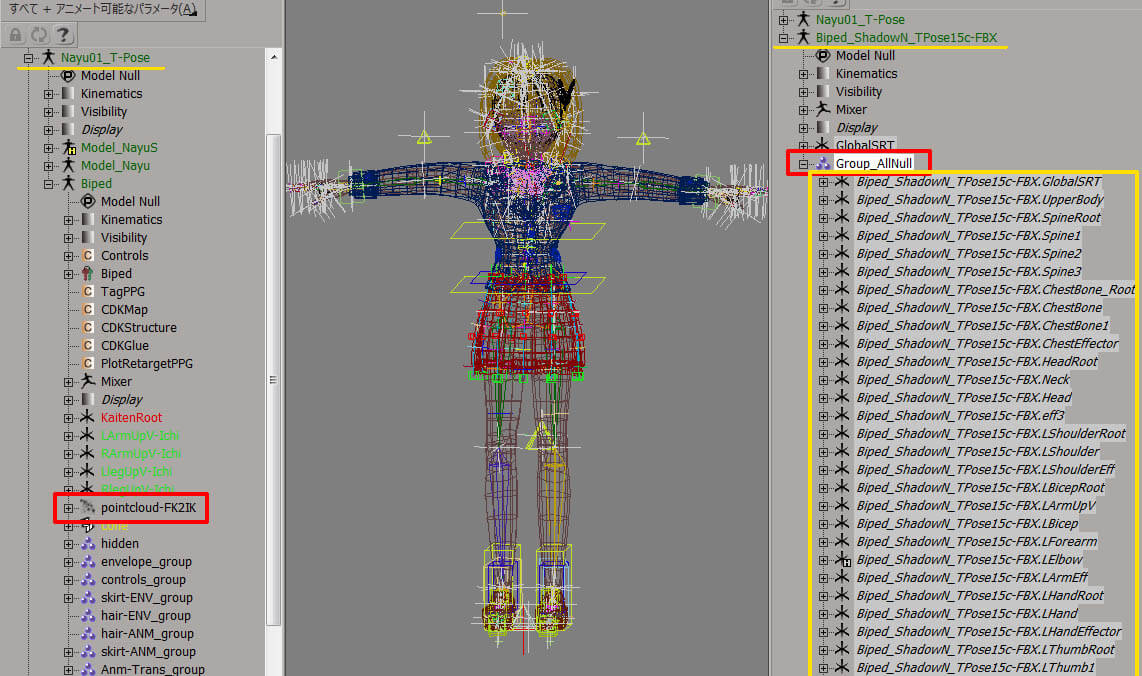 Set Pointcloud an ICE_Tree .  BuildArray配列を作成し、SetData で BoneTransforms という値の箱に入れます。 たったこれだけです。 In GetData set the group Group_All will get all global value , with BuildArray will put it in an Array , with SetData makes all array data to BoneTransforms . That's all !! 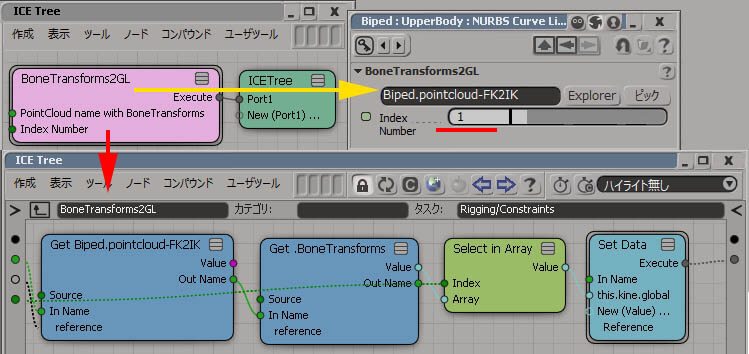 それはこのBoneTransforms という値の箱から何番目の値をそのグローバルとして設定するかだけです。 ただし、その際、オフセット値を入れられるような工夫が必要な場所もあります。 上図は、Group_All 2番目のオブジェクトUpperBodyに付いている ICE 設定です。 0 から始まるので、 Index Number は1です。 BoneTransform2GL コンパウンドの中身は PointCloud からBoneTransforms という値の箱から Index番号の値を取り出しそれをそのオブジェクトのグローバル値に SetData しています。 この Index番号を知る便利な方法として、例えばX軸が上方向になっている Cone を用意し、 それにICEを設定して Index番号 を変更していくと、Cone の位置がどんどん変化するようになります。 設定したいオブジェクトの位置にCone が来たら、その時の Index番号を使えば良いのです。 Other work to do , is setting ICE to each bones , but that is just getting values from this BoneTransforms , with the order number which is where . But sometime it needs to set some offset values . The figure above is showing the second value which is for UpperBody . The order number which is Index , starts from 0 , so it will be 1 for UpperBody global transform . An easy way to know this Index number , is to make a cone and slide the Index Number and see where the cone goes . 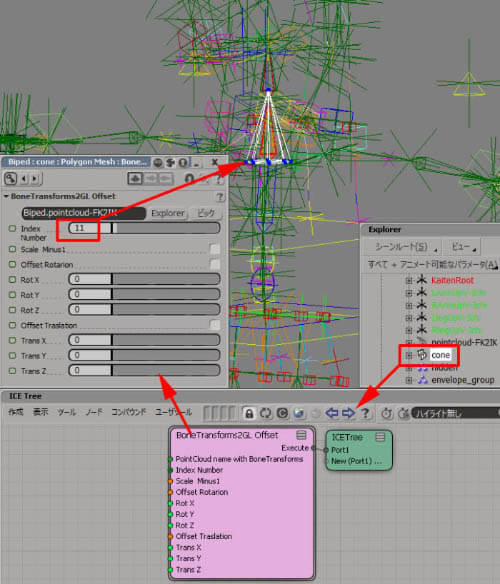 また、オフセット値とスケールの反転を対応したコンバウンドの中身はこちらです。 Upper figure shows , Index Number is 11 to Neck bone . 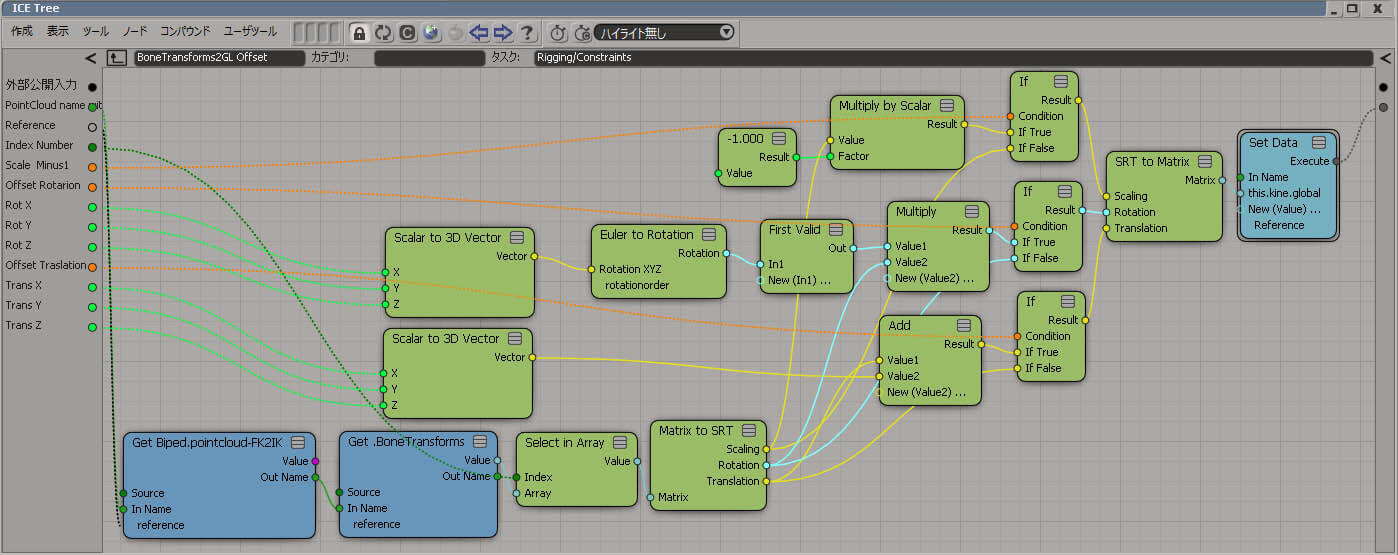 大体の部分はこのオフセットノードを使って連携をあわせています。 が、設定そのものが少し違う部分を詳しく紹介します。 IF node is used when offset value is needed . Most parts are using this offset to mach the position , but some parts has some different settings . 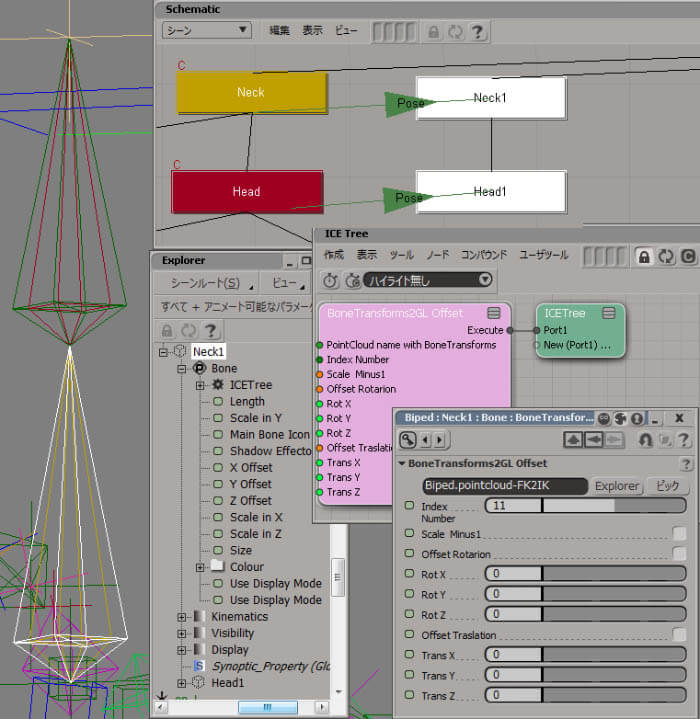 ボーン構造の下(つまり第一ボーン)にグローバル値で回転値を設定すると それ以下に軸回転が伝達しないということがあり、 わざわざ別のインプリシットのボーンに ICEを設定して、それにPoseコンストレイントをかけてます。 The Neck bone is 2 bone with no UpVector , and setting Global SRT makes this bone not rotating in X axis to child bone , so made a implicit bone to set GlobalData , than Neck bone to be Pose Constrain to that implicit bone . 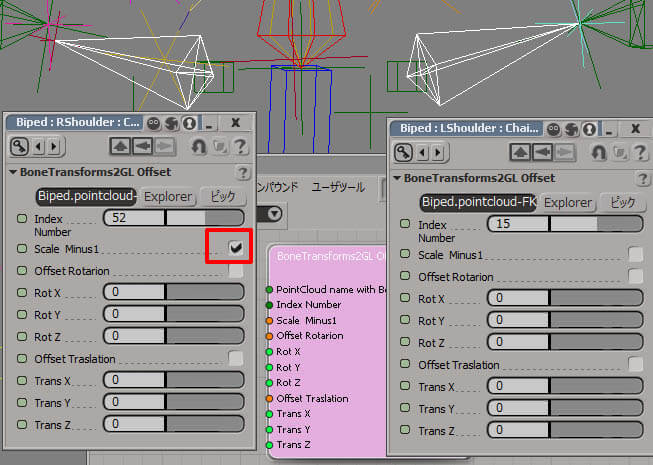 Left side Shoulder bones are normal , but Right side Shoulder bones has Minus numbers to Scale . 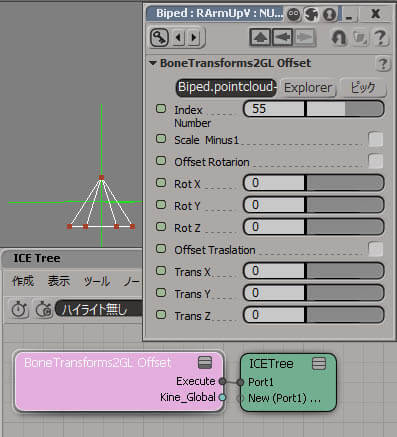 UpVectors has Position Data only  IK-Rig foot has a little bit difficult , translation come form legEff but rotation from FootBone1 . 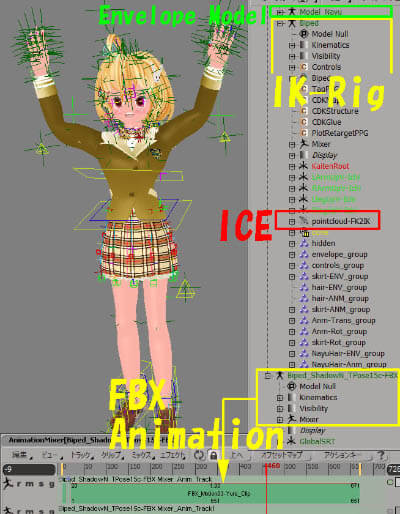 という訳で、こんな感じのシーンになっています。
When ICE construction is done , character will move like this . |
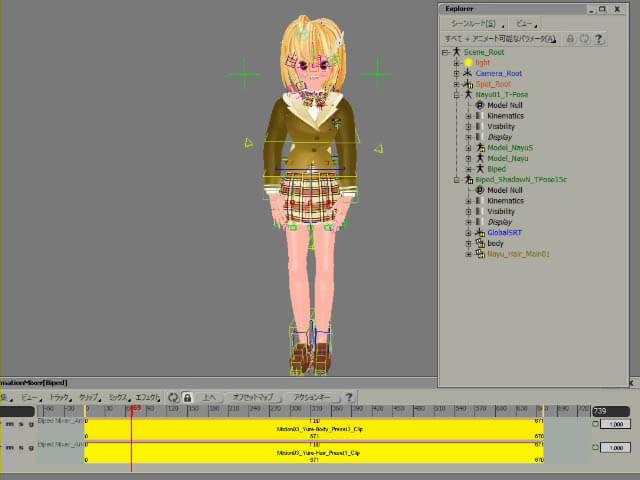
| IK-RigへアニメーションClip化;Making Clip Animation for IK-Rig これもなんてこと無い、いつも IK-Rig にキー登録してアニメーションを作っているのと同じ要領です。 This part is same as usual , setting keys to IK-Rig . 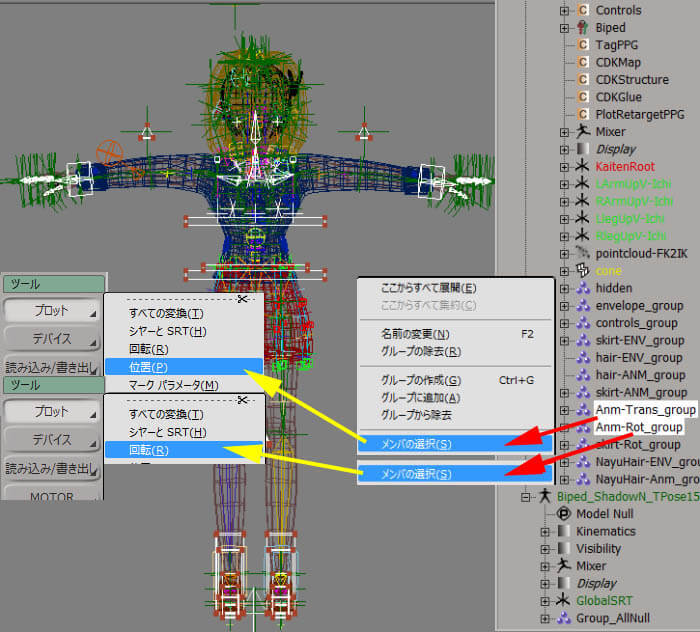 Selecting Anm-Trans_Group and Anm-Rot_Group as Select Members , 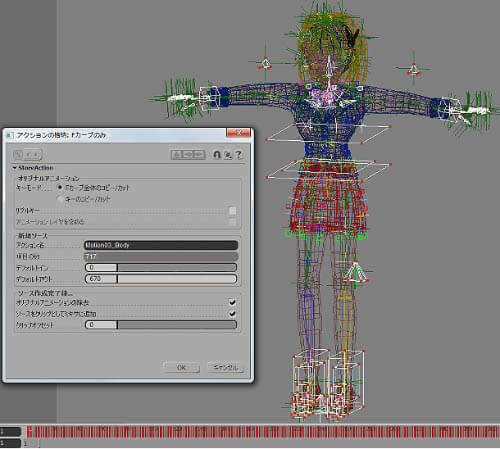 Plot each Positions and Rotations . 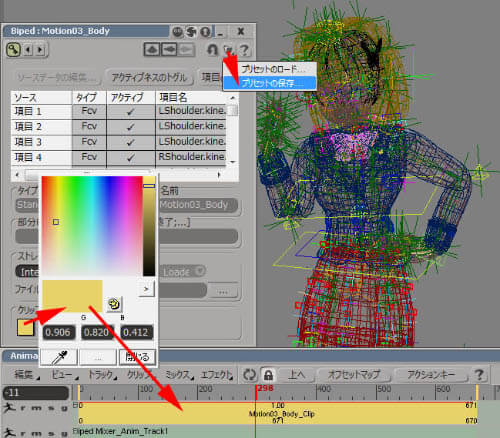 自分の IK-Rig キャラクター用のアニメーションとしてどんどん用意することが出来ます。 ICE の設定の無い、いつものIK-Rig のシーンに保存したClipをMixer上に読み込むと同じ動きが再生されます。 (下図では髪の毛と体のClipは別々にしています。) And make the animation to a Mixers Clip and save it. This is making a library of animation for the IK-Rig . Load this Clips to original IK-Rig that has no ICE , and it will move as usual animation . あとは Softimage でアニメーションの細かい修正をします。 A few fix will be made in Softimage . |
| キャラクターアニメーションの完成へ;Completing character animation 手足の動きを修正してみます。 Clip化したアニメーションは通常のキーアニメーションに戻しておきます。 Explorerで、Mixer/Sources内のClip(例;Motion03_Yure-Body_Preset3)を選択しておいて、Animateモジュール > アクション > 適用 > アクションです。 ここでは MotionTrail を使ってみます。動きの軌跡を編集することで、ファンクションカーブを編集します。 ついでに、このツールを起動するのに便利なGUIプラグインを作成したので提供します。 >> MotionTrail_Manipulator.vbs(GUIのみ) (C:\Users\ユーザー名\Autodesk\バージョン名\Application\Plugins以下に置く自動認識型プラグイン) Fixing hands and feet animation. Make the fixing Clip Animation to ordinary key by in Animate Module Action > Apply > Action . Motion Trail is good tool to fix the animation , like editing fcuves. Here is a nice GUI plugin to launch this tool with Animation Manipulator GUI. >> MotionTrail_Manipulator.vbs(GUI only) (C:\Users\USER NAME \Autodesk\VIRSION NAME\Application\Plugins Put it under this path and will be loaded automatically ) 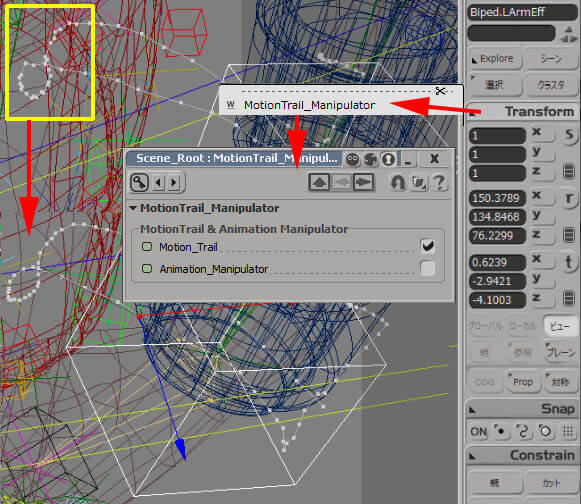 2つのツールを同時に動かすことは出来ません、先に動いていた方が優先されます。 なにが便利かというと、操作中にふと違う所を触ってしまうと MotionTrailの選択が取れてしまうので、 チェックボタンをクリッとすれば再度起動し編集を続けられます。(また、チェックの ON/OFFで確実にツールが起動/無効できます) This GUI plugin needs the original tool to be installed first . Two tools can't be launched in same time , the tool chosen first has the priority . What is useful about this GUI is , when miss selecting other things in the scene Motion Trail comes OFF , but check in ON in this GUI makes the tool continuously using . 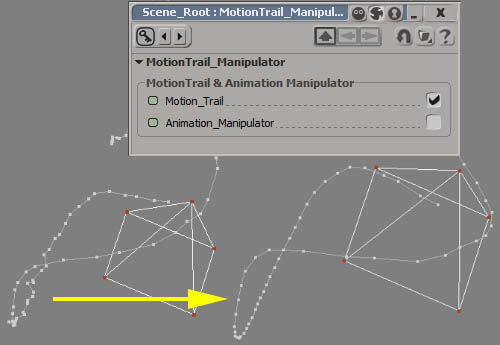 このツールのコツは、編集したいフレーム数分だけのタイムラインにしておくこと、 3次元的なカーブなので、編集中多角的に見ること、場所によってはオペレートしにくい時があるが根気良く、です。 このツールの出来る事をファンクションカーブの編集で成し遂げることはかなり困難、 この軌跡の編集は位置と時間の編集でもあるので、元の動きを壊さないようにも注意が必要です。 ユレモノのアニメーションを修正・追加していきます。 髪の毛はMotionBuilderからのものを参考にしつつ、やはりかなり直しています。 胸の揺れはMotionBuilderからのものをほとんどそのまま使っています。 スカートとリボンと後ろ襟の動きは完全に手付けのアニメーションです。 Above showes fixing UpVector Transform more smoothly . (Sometimes it is hard to place the points in a row , must see in 3 dimensions ) Next , fixing the spring like animation which came from MotionBuilder . Hair was almost redone in Softimage but chest animation was used as is . Skirt , tie , collar animation was made by hand . 次は、カメラを複数用意して カット割りをしていきます。 Making Multi Camera for some CUTS , comes next . |
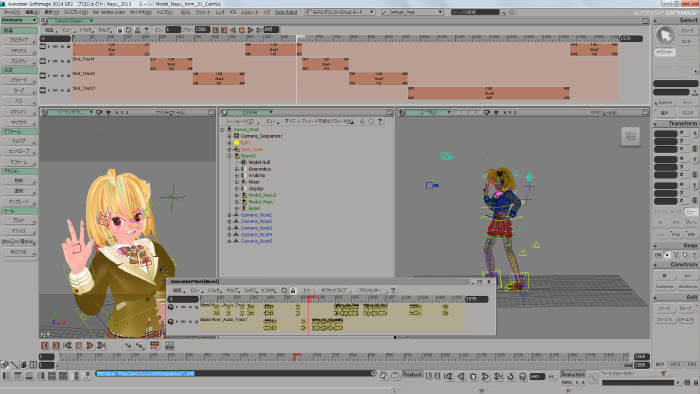
| カット割り(複数カメラの用意とCameraSequencer);Making CUTS (Multi Camera with CameraSequencer) 最終的なカットを想定して、複数のカメラを用意してフレーム毎に切り替えるようにします。 カメラ自身にもアニメーションを付けるのですが、 CameraSequencer を使ってタイミング調整も行います。 キャラの動きは再度Clip化しておきます。 Thinking the final CUTS of video , get multi Camera and change Camera in frame Animation . Camera it self has an animation , also CameraSequencer is used to fix all the animation in the scene . To do this , make the character animation to Mixer Clip Again .  Fixing few camera , the Character Clip was edited like shown below . 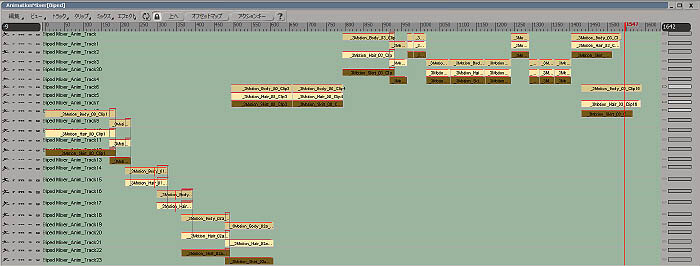 この時点で、声優さんのVoiceデータに合わせたフェイシャルアニメーションがある程度入っています。 CameraSequencerはシーンのフレームを再度別のカメラカットで使用したり出来ますが、 シーンタイミングで置いてある音声再生はしません。 下図サンプルムービーは、大体そんな台詞を言うことを想定してカットを作っている、と思ってください。 And in CameraSequencer (View> Layouts > CameraSequencer ) , is possible to fix all animation in the scene . But CameraSequencer does not play audio . Figure below is just a sample timing to speak . さー、ここまで来たら、後は各カット毎に1つのシーンにして細かくカットに合うように調整して、キャラのレンダリングをします。 画像サイズHD_720_16-9_1280x720 で Adobe製品で読み込み対応している TIFF (.tif) 形式で書き出しします。 All set , rendering the scene for each CUTS ( in this example was 8 CUTS ). Size was HD_720_16-9_1280x720 , format was TIFF (.tif)file which was loadable in ADOBE Tools . |
+ Adobe AfterEffects,Premiere,Bridge,Audition,MediaEncoder
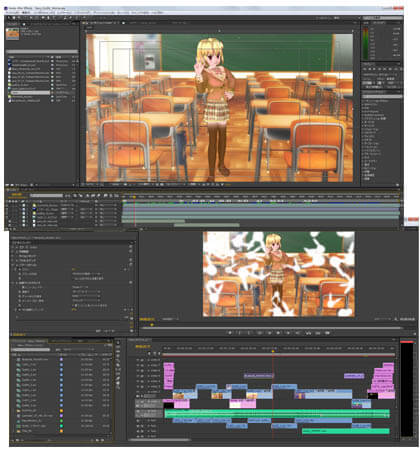
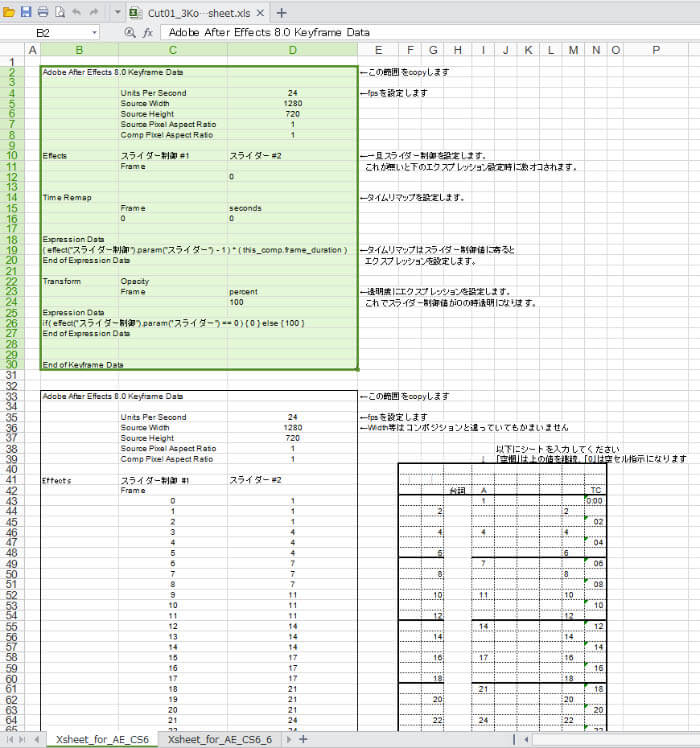
| AfterEffects によるコマ落ち動画(カット毎の画像製作);Limited Animation in AfterEffects (Ex of CUTS) ここからはAdobe製品群の紹介と製作事例になります(Adobe Production Premium CS6 ) 。 まずは、レンダリングした連番ファイルの一括リネームに便利な Adobe Bridge CS6 (64bit) の紹介です。 例えば、シーン途中のフレーム数からのレンダリング画像の連番ファイル名はNayu_3Motion_Cut02.171.tif~Nayu_3Motion_Cut02.295.tif だったとして、解り易い 0001 から始まるカット名の名前に変更したい場合に一括処理出来るようになっています。 Below this page is about Production example of using Adobe tools (Adobe Production Premium CS6 ). To start , is showing Adobe Bridge CS6 (64bit) , renaming rendered files very fast and easily . For example , rendered files in middle of a scene has names like Nayu_3Motion_Cut02.171.tif to Nayu_3Motion_Cut02.295.tif . This tool can make a rename to a simple name that starts from 0001 in just one click . 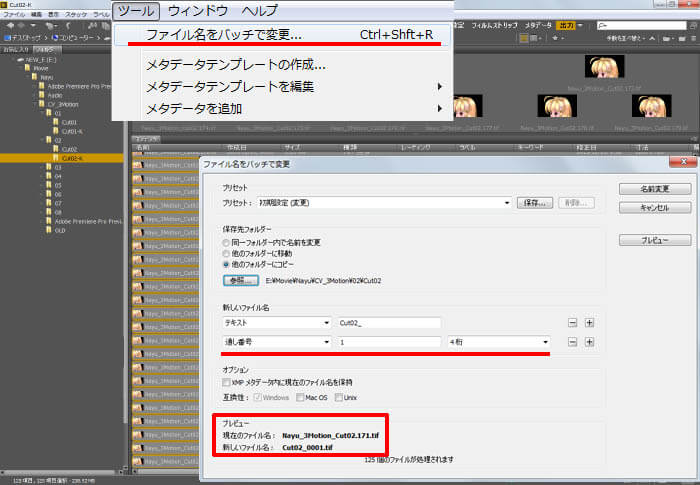 使いやすい点として、変更後のファイル名がプレビューできるので、間違い無く実行できます。 Tools > Batch Rename is the tool . Preview has the New filename that will be given, is good to know before doing . AfterEffects を使ってコマ抜きをする方法はタイムリマップとEXCELファイルを利用したタイムシート を活用した方法で行いたいと思います。 beanjamさんのところにこの説明がありましたので、活用させて頂きます。ありがとうございます。 >> タイムシートインターフェースhttp://www.beanjam.co.jp/CG_data/AE/AE_top.html#anchor-aetip2 ここではAfterEffects のバージョンが CS6 になっているので、多少エクスプレッションの記述が違う所があります。 また、設定部分とタイムシート部分と分けてみました。 指定している内容は、24FPS, 1280x720 ,タイムリマップをスライダーで制御し、0の時は何も表示されないになります。 Making Limited Animation in AfterEffects , will be done using TimeRemap and TimeSheet made in Excel file. There was a good sample at beanjam , thank you very much . >> Timesheet interface http://www.beanjam.co.jp/CG_data/AE/AE_top.html#anchor-aetip2 Here , the AfterEffect's version will be CS6 and the expression is a little changed , and also English has different parameter name . And the setting are separated in 2 part . The setting are , 24FPS , 1280x720, TimeRemap is controlled by a slider , and when the slider is 0 nothing is showing. ココに提供しますので、良かったら活用してみてください。↑ Sample file are here ↑ but the English expression has different function name .
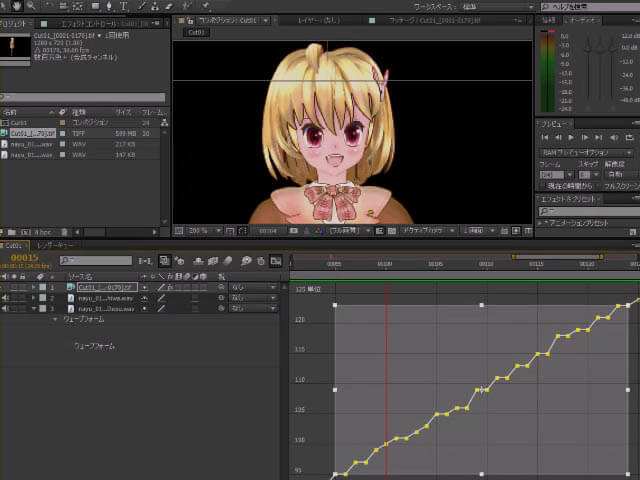
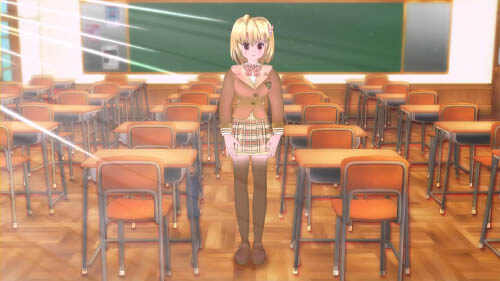
では、活用例です。 AfterEffect CS6 のプロジェクト設定を◎フレームにします。 From production Sample . Set AfterEffect CS6 Project Settings to ◎Frames . 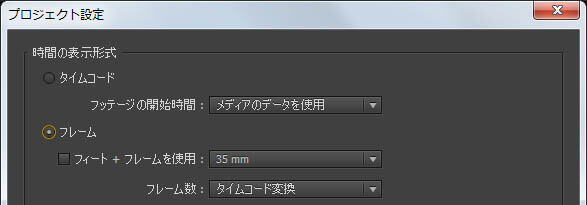 Import > File... select the renamed files using Bridge , as TIFF Sequence . This sample has 170 files for CUT Number 1 . 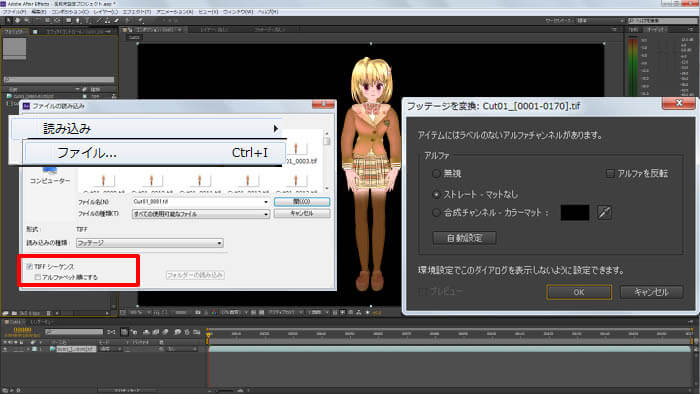 タイムリマップが設定され、そのエフェクトのスライダー制御も設定され、スライダーが 0 なので最初のフレームに何も表示されなくなります。 Then , Copy & Past the upper part of the EXCEL file to the Tiff Footage , will make TimeRemap and a Slider Control , expression linked to Opacity 0% when slider is 0. 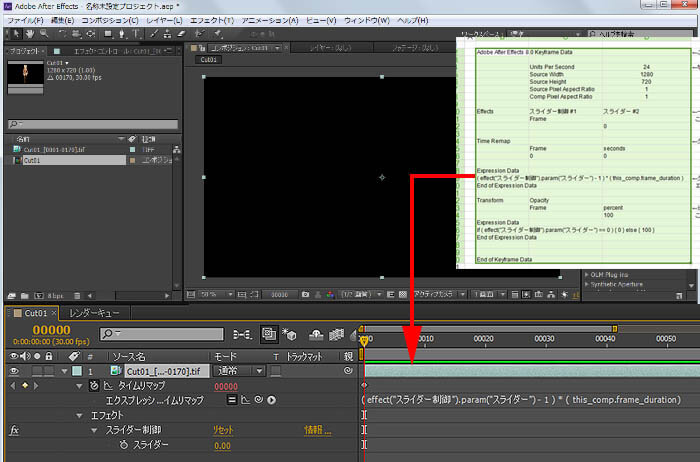 スライダー制御にキーが打たれ、階段状になる分コマが飛びます。 Next , Copy&Pasted the second part of EXCEL file ,after the sheet is filled with timing are set . Key Animation will be set to TimeRemap Slider, and the animation moves limitedly . 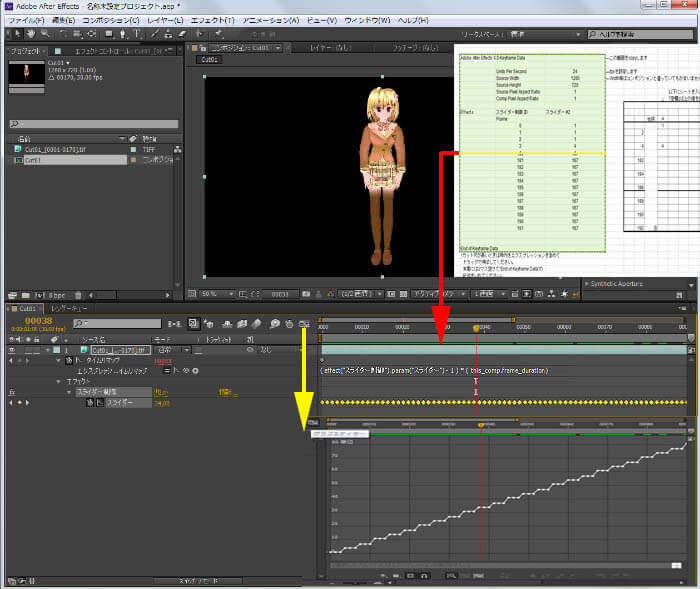 Voiceファイルのフッテージを連番フェイルフッテージに付けたマーカー位置に合わせます。 VoiceファイルのフッテージはLキーを2回押すと波形表示になり、 右上のRAMプレビューボタンを押すと映像と音声を同時再生します。 実は、Ctrl + カレントフレームスクラブでも音声を聞くことができるのです。 そこで、今度は連番フェイルフッテージのスライダー制御の値を編集することでコマ飛ばしをして前後のフレームから より音声に合った画像を選ぶことでタイミング調整をします。(実際は下動画よりもっとリップシンクしています。) Make the voice mach to the Tiff Footage. Import the Audio file to the Marker of Tiff Footage , where the voice to start . Double L keyboard makes Audio Footage to show audio waves . RAM Preview button plays both Video and Audio , with Ctrl + Scrub current flame makes Audio play , too. Now editing Tiff Footages Slider FCurve , choose the most best tiff file for the Audio , is Lip-Synching. 背景画やチリのエフェクト動画、ハイライトや光の差し込み等々色々な画像を用意して1つのカットを完成させます。 Complete the Cut No1 with BG , Dust effect made by ICE , Highlight and Light Effect . 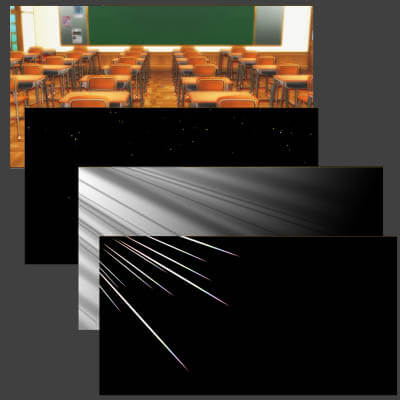 キャラクター画像のちょっとしたブラー効果は画面へ馴染ませる為に絶対必要なエフェクトになります。 Each Layers has many effects (Glow/Brightness&Contrast) and different Modes Tiff Footage is Character video and needs just a little Blur to get smoothness with BG . 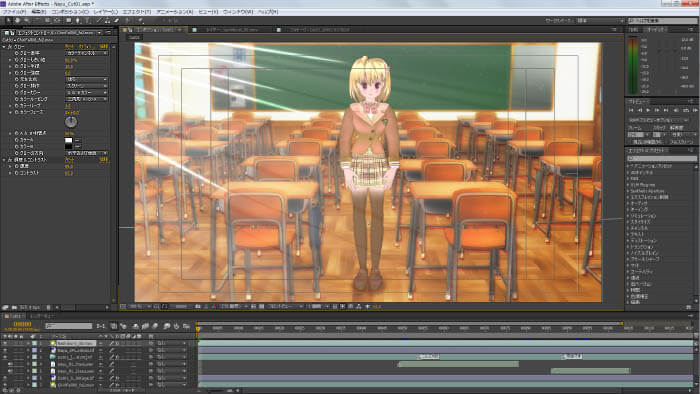 Finishing Cut 1 . PS日本語Windows7で起動しているAfterEffectsCS6 を英語メニューに起動したい場合は、ae_force_english.txtという空のファイルを C:\Users\ユーザー名\Documents以下にコピーして起動すると英語になります。このファイルを削除すると日本語になります。海外のチュートリアルをやりたい時とかに便利です。 |
| Premiere による動画編集;Editing video with Premiere 上記のように、各カットを作成していき、1連のムービーに仕上げていきます。 ここでの例では8カットになりました。今回は各カットを一旦無圧縮のAVIファイルにして編集を行いました。 After making each CUTS with AfterEffects ,composite to a video . In this Production Sample , there was 8 CUTS . Below was 8 Uncompressed AVI was used to make it to 1 file . 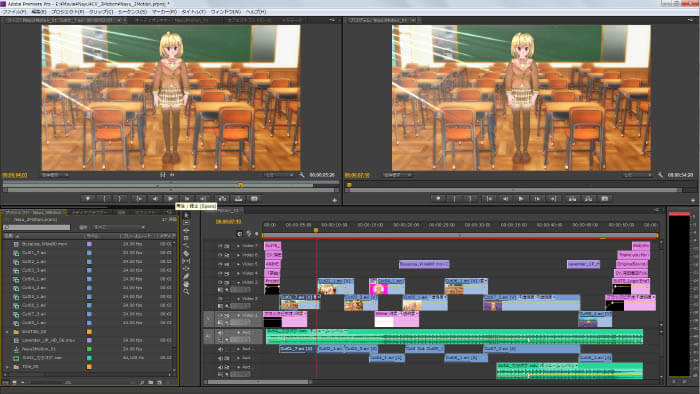 他のソフトとダイナミックリンクしていて相互利用がし易い点があります。 音声ファイルに関しては、AdobeAuditionを使用して編集したオーディオをレイヤーのままPremiere に持って来ることも出来ます。 下図は、ICレコーダーで収録した音声ファイルがノイズが多い場合にフィルタリングして綺麗にしているところです。 What is good about Premiere is , Video and Audio is more likely to edit together, has many Dynamic Link to other Adobe software , like Audio file can be linked to Adobe Audition . Below figure is doing noise reduction (filtering) from a audio file that came from IC recorder . 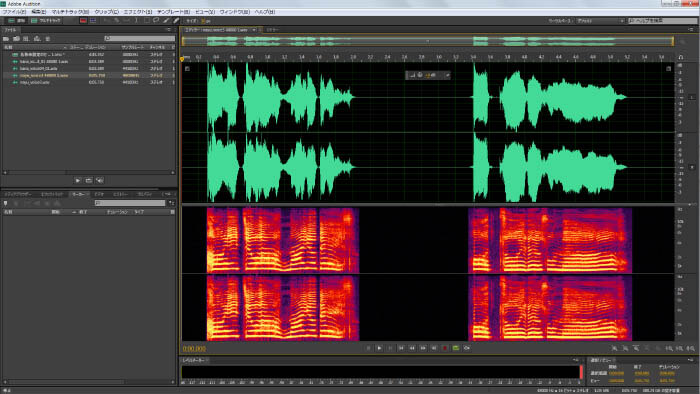 そうしたら、マルチトラック > AdobePremiere Pro へ書き出しという項目があるのです。 And after editing , set that audio to Multi Track . Think this as some music data . Send this as MultiTrack > Export to AdobePremiere Pro . 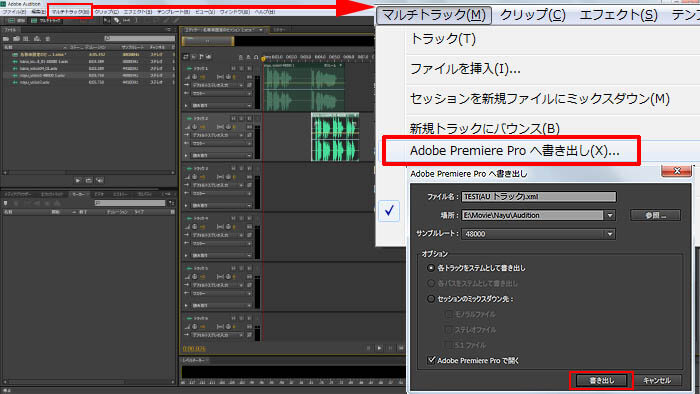 With [ New Audio Track ] , Audio is placed as Layers in Premiere .  This workflow can be like this too , send Audio in Premiere Track to Audition by Edit > Edit in Adobe Audition > Clip . 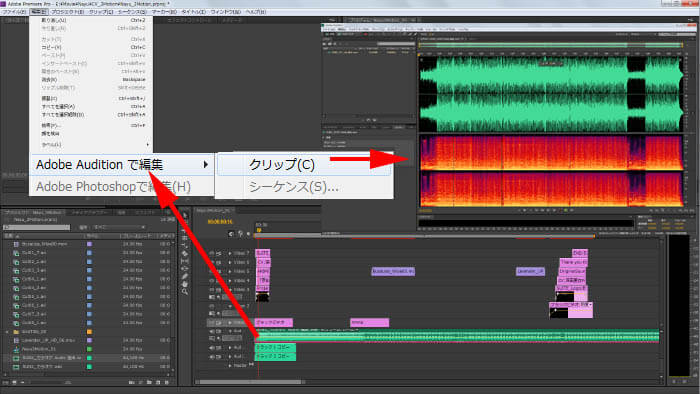 ファイル > 名前を付けて保存 > XML形式でコピー保存... を実行してaepx拡張子で保存します。 Premiere では、この書き出されたaepxファイルを通常の素材と同じ要領で読み込むと ダイナミックリンクが実行され、まるで1つのムービークリップのように音声と共に読み込まれます。(ピンク色してます) Premiere can also load AfterEffects Project file as a clip video . In AfterEffects File > Save as > Save a copy as XML.. to save the project in aepx file . Premiere loads this file as usual data file , Dynamic Link come up , and load as a single video with audio . (Clip color is pink) 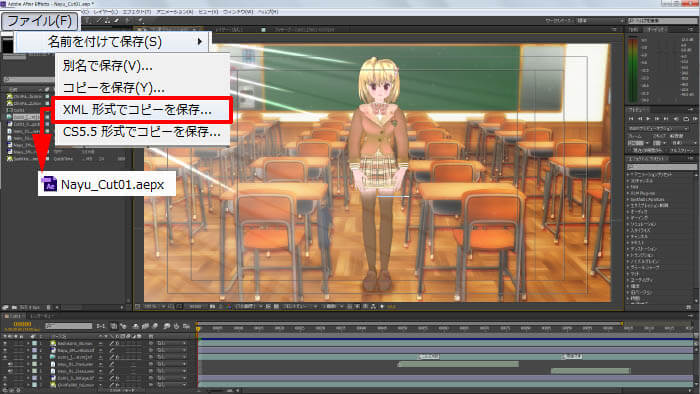 ↓ 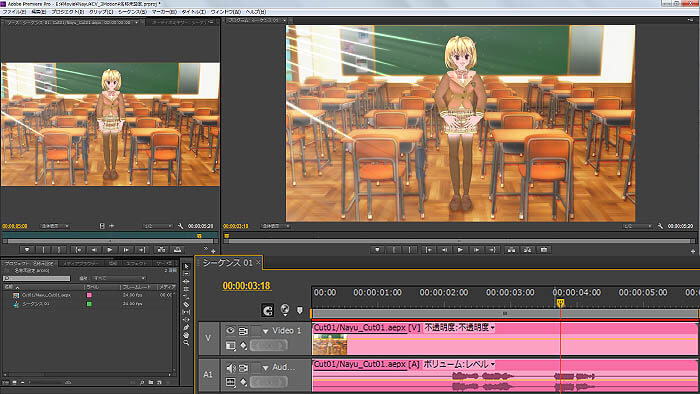 ファイル > Adobe Dynamic Link > After Effects コンポジションを読み込み... で直接シーンファイル .aepを読み込んでしまいます。 左下のプロジェクトタブ内から読み込みで直接シーンファイル.aepを読み込むことも出来ました。 But the another way is more directly , in Premiere File > Adobe DynamicLink > Import AfterEffects Composition , loads .eap file. This Also can be done from the Project Tab > Import .eap file. 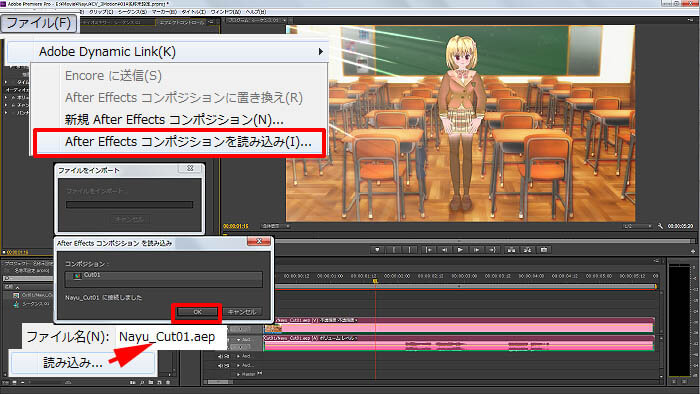 再度Premiere で見ると色変更がされているというワークフローが確立され、レンダリングを毎回するということがなくなります。一瞬です!! この時、AfterEffects 側はシーンファイルとして保存していなく、ただ色変更して Premiere 画面をクリックしただけです。 しかも今回のような AfterEffects 側のタイムリマップや音声もちゃんと来ています。これすごく良くないでしょうか。 (AfterEffects上でPremiere形式のプロジェクトファイルとして書き出しをした場合タイムリマップは付いてきません) The greatest thing about this is , it's not a rendered video , so can go back to AfterEffects and do some editing like color correction , then click Premiere window , the result is there without rendering all again . And the TimeRemap and Audio is still there . (If saving in PremierePoject file in AfterEffects , Timeremap result will not come to Premiere .) 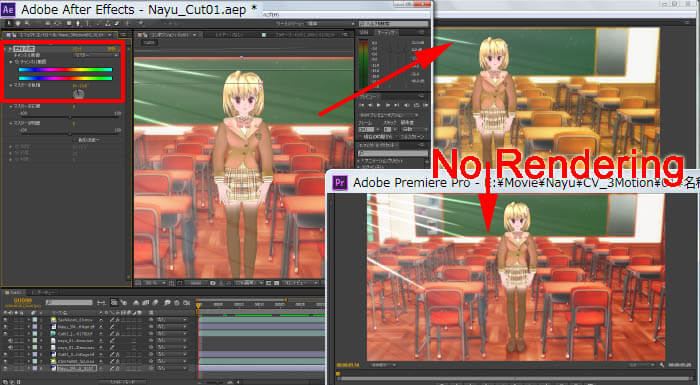 Premiere 側は保存してある状態に戻ります。 逆に言えば、保存しなくても Premiere 側の画像も変化してくれるので、映像チェックでOKが出てから AfterEffects 側を保存できるかも知れません。 Off course , if you close AfterEffect file without saving , Premiere view will go back to the result of what was saved , but thinking of workflow , you can save the file after the Boss says OK with the Premiere Video result. 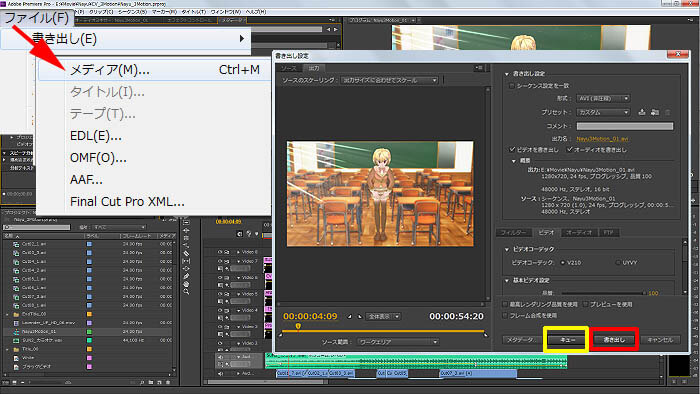 すると書き出し設定画面が表示されて、この中で設定を確認して[書き出し]ボタンを押します。 ですが、ここはあえてその横の [キュー] を選択しています。 キューはレンダリングするお仕事を別のソフトAdobe Media Encoder で行うことをさせるものです。 監視用のフォルダーを用意して、そこにキューが入って来たら自動的にエンコードを開始する、 また、一度に複数の形式(AVI Mpeg2,FLV等)にエンコードすることが出来たりします。 無圧縮のAVIは提出用で簡易H264はプレビュー用にするなど便利です。(出力形式のプリセットが豊富にあります。) Last is making out to a single file , is usually File > Export > Media and press [Export] . But here , let's press [ Cue ] , is rendering using Adobe Media Encorder . You can set a directory as a WatchFolder to automatically render cue that comes into a folder, or do rendering with one data to some file type like Uncompressed AVI and Mpeg in same time . 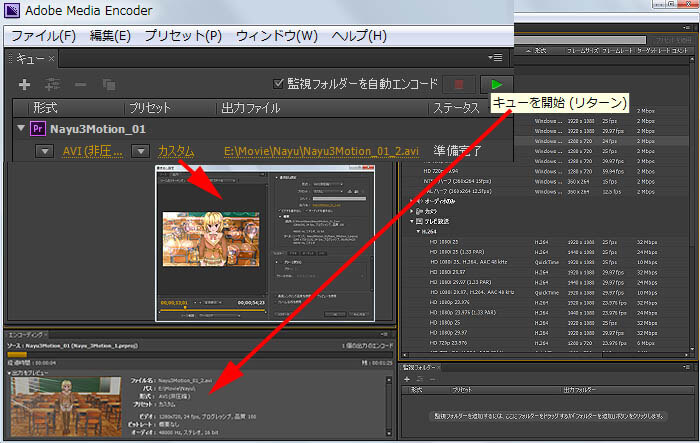 あるいはマシンを映像製作に使っていない時間にレンダリングをさせるなども考えられます。 Using Cue make your Video Editing job to go on while rendering , or you can render the Cue later when the PC is not used in night . |
| 最終画像;FinalVideo という訳で作成したムービーはこちらに上がっています。良かったら見てみてください。 皆さん、ご協力ありがとうございます。 At last the accomplished video is here . Thank you for all cooperators .
|
||||
| という訳で、次回 は ... What's Next ... 乞う、ご期待!! Stay tuned ..
|