- ITソリューショントップ
-
製品・ソリューション
-
ダイキンのIT
 製造業向けITソリューション
  建設業務改善ソリューション
  ビル管理業務支援 DK-CONNECT BM
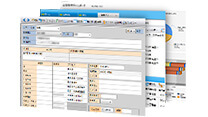
 FILDER CeeD TOP
  FILDER CeeD 電気 TOP
  Rebro D TOP
 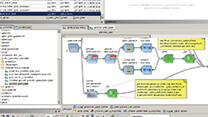 データ・サイエンス・ソリューション Pipeline Pilot
 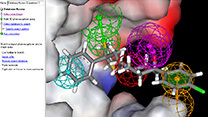 ライフサイエンス向けソフト Discovery Studio
 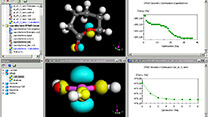 マテリアルサイエンス向けソフト Materials Studio
  電子実験ノート
 総合3DCG 制作ソフト Maya
  総合3DCG 制作ソフト 3ds Max
  総合3DCG 制作ソフト MODO
  アニメーション制作ソフト Toon Boom
 |
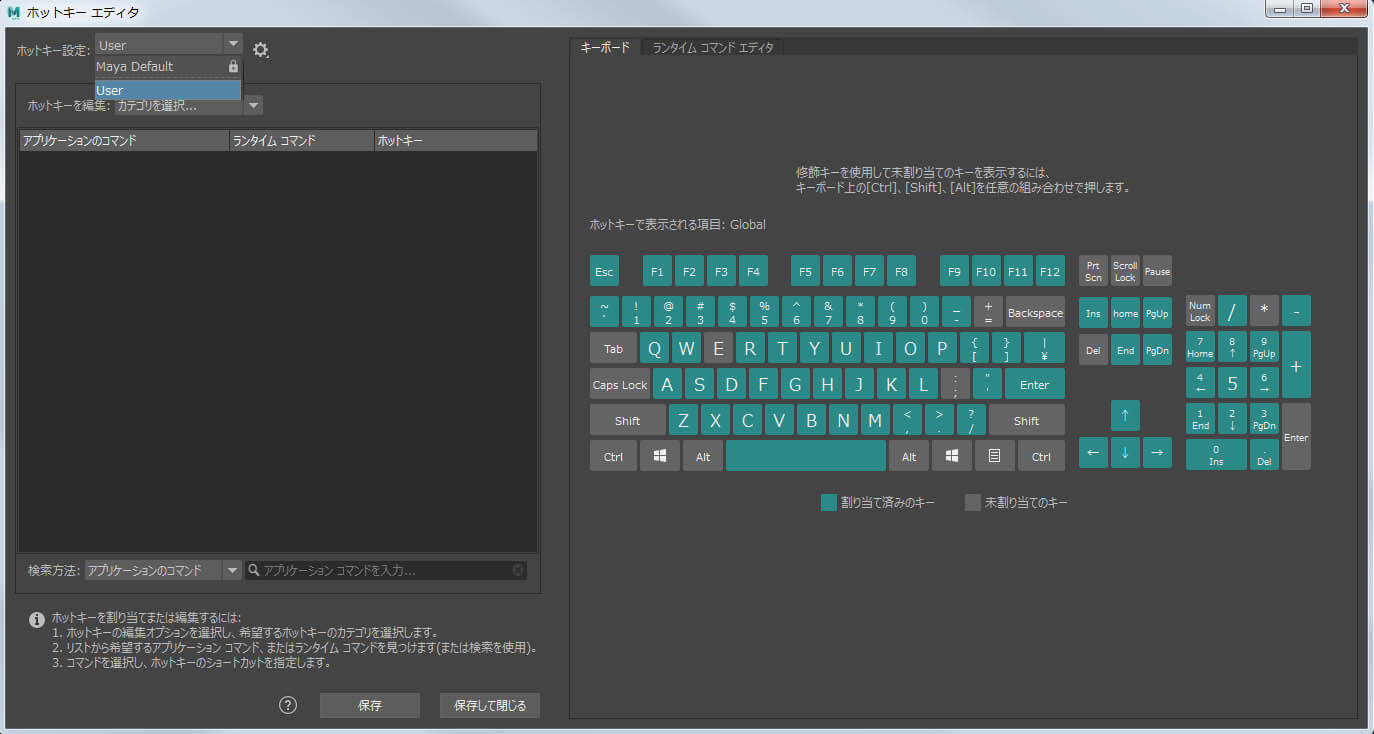
| Maya 2017 情報と対応、既知の問題;For Maya2017 and KPL Maya2016以降、Mayaのホットキー設定ウィンドウと機能 は大幅に変更されています。 まず、ホットキー設定ウィンドウは、メニューを表示させる場所は変わらず、ウィンドウ>設定/プレファレンス>ホットキーエディタですが、 設定画面はキーボード画面と各機能毎のコマンド設定に変更されました。 ※注意、 あまりにも簡単に変更出来てしまいますので、 操作は慎重に 行ってください。Undo出来ません。 バックアップ とか画面キャプチャーとかしておくことをお勧めします。 ユーザーの作製したものに切り替えるには、画面左上のホットキー設定; [ User ]等に変更します。 Maya2017では機能画面毎にも設定出来ます。 ユーザーでの任意設定は、検索方法を[ホットキー]にして任意のキー(例;N)を押すと、それに設定されているコマンドが表示されます。 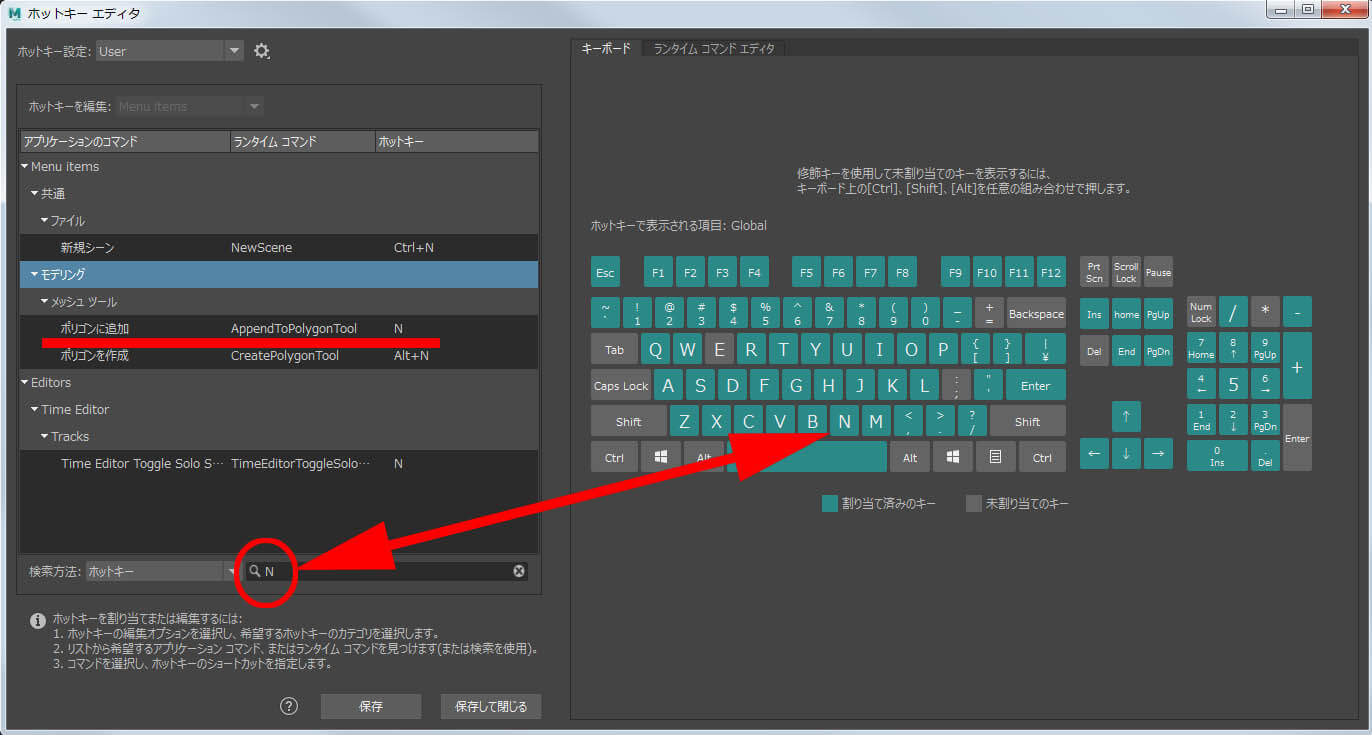 Maya 2017 HotKey Editor 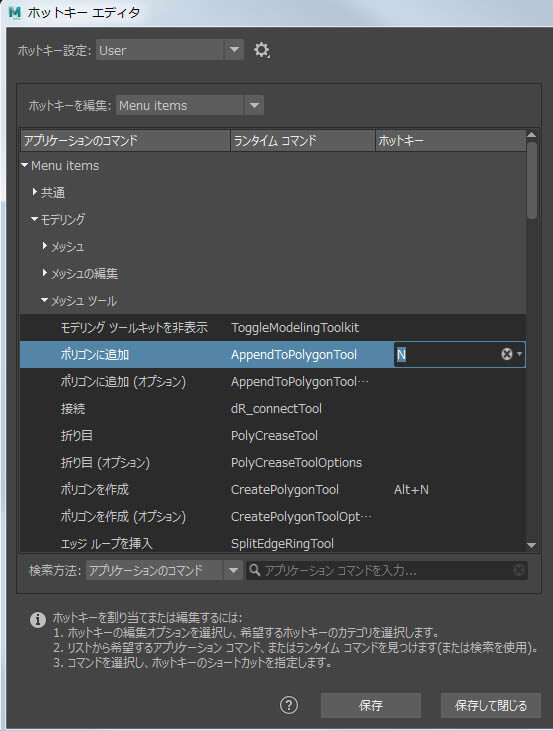 Maya 2017 HotKey Editor 私的に有効にしたのは、 [レ] ドッキング/ドッキング解除を無効化 という項目があり、有効にすると、 フローティング表示した画面が下のメイン画面とドッキングしようする動作を防ぐことが出来ます。私はこの方が使い勝手が良いです。 このワークスペースのオプション画面からは、メニューセットで使うホットキー設定を選択することも出来ます。 モデルング用のレイアウトにした時、ホットキーの設定が何にしたいかを設定出来ます。 (逆にレイアウトを変えた時にホットキーの設定が変更されても驚かないでください。設定を選んでください。)  Maya 2017 Workspace userNamedCommands.mel userRunTimeCommands.mel は、今まで通り、Mayaのユーザーディレクトリーのprefsの中に入れます。例 C:\Users\ユーザー名\Documents\maya\2017\ja_JP\prefs\ 内 userHotkeys_User.mel は、追加されたhotkeysというディレクトリーの中に入れます。例 C:\Users\ユーザー名\Documents\maya\2017\ja_JP\prefs\hotkeys\ 内 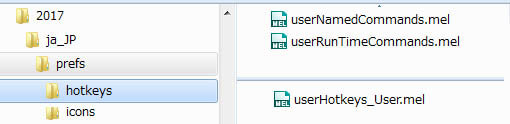 HotKeyエディタで表示される任意の名称になっているようです。だからこの例ではUser) ※Maya2017用のHotKeyではAlt+0にTimeEditorを設定してあります。 Known Problem and Limitation; Some User setting HotKeys (ex, Arrow Keys) do not work in Maya2017 FirstRereaseVersion |
| 目標や設定について ;Objective and Establishment 目指しているところはSofitimageの基本操作にあわせてMaya機能が動くことですが、 Maya操作や機能の良いところは生かしたいので、”完全SI操作”を目指していません。 また、HotKey設定での限界もあるでしょうし、追加設定によって本来設定してあった機能が動作しなくなる部分もあります。 それを差し引いても、Softimageユーザーにとってはかなり優れた操作感をもたらすはずです。 例えば、・・・・・[スペースバー]を良く押してしまう!!Zキーも良く押してしまう ・・・・ など、 そして、以下のような機能をキー登録してみました。 青文字 は V2 で追加した機能です。 The main object is to make Maya in hands of Softimage Keyboard settings , but want to keep what's good about in Maya , so it's not completely Softimage Keyboard . Also , HotKey settings has some limit , and by moving some keys will loose some settings that has been in default. Notwithstanding, this will give Softimage user a friendly touch to Maya UI. For example, you used to tap [Spacebar] as Select , z Key button for [TrackTool] . So , here's some features that was covered .... Blue letters shows newly added features in Volume2 .
それでも気になる点はたくさんあるかと思います。そこはドンドンMayaに慣れていって独自にカスタマイズして行ってください。 また、ベテランMayaユーザーさんにとっても気に入った機能があればその部分だけ取り入れてみては如何でしょうか。 Even though , there might be what you don't like , customize it your self . For Maya users , uses some commands , if likely . 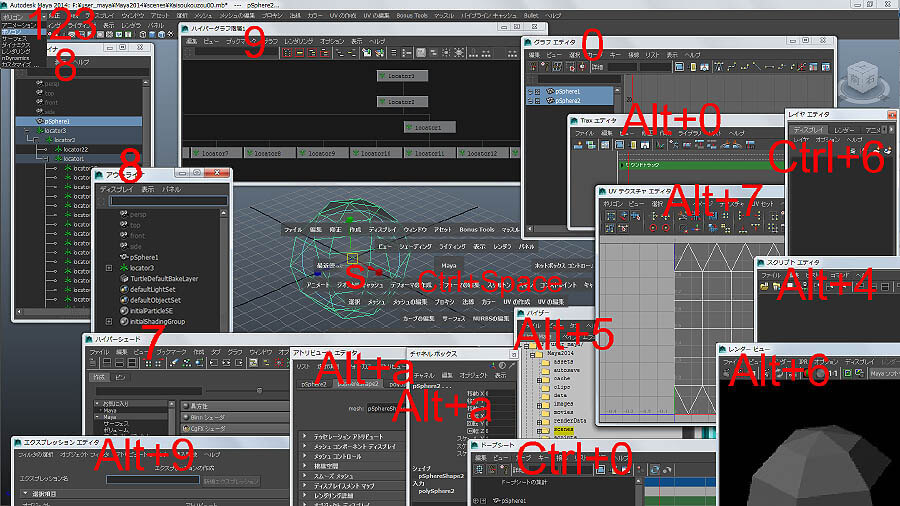 |
| HotKey エディタ と設定ファイルについて ;HotKey Editor and files Maya ではユーザーが独自に機能をキー登録するツールとしてHotKey というものが用意されています。 ウィンドウ > 設定/プレファレンス > ホットキーエディタからキーを登録するエディタ にアクセス出来ます。 In Maya "Keyboard Mapping" is called HotKey , which is Window > Preference > HotKey Editor . 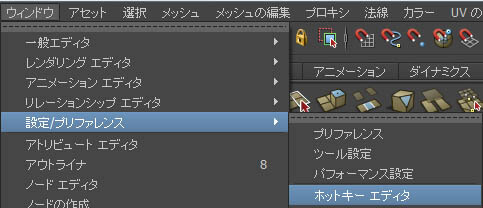 設定ファイルは3つで、ユーザーディレクトリーに保存されます。この3つのファイルを全て空白にすれば、元の状態に戻ります。 具体的には、 C:\Users\ユーザー名\Documents\maya\2014-x64 (バージョンによる) \ja_JP\prefs に、 (上記がデフォルトのディレクトリーですが、任意に変更されている場合もあります。) userHotkeys.mel、userNamedCommands.mel、userRunTimeCommands.mel というファイルに記述されます。 設定方法も簡単で、右項目の キー [ ] に登録したいキーを入力してそのキーに割り振られているコマンドがあるかを [照会] で確認出来、 もし既存の登録を無くしたい場合はそのカテゴリーとコマンドを選択しておいて現在設定されているホットキーから [除去] を押します。 重なる場合は登録時に警告が表示されます。そのキーで良ければ [割り当て] で登録します。 下図例は8キーにアウトライナーを表示するように設定している例です。 Files saved in HotKey Editor goes to user directory , in 3 Mel files . To clear Keyboard settings to default , make 3 files empty . The default place is C:\Users\User name\Documents\maya\2014-x64 (version) \ja_JP\prefs (This directory can be changed ) with 3 files , userHotkeys.mel,userNamedCommands.mel,userRunTimeCommands.mel . Keyboard setting is very simple as below , exsample shows setting 8 Key button as OutlonerWindow shortcut. 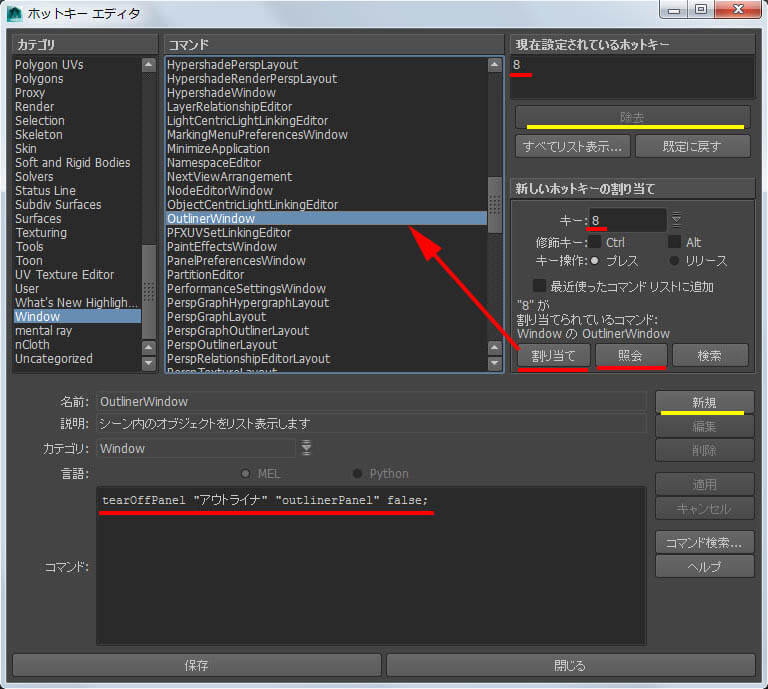 例えば User カテゴリを選択し、 [新規] ボタンから作成し始め、ユニークな任意のコマンド名として登録します。 [適用] でコマンドを登録し、それを設定したいキーに [割り当て] します。 下図は”カレントフレームを最終クレームにする”という Mel を GoToMaxFrame という新規コマンドとして登録し、 それをEnd キーに [割り当て] した例になります。 To set custom script , Mel or Python , to Keyboard Button is quite easy . For exsample , in USER category , make an unique command name for that script , and set it to the one you want. Below shows a Mel that " makes current frame to last frame " as a new command "GoToMaxFrame", and set the commnad to End Keyboard Button. 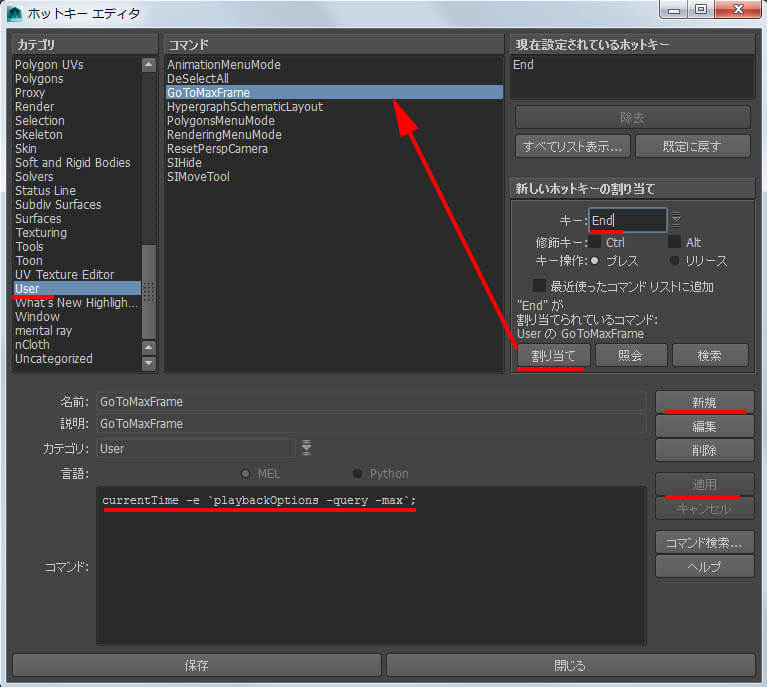 なかには一度Mayaを再起動しないと動作しない内容もあります。 新たに設定した内容は 上記のディレクトリーに3つのファイルに保存されます。 3つの設定ファイルを開くと Mayaの仕組みやMelについて知る手がかりになります。 userHotkeys.melにはキー と コマンド名 が、userNamedCommands.melには登録された コマンドの中身 が、 userRunTimeCommands.melには カスタムコマンドの中身 が記述されています。 After editting , do [Save] , some command needs to restart Maya. Looing into these 3 text files , makes understanding Maya well , userHotkeys.mel has ShortCutKeys and Command name , userNamedCommands.mel has what is the Command sctipt is , userRunTimeCommands.mel has Custom Command script . 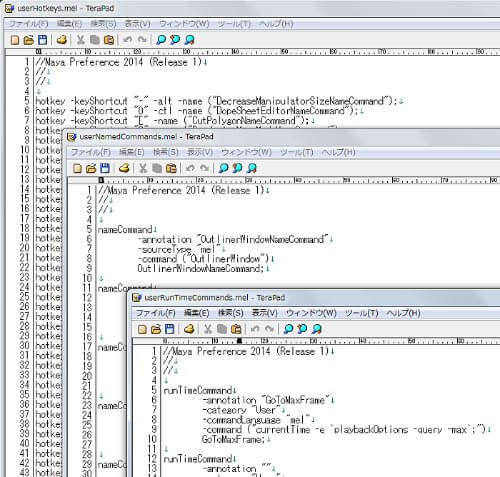 |
| 機能紹介 ;Functions ホットキーで実現した幾つかの機能を紹介します。
まずは、最も基本的な動作であるオブジェクトの移動/回転/スケールはV/C/Xキーに登録されていますが、左マウスボタンで動作します。 加えてSキーに移動回転スケールツールが設定されていて、こちらもとっても便利で同じく左マウスボタンで動作します。 y キーにオブジェクト/コンポーネント選択のトグル (Maya標準のF8もある) を設定、SIのポリゴン選択ツールを彷彿しましたので。 Shift+dキーにポリゴン面の分割、Ctrl+d キーに押し出し、nキーにポリゴン面の追加(AppendToPolygonTool)を登録し、 モデリングが楽になりそうでした。 Some functions achieved in this HotKey . The most basic , Scale/Rotate/Translate is in x /c / v Key buttons , but most is , it moves in LMB , Also s = MoveRotateScaleTool moves in LMB , very convenient. y Key button is SelectToggleMode ( Object/Component) same as F8, Shift+d Key button SubdividePolygon , Ctrl + d Key button Extrude , n Key button Add Polygon Tool , which will help great in modeling . 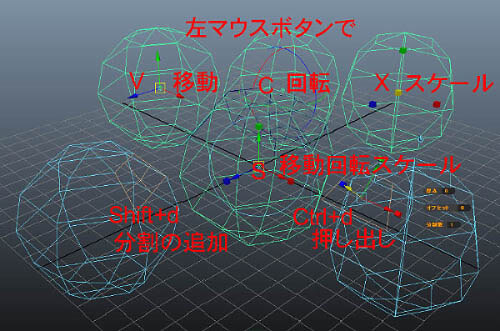 m キーにはSIの MoveComponent を実現、Maya2014の新機能マルチコンポーネント;SelectMultiComponentMaskを使用しています。
そしてこの機能はトグル にしました。 なお、2014以前のバージョンに対しては頂点編集ツールとして上記コマンドが無い場合のエラーを回避しました。 m Key button is MoveComponent , which is using Maya 2014 new feature SelectMultiComponentMask . For former version this m Key button will act as Move Point Tools .  9キーで表示されるハイパーグラフ階層は最初からスケマティック表示になっています。
8キーのアウトライナーは8キーを押す毎に複数表示します。これは大きな階層構造のシーンで、新たに作成したオブジェトを階層間に挟み込んだりする時 既に開いているアウトライナーの中に、中ボタン選択でD&Dが出来るなど、色々と便利です。 9 Key button is HypergraphHierarchyWindow in schematic . 8 Key button is Multiple Outliner , good to use in large hierarchy scene , can put new object to somewhere between , with selecting in MMB and D&D to another Outliner Window . 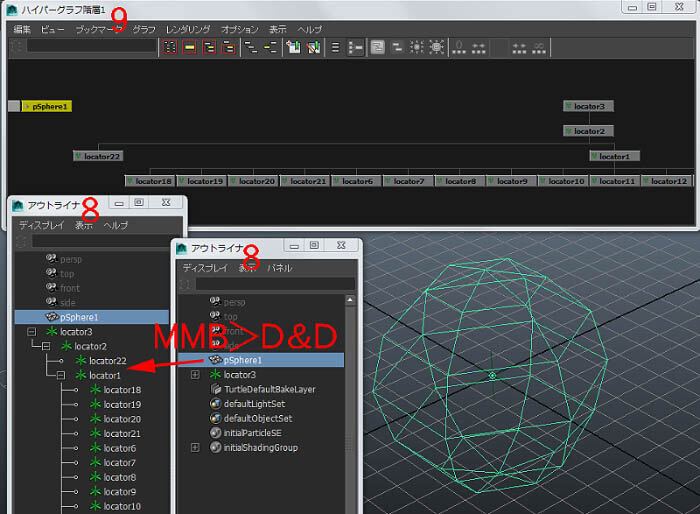 バージョン2追加機能Added features in Volume 2
ウィンドウ系で主なものを複数表示するようにしてみました。何個でも表示します。
対応したのは、 0 = グラフエディタ、 9 = ハイパーグラフ、 Ctrl+0 = ドープシート、 Alt+0 = Trax エディタ、 Ctrl+4 = ノードエディタ 、 そして Alt+a = アトリビュートエディタ でこれは2回目からは表示している アトリビュートエディタのタブのコピー になります。 表示を取っておきたいものをいくつでも表示しておけます。 細かい工夫はまだまだこれからですが、グラフエディタは表示して時からバッファカーブとインフィニティーの表示がONになっています。 Most common windows are Multiple view , now . That is 0= GraphEditor 、 9 = HyperGraph 、 Ctrl+0= DopeSheet、 Alt+0= TraxEditor、 Ctrl+4 = NodeEditor And Alt+a =AttributeEditor is , from second is Copy of AttributeEditor Tab which will be used to keep an AttributeEditor showing , and in many as you like . More in option , GraphEditor has BufferCurves and Infinities On when showing . 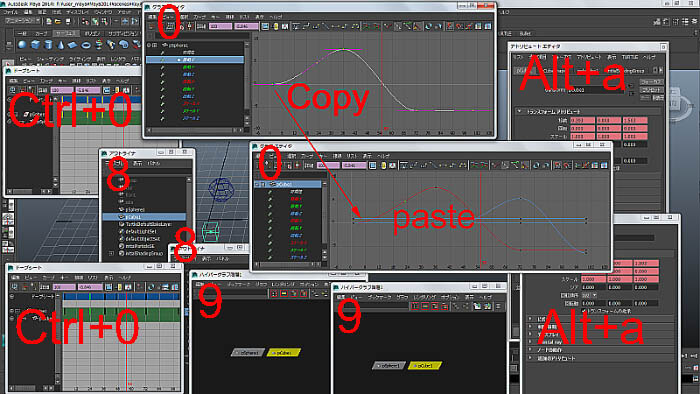 グラフエディタで選択した 単一 のカーブから Alt+xで直接 アニメーションカーブアトリビュートを表示 するようにしてみました。
Mayaではカーブの接線情報が ここに表示されているからです。 表示と同時に ウェイト付き接線とスプレッドシートの展開にチェックが入っています。 Alt+aで今まで通りアトリビュートエディタのタブのコピーは出来るのですが、スプレッドシートの展開 は残念ながらOFFになっています。 From GraphEditor Alt+x will show the AnimationCurveAttribute from selected one FunctionCurve . This way you can access to the Tangents of the curve . Alt+a copys the AttributeEditor Tab , but the SpreadSheet is not On . 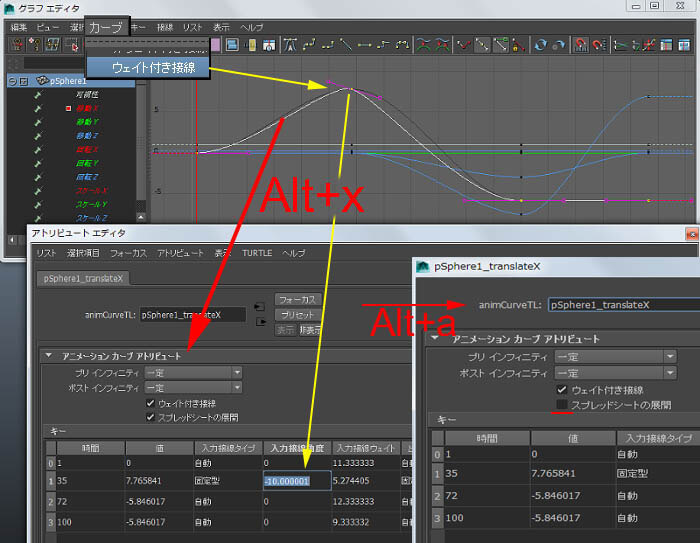 Mayaらしいキー登録として、
Shift+x =XYZのスケールにアニメーションキー設定、 Shift+c = XYZの回転にアニメーションキー設定、 Shift+v = XYZの移動にアニメーションキー設定 にしてみました。 As Maya likely , Shift+x = set XYZ Scale Key animation , Shift+c =set XYZ Rotate Key animation , Shift+v = set XYZ Translate Key animation . キャラクタライズ対応として、
w = ペイントスキンツール(スカルプトは Ctrl+w に移した)、Alt+b = そのブラシの半径がマウススクラブで大小に、。 Ctrl+j = ジョイント移動(SIのMoveJoint) を追加しました。( V2.1 ) For characterizing , w = ArtPaintSkinWeightsTool(SculptPolygonsToolOptions is nowCtrl+w ) 、 Alt+b = ModifyUpperRadiusPress is brush size , Ctrl+j = is like Softimage Move Joint which is actualy moving Pivot ( V2.1 ) |
| 全キー設定一覧;Shortcut Keys では、登録したキー内容の一覧です。 コマンドも記述されていますので、気に入った機能だけキー登録して活用することも出来ます。 青文字 はV2 、 緑文字 は V2.1 で追加した機能です。 This is the list of all customized Key . (Include Default Key to recognize ) Command is also listed , so you can only use the likely ones. Blue letters shows newly added features in Volume2 , Green is V2.1 .
There's still more improvement to do , but this is the first release . |
||||||||||||||||||||||||||||||||||||||||||||||||||||||||||||||||||||||||||||||||||||||||||||||||||||||||||||||||||||||||||||||||||||||||||||||||||||||||||||||||||||||||||||||||||||||||||||||||||||||||||||||||||||||||||||||||||||||||||||||||||||||||||||||||||||||||||||||||||||||||||||||||||||||||||||||||||
| 設定ファイル;Setting Files という訳で現在のところまでのホットキー用の3つのファイルを公開します。(設定ファイルは 上記のディレクトリーにに上書き保存します。) あくまでも自己責任でお使いください。
3 Mel Files to release for HotKey , Copy to the Directory , use as your own risk.
|
| という訳で、次回は... What's Next ... 乞う、ご期待!!
|