CG・コンテンツ制作
SUITE USERS NOTES
Using Backburner from Softimage
see Japanese version
izt_ml

Prologue
Backburner is the Network Rendering Management Tool that supplied from Autodesk.
 Backburner is included in the 3ds Max, Maya installer, so maybe many user have already used it.
 Unfortunately, Backburner is not included in the Softimage installer, and Autodesk does not support using Backburner from Softimage officially. sorry... it is Japanese)
 But, Backburner can accept general batch job as well as rendering job, so you can submit Softimage rendering job using this submit command.

.You can find some submit tools for Backburner on the other web site. In this site, I release new submit tool.
The advantage of this tool is the compatibility with the menu of the Maya's submit tool. If you are using Buckburner from Maya, maybe this tool is useful.

Have you ever checked whether the rendermap job can be submitted to the Backburner or not ?
Yes, it is possible. Also I release new tool for rendermap in this site.

Additionally, if you want to use more efficient Rendering Management Tool, I recommend Qube!.(English site)
It is not free. The submit plugin tool for rendering job is included in the Qube! as the Jobtype, so in this site,
I only release the submit plugin tool for the rendermap job.

Now I start the description on the premise of the Backburner has already installed and you have enough batch rendering licenses. The following is the environment that I developed this tool, but it works on the 2010 version or later. Softimage network license include 5 batch licenses.

Environment:
Autodesk Softimage 2013 SP1 Windows 64bit version, Network license.
Backburner 2013
Note: You should setup same environment for each server machines. (same OS, same install dir,...)

menu_bb_forSI_sm
Windows7 Professional 64Bit
AMD PhenomⅡ965
Memory 12GB、NVIDIA GeForce 9600GT
How to install Backburner plugins
Rendering job submit tool for Backburner(DKN_BackBurner_for_Softimage)
Rendermap job submit tool for Backburner(DKN_RenderMap_by_Backburner)
About Qube!
Rendermap job submit tool for Qube!(DKN_RenderMap_by_Qube)


How to install Backburner plugins Install is very easy. Download zip file from following link and extract it. You will get DKN_Backburner.xsiaddon.
Drag&drop it on the view of Softimage.

>> Download plugins: DKN_Backburner.zip

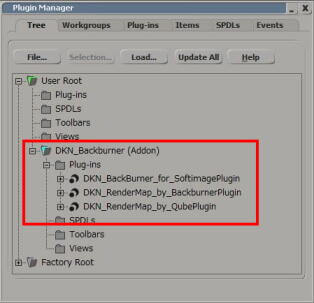
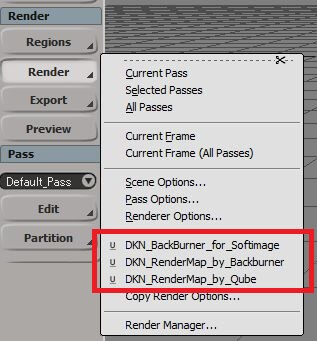
After installation, three plugins will appear in the Plugin Manager and Render menu.
p_managerrend_menu_e


Rendering job submit tool for Backburner(DKN_BackBurner_for_Softimage)
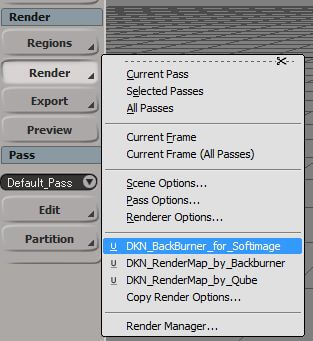
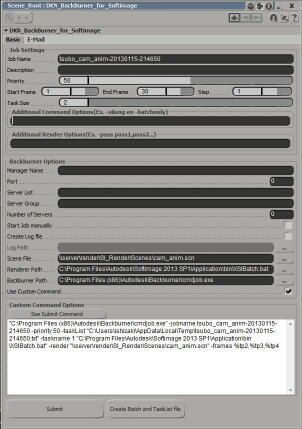
It is easy to use. Load the scene and execute Render > Render > DKN_BackBurner_for_Softimage
The scene must be accessed by UNC path, usually, the scene is loaded from file server.
bb_forSI_org_e
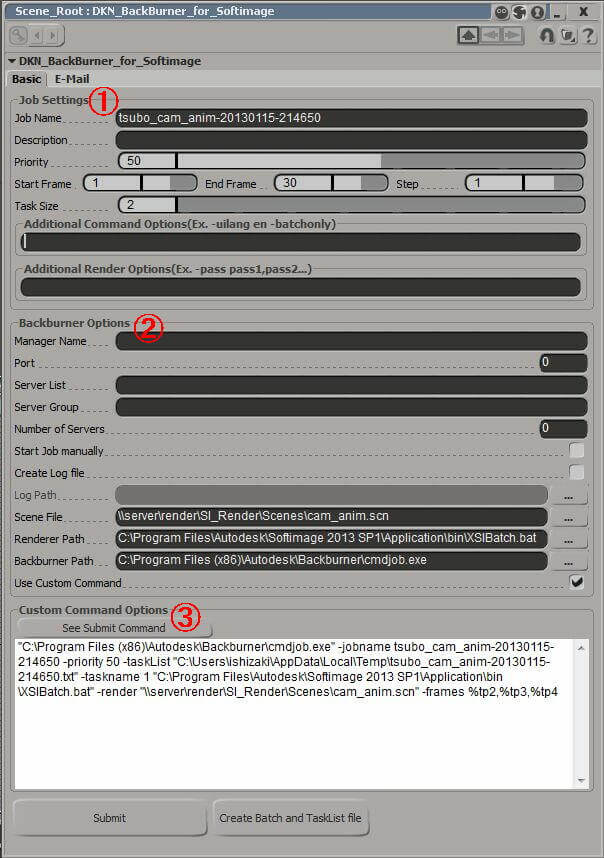
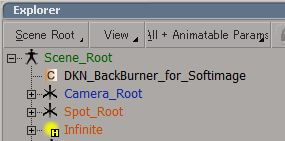
In the Explorer, new property will be created under the Scene_Root then it's property will be inspected.
If you are using Backburner from Maya, the parameters in this property page are familiar-looking for you.
After setup these parameters, click "Submit" button to submit jobs.
DKN_BackBurner_for_Softimage proprty remains under the Scene_Root, if necessary, you can inspect this property and submit jobs again, if not necessary, delete it.
pp_bb_forSI_e
menu_bb_forSI
Job Setting

Job Name:
Specify the job name. Default is <scene name>-<date>-<time>
Description:
Description of the job.
Priority:
Priority of the job. Default is 50, possible value is 0(max) to 100(suspend)
Start Frame, End Frame, Step:
Specify the start/end/step frame to render.
Task Size:
Specify the number of frames per one job that assigned to each servers.
Additional Command Options:
Specify the command options for xsibatch command.
For example, when you use Japanese UI, garbled characters log will output.
You can avoid it by use "-uilang en" option.
Additional Render Options:
Specify the rendering options for xsibatch command.
For example, you can specify "-pass pass1,pass2" to specify the pass to render.
Backburner Options

Manager Name:
Specify the machine name that working Backburner manager.
If not specified, Backburner manager will be detected automatically.
Port:
Specify the port number. Usually you don't need change it.
Server List:
Specify the server name. To specify multiple servers, you can use ;(semicolon) as the delimiter.
If the Server Group is specified, this field is grayed out.
If both the Server List and Server Group are not specified, submitted jobs are assigned automatically.
Server Group:
Specify the server group.
If the Server List is specifed, this field is grayed out.
If both the Server List and Server Group are not specified, submitted jobs are assigned automatically.
Number of Servers:
The maximum number of servers that submitted jobs.
Start Job manually:
Submit suspended jobs, the jobs can be started manually.
Create Log file/Log Path:

When turn on, the log file will be created.
Specify the folder that output the log file.
The folder must be existed.
Scene File:
Specify the scene file by UNC path.
Default is the current scene file.
Renderer Path:
Specify the xsiBatch.bat file by full path.
Backburner Path:
Specify the Backburner's cmdjob.exe file by full path.
Use Custom Command:

If you want to use custom command, turn on this checkbox.
Custom Command Options

See Submit Command:
Show actual submitted command.
When turn on "Use Custom Commands", this "See Submit Command" button must be clicked.
You can edit options in this field.
If turn off "Use Custom Commands", this field is grayed out.

Submit:
Output the Task list and submit jobs.
Create Batch and TaskList file:
Output the batch file and task list without submit the jobs.
In C:\Users\<username>\AppData\Local\Temp folder, <job name>.bat、<job name>.txt are created.
Usually Batch file is not used, it is useful when submit jobs from command prompt.
Note: Task list and batch file will not be removed automatically,
 so sometimes please remove these files manually.
menu_bb_forSI2
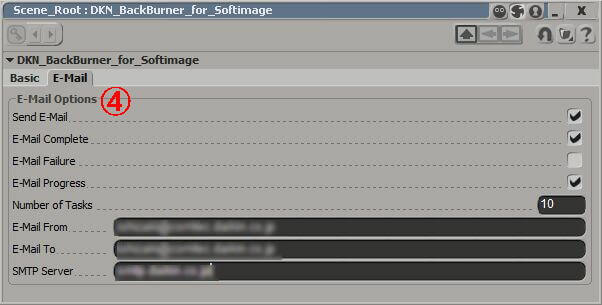
E-Mail Options

Send E-Mail:
When turn on, use send E-Mail feature.
E-Mail Complete:

When job is completed, E-Mail will be sent.
E-Mail Failure:
When failure the job, E-Mail will be sent.
E-Mail Progress/Number of Tasks:
When this number of tasks are completed, E-Mail will be sent.
E-Mail From/E-Mail To/SMTP Server:
Specify the E-Mail address of send to/from and SMTP server.

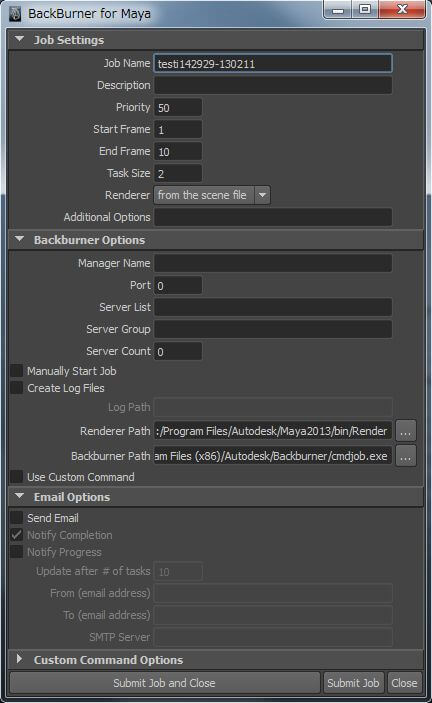
For reference, the following is the submit menu of Maya. In Maya, you can submit jobs in Render > Create Backburner Job menu.
Please check the menu items are almost same. But layout is little different...

maya_bb_e

Next is some additional explanation.

<About the Task list>
In Maya, when submit the jobs to Backburner, the task list is created, then submitted jobs are assigned to rendering server according to this task.
For example, in the case of start frame is 1/end frame is 30/task size is 6, 1-6 frames are assigned to <Server1>, 7-12 frames are assigned to <Server2>, 13-18 frames are assigned to <Server3>....
Task list is created in C:\Users\<username>\AppData\Local\Temp\<job name>.txt. The following is the format.
It describes TaskID, start frame, end frame.

frames1-6 1 6
frames7-12 7 12
frames13-18 13 18
frames19-24 19 24
frames25-30 25 30

Basically DKN_BackBurner_for_Softimage tool adopt same design. The point of difference is the "step value" is available.
For Example,  in the case of start frame is 1/end frame is 30/step is 3/task size is 4, the task list is output as follows.
It describes TaskID, start frame, end frame, step value.
4 frames are assigned for each tasks.

frames1-10 1 10 3
frames13-22 13 22 3
frames25-30 25 30 3

Note: Task list and batch file will not be removed automatically. Sometimes please remove these files manually.

<Additional Command Options>

Specify the command options for xsibatch command. You can confirm available options in the Softimage command prompt as follows.
xsibatch -help

Not so many effective options. But if you are using Softimage in Japanese menu, the output log include garbled characters.
To avoid it, you can specify English mode option.
-uilang en
But when invoke Softimage next time, Softimage will start as English UI mode, so you need restart as Japanese mode or invoke Softimage using next options.
-uilang jp

<Additional Render Options>
Specify the rendering options for xsibatch command. Also you can confirm available options in the Softimage command prompt as follows.
xsibatch -help
For example, following options are available.
-pass <pass1;pass2...>
-output_dir <directory>


Rendermap job submit tool for Backburner(DKN_RenderMap_by_Backburner)

Submit of rendermap job is not so popular. But it is useful when generate rendermap for whole scene at once.
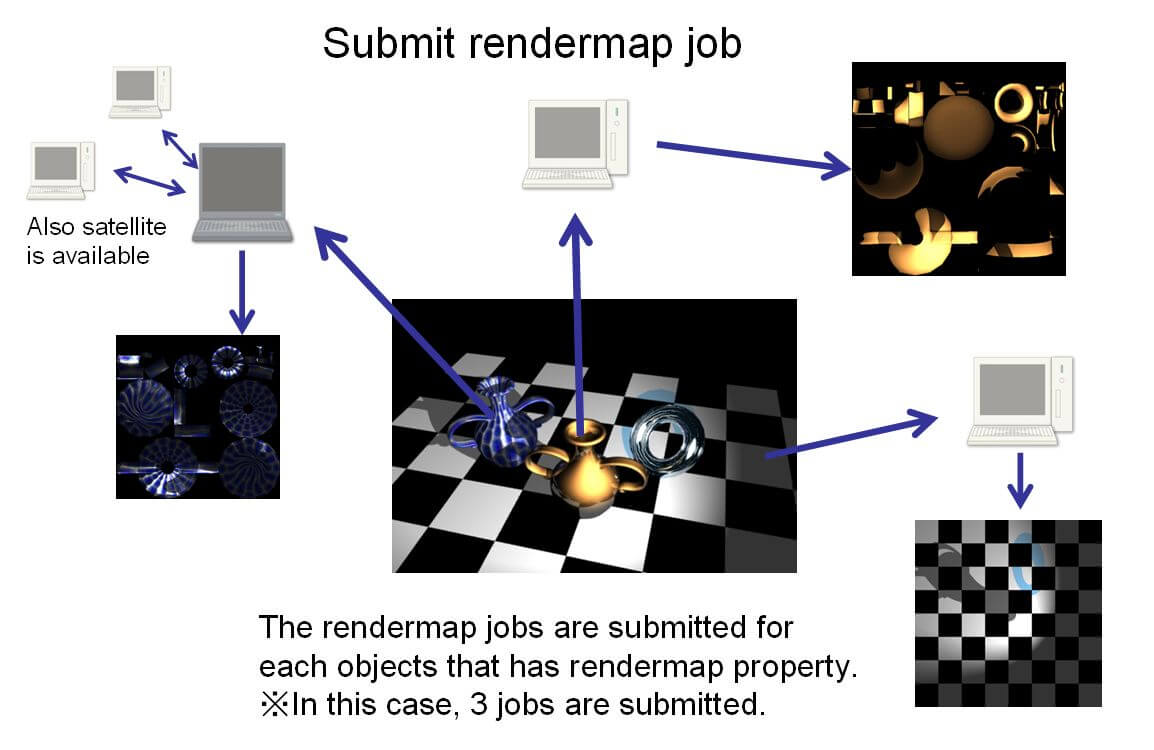
The following figure is the concept. It is object bases. The rendermap jobs are submitted for each objects that assigned rendermap property.

wf_rendmap_e

<Setup>
After the plugin has be installed, you need additional steps as follows.

1. xsiBatch.bat works with -script option, you need install "bat_obj_rendermap.vbs" script file.
  This script receive object name, then execute "RegenerateMaps" command.
  You can find "bat_obj_rendermap.vbs" script in this folder.
  C:\Users\<username>\Autodesk\Softimage_<ver>\Addons\DKN_Backburner\Data\Scripts
  Copy this script file to the folder that can be accessed by same UNC path from each servers.
2. In the property page, to select server by pulldown menu, please edit script file as follows.
  Open following script file by text editor,
  C:\Users\<username>\Autodesk\Softimage_<ver>\Addons\DKN_Backburner\Application\Plugins\DKN_RenderMap_by_Backburner.vbs
  Find following function line. You can find it around 240th line.
  function DKN_RenderMap_by_Backburner_OnInit( )
  In this function, there is "Array" definition.
  workers = Array( "Not Specified",0, "pc1",1, "pc2",2, "pc3",3 )
  Please change this definition according to your environment.
  "Not Specified",0, "<Server1>", 1, "<Server2>", 2, "<Server3>", 3, .....
  You can enumerate server list as you like. But don't change the first "Not Specified",0 line.
  Ideally, detect available servers and enumerate it automatically but it is difficult ...
  After change it, overwrite the file.

<submit steps>
1. Add rendermap property to the objects that you want to generate rendermap in the scene.
    ・Select object or group, then execute Get > Property > Render Map
    ・In the inspected property page, setup necessary parameters.
2. Save scene on the file server. Saved scene must be accessed by UNC path.
3. Execute Render > Render > DKN_RenderMap_by_Backburner
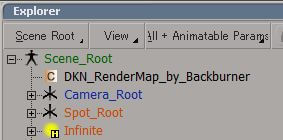
    New property will be created under Scene_Root and inspected.
    ・Specify scene file and script file by UNC path.
    ・Specify xsiBatch.bat file by full path.
    ・The objects and groups that have rendermap property appears in the property page.
      - setup submit ON/OFF, server, priority, arguments for cmdjob command.
      - In the Common arguments field, specify common arguments for xsibatch and cmdjob command .
4. Click "Submit" button.
    You can confirm actual submitted command in the history pane.
    "DKN_RenderMap_by_Backburner" property remains under Scene_Root,  if necessary, you can inspect this property and submit jobs again, if not necessary, delete it.

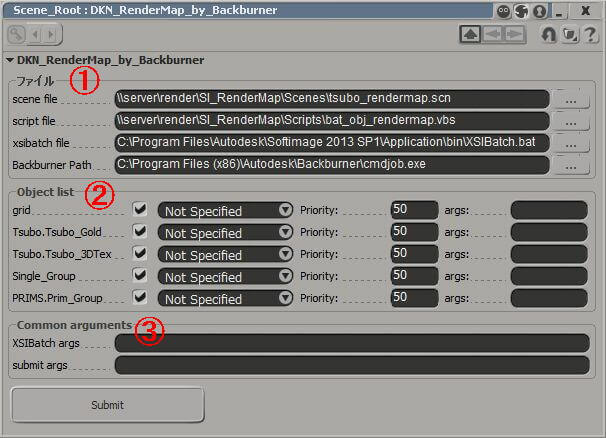
pp_rmap_byBB_e
menu_rmap_byBB
File

scene file:
Specify the scene file by UNC path.
Default is the current scene file.
script file:
Specify "bat_obj_rendermap.vbs" file on the file server by UNC path.
xsibatch file:
Specify the xsiBatch.bat file by full path.
Backburner Path:
Specify the Backburner's cmdjob.exe file by full path.
Object list

The objects and groups that have rendermap property appears in the property page.
Setup submit ON/OFF, server, priority, arguments for each cmdjob command.
In the case of left setting sample, five jobs will be submitted.
If "Not Specified" is selected, rendermap jobs are assigned to possible servers automatically.
Common arguments

XSIBatch args:
Specify the command options for xsibatch command.
For example, when you use Japanese UI, garbled characters log will output.
You can avoid it by use "-uilang en" option.
submit args:
Specify the common command options for cmdjob command.


About Qube!

If you want to use more efficient Rendering Management Tool, please check Qube!
Please access our site and developers site.

Rendering submit tool for Qube! is supplied from PipelineFX as the Jobtype.  In this site, I will release rendermap submit tool only.


Rendermap job submit tool for Qube!(DKN_RenderMap_by_Qube)

Operation is almost same as Backburner version except the submit command.

<Setup>
After the plugin has be installed, you need additional steps as follows.

1. xsiBatch.bat works with -script option, you need install "bat_obj_rendermap.vbs" script file.
  This script receive object name, then execute "RegenerateMaps" command.
  You can find "bat_obj_rendermap.vbs" script in this folder.
  C:\Users\<username>\Autodesk\Softimage_<ver>\Addons\DKN_Backburner\Data\Scripts
  Copy this script file to the folder that can be accessed by same UNC path from each servers.
2. In the proprty page, to select server by pulldown menu, please edit script file as follows.
  Open following script file by text editor,
  C:\Users\<username>\Autodesk\Softimage_<ver>\Addons\DKN_Backburner\Application\Plugins\DKN_RenderMap_by_Qube.vbs
  Find following function line. You can find it around 240th line.
  function DKN_RenderMap_by_Qube_OnInit( )
  In this function, there is "Array" definition.
  workers = Array( "Not Specified",0, "pc1",1, "pc2",2, "pc3",3 )
  Please change this definition according to your environment.
  "Not Specified",0, "<Server1>", 1, "<Server2>", 2, "<Server3>", 3, .....
  You can enumerate server list as you like. But don't change the first "Not Specified",0 line.
  Ideally, detect available servers and enumerate it automatically but it is difficult ...
  After change it, overwrite the file.

<submit steps>
1. Add rendermap property to the objects that you want to generate rendermap in the scene.
    ・Select object or group, then execute Get > Property > Render Map
    ・In the inspected property page, setup necessary parameters.
2. Save scene on the file server. Saved scene must be accessed by UNC path.
3. Execute Render > Render > DKN_RenderMap_by_Qube
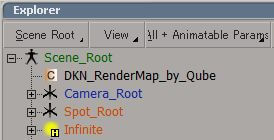
    New property will be created under Scene_Root and inspected.
    ・Specify scene file and script file by UNC path.
    ・Specify xsiBatch.bat file by full path.
    ・The objects and groups that have rendermap property appears in the property page.
      - setup submit ON/OFF, server, priority, arguments for qbsub command.
      - In the Common arguments field, specify common arguments for xsibatch and qbsub command .
4. Click "Submit" button.
    You can confirm actual submitted command in the history pane.
    "DKN_RenderMap_by_Qube" property remains under Scene_Root,  if necessary, you can inspect this property and submit jobs again, if not necessary, delete it.

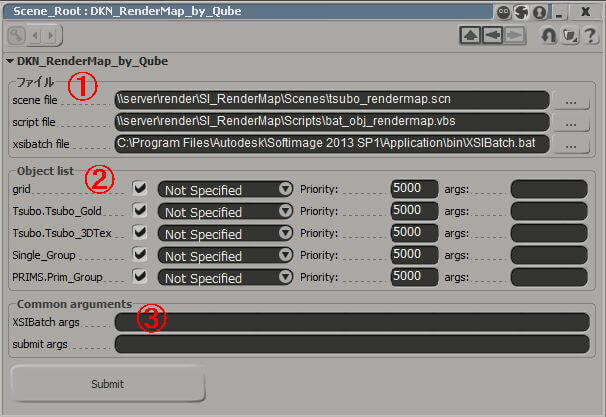
pp_rmap_byQube_e
menu_rmap_byQube
File

scene file:
Specify the scene file by UNC path.
Default is the current scene file.
script file:
Specify "bat_obj_rendermap.vbs" file on the file servers by UNC path.
xsibatch file:
Specify the xsiBatch.bat file by full path.
Object list

The objects and groups that have rendermap property appears in the property page.
Setup submit ON/OFF, server, priority, arguments for each qbsub command.
In the case of left setting sample, five jobs will be submitted.
If "Not Specified" is selected, rendermap jobs are assigned to possible servers automatically.
Common arguments

XSIBatch args:
Specify the command options for xsibatch command.
For example, when you use Japanese UI, garbled characters log will output.
You can avoid it by use "-uilang en" option.
submit args:
Specify the common command options for qbsub command.


What's Next ...
Stay tuned ..

お気軽にお問い合わせください

Daikin CG News お申し込み

CGクリエイター向けのセミナー・イベントやキャンペーン、製品情報をメールマガジンでお届けします。(登録無料)

Twitter

ページの先頭へ